> ## Documentation Index
> Fetch the complete documentation index at: https://docs.augmentcode.com/llms.txt
> Use this file to discover all available pages before exploring further.
# Integrate GitHub Enterprise Server (GHES)
## Introduction
In this page you'll learn how to configure those items:
1. Get GHES to push events (ex: “new PR created”) to Cosmos via webhooks
2. Configure a Cosmos Daemon on a VM (where the GHES local repos will be cloned locally)
3. Get Cosmos to interact with GHES via the `gh` cli
4. Deploy your first Cosmos PR experts and v1.0 software factory
Below is the flow showing how a PR deep code reviewer expert will automatically trigger when a PR is created:
```mermaid theme={null}
sequenceDiagram
autonumber
participant A as Augment Code | Cosmos
participant VM as VM
participant GIT as GitHub Enterprise Server (GHES)
GIT->>A: Webhook: Pull Request created (PR payload)
A->>VM: run experts locally via Daemon
VM->>VM: Start Expert (spawn/run expert agent)
VM->>VM: Expert analyzes PR (diff + context)
VM->>GIT: POST PR comment (gh CLI: create comment)
GIT-->>VM: 201 Created (comment posted)
```
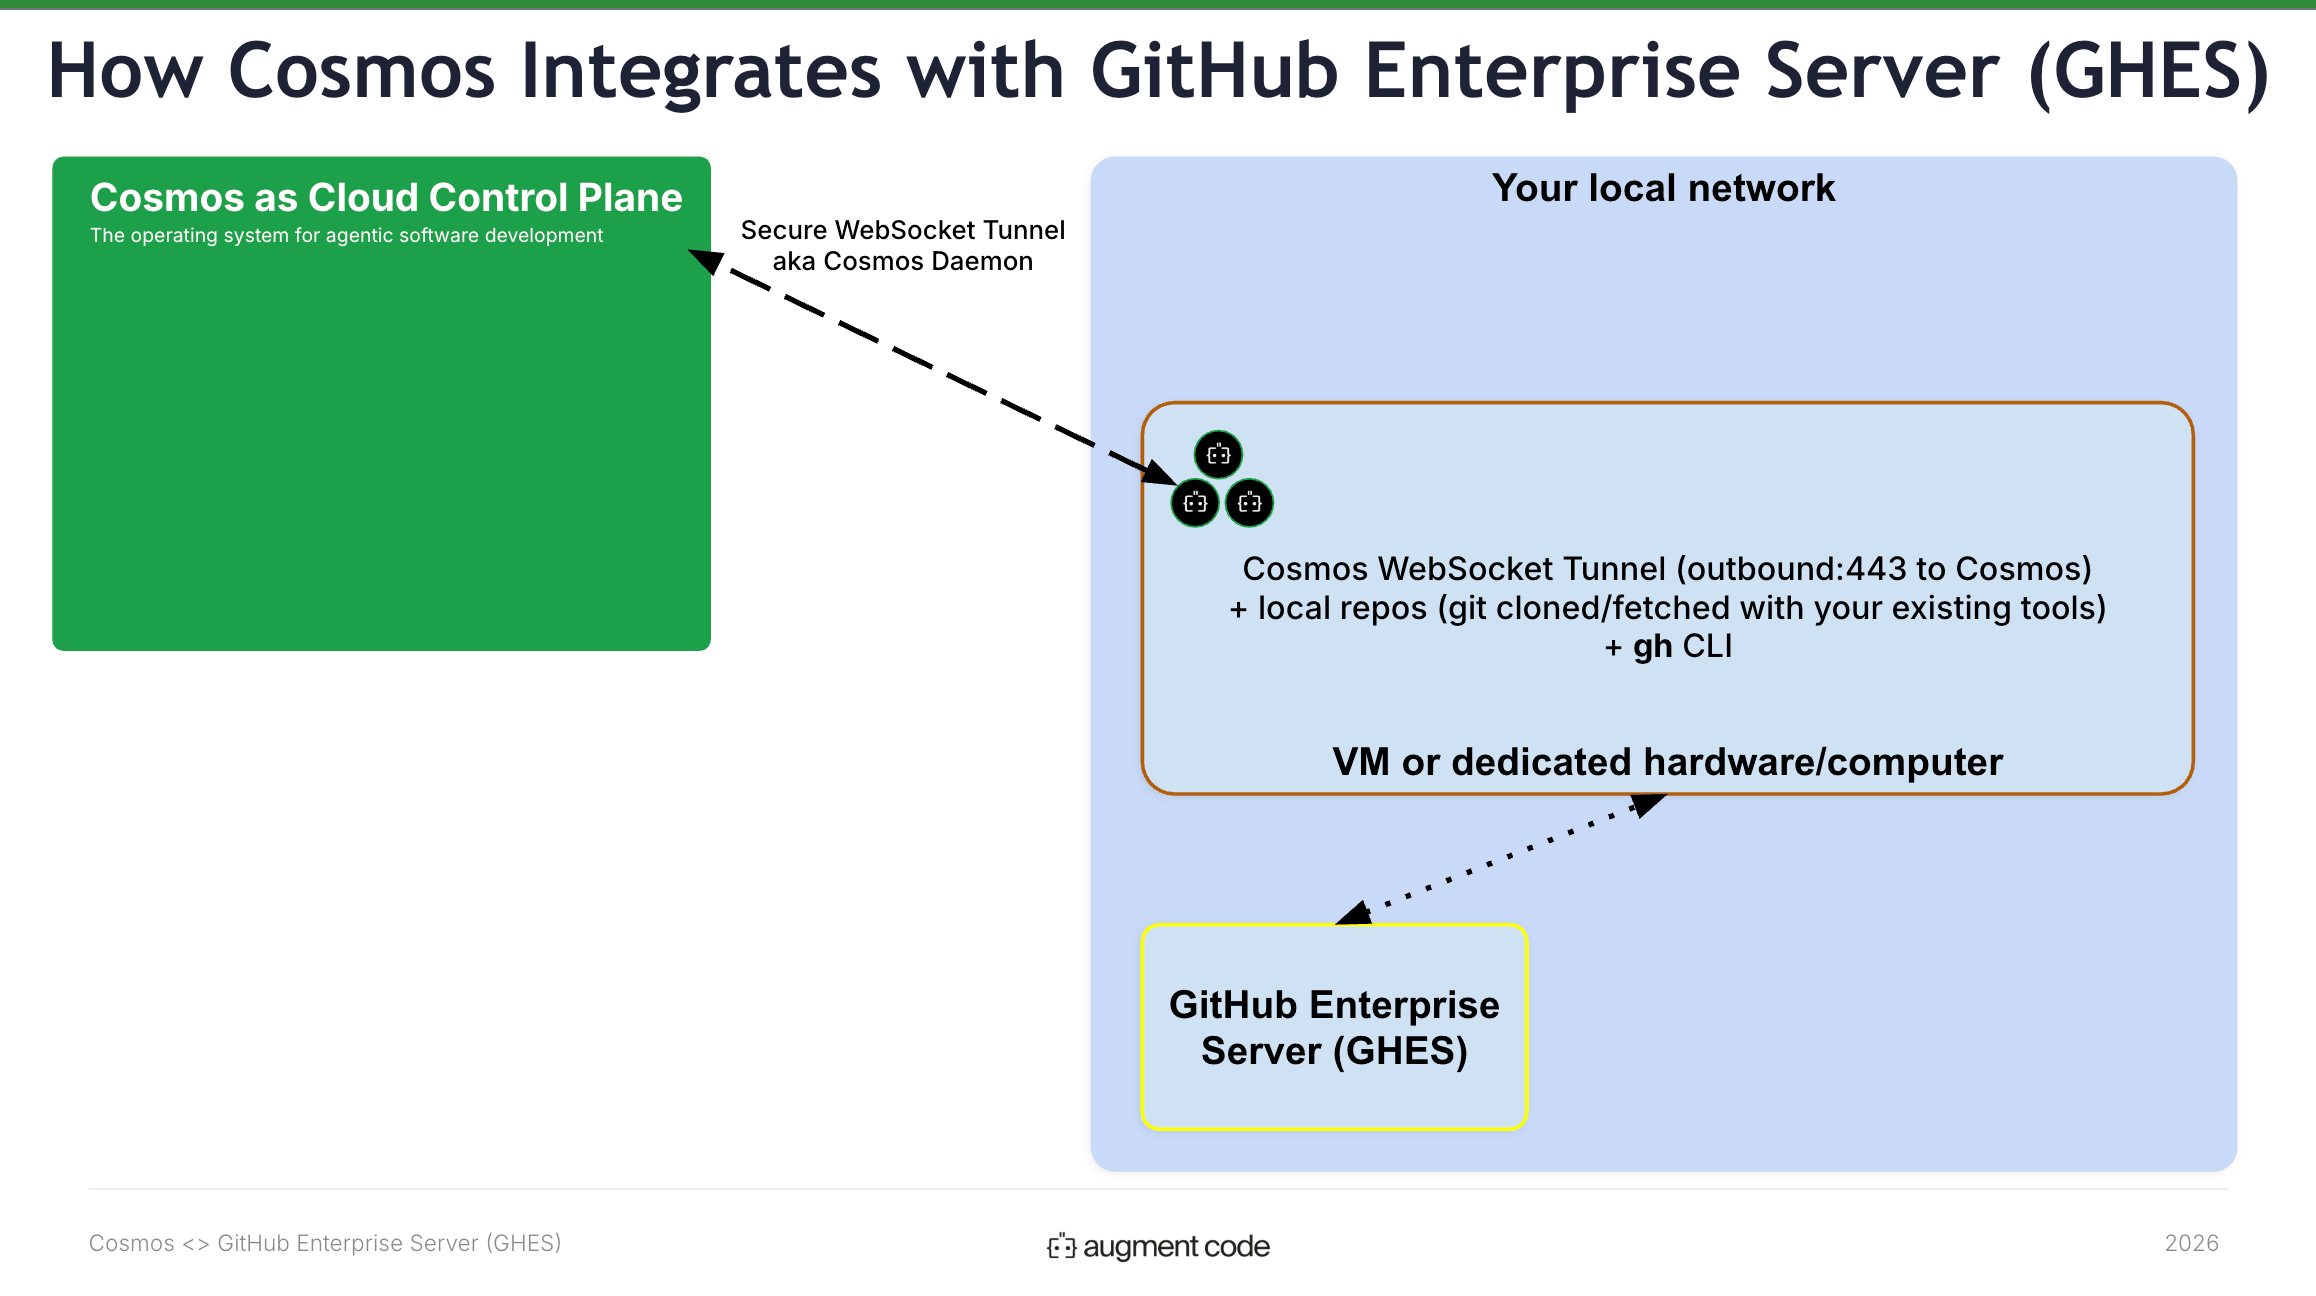
Below is a high level architecture diagram of the components at play:
 ## Prerequisites
To configure the one-time connectivity between Cosmos and GHES:
**Cosmos**
* must be an admin to create a Augment service account and webhooks
**GHES**
* must have admin role to create a new user acting as service account
* must be an enterprise owner (and owner of the organizations that owns the repos) to add the service account as collaborator on repos
* allow inbound connections from other VMs on your VPC into GHES (inbound calls will come from within your network)
**Your infra**
* must have the ability to deploy VMs in a VPC that has network connectivity to your GHES. Must enable outbound network connectivity to \*.[augmentcode.com](http://augmentcode.com/) (see [https://docs.augmentcode.com/setup-augment/network-configuration](https://docs.augmentcode.com/setup-augment/network-configuration))
## Step 1 - Configure GHES to notify a Cosmos Webhook
### Webhook receiver in Cosmos
Let’s create a new webhook in Cosmos (so Cosmos can listen to GHES events):
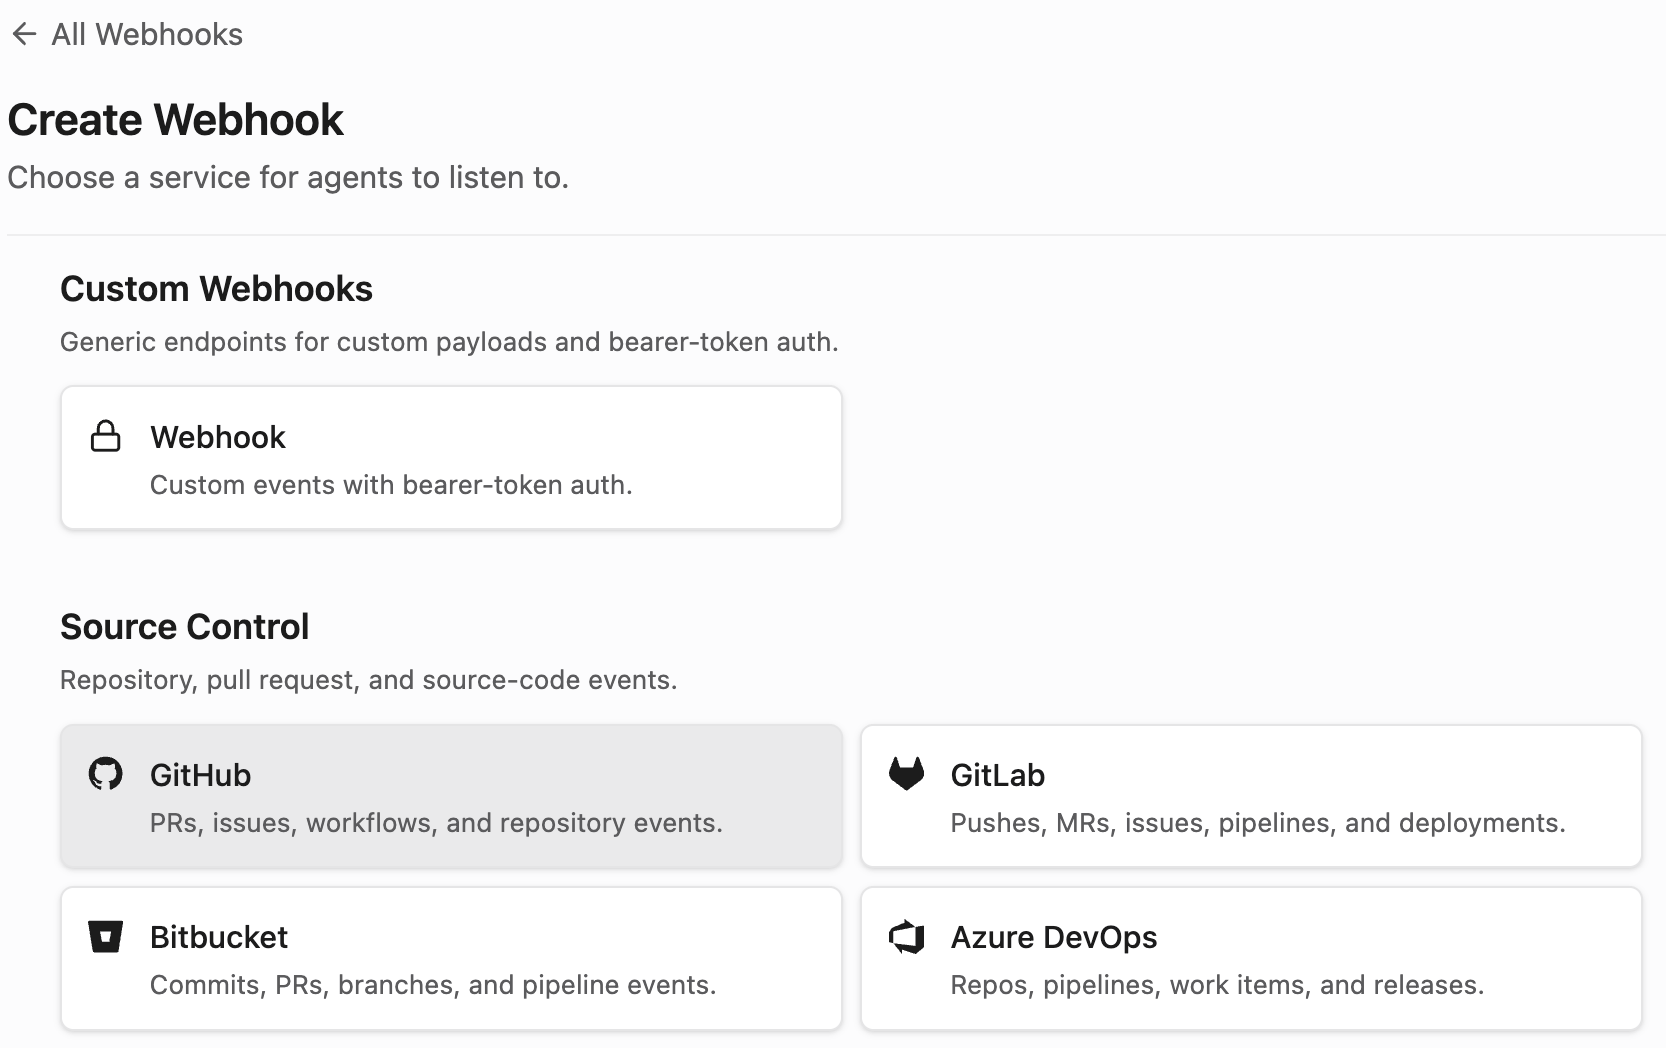
* As an admin go to Cosmos [cosmos.augmentcode.com](https://cosmos.augmentcode.com/) > Settings > Webhooks > Create a webhook > Click on GitHub:
## Prerequisites
To configure the one-time connectivity between Cosmos and GHES:
**Cosmos**
* must be an admin to create a Augment service account and webhooks
**GHES**
* must have admin role to create a new user acting as service account
* must be an enterprise owner (and owner of the organizations that owns the repos) to add the service account as collaborator on repos
* allow inbound connections from other VMs on your VPC into GHES (inbound calls will come from within your network)
**Your infra**
* must have the ability to deploy VMs in a VPC that has network connectivity to your GHES. Must enable outbound network connectivity to \*.[augmentcode.com](http://augmentcode.com/) (see [https://docs.augmentcode.com/setup-augment/network-configuration](https://docs.augmentcode.com/setup-augment/network-configuration))
## Step 1 - Configure GHES to notify a Cosmos Webhook
### Webhook receiver in Cosmos
Let’s create a new webhook in Cosmos (so Cosmos can listen to GHES events):
* As an admin go to Cosmos [cosmos.augmentcode.com](https://cosmos.augmentcode.com/) > Settings > Webhooks > Create a webhook > Click on GitHub:
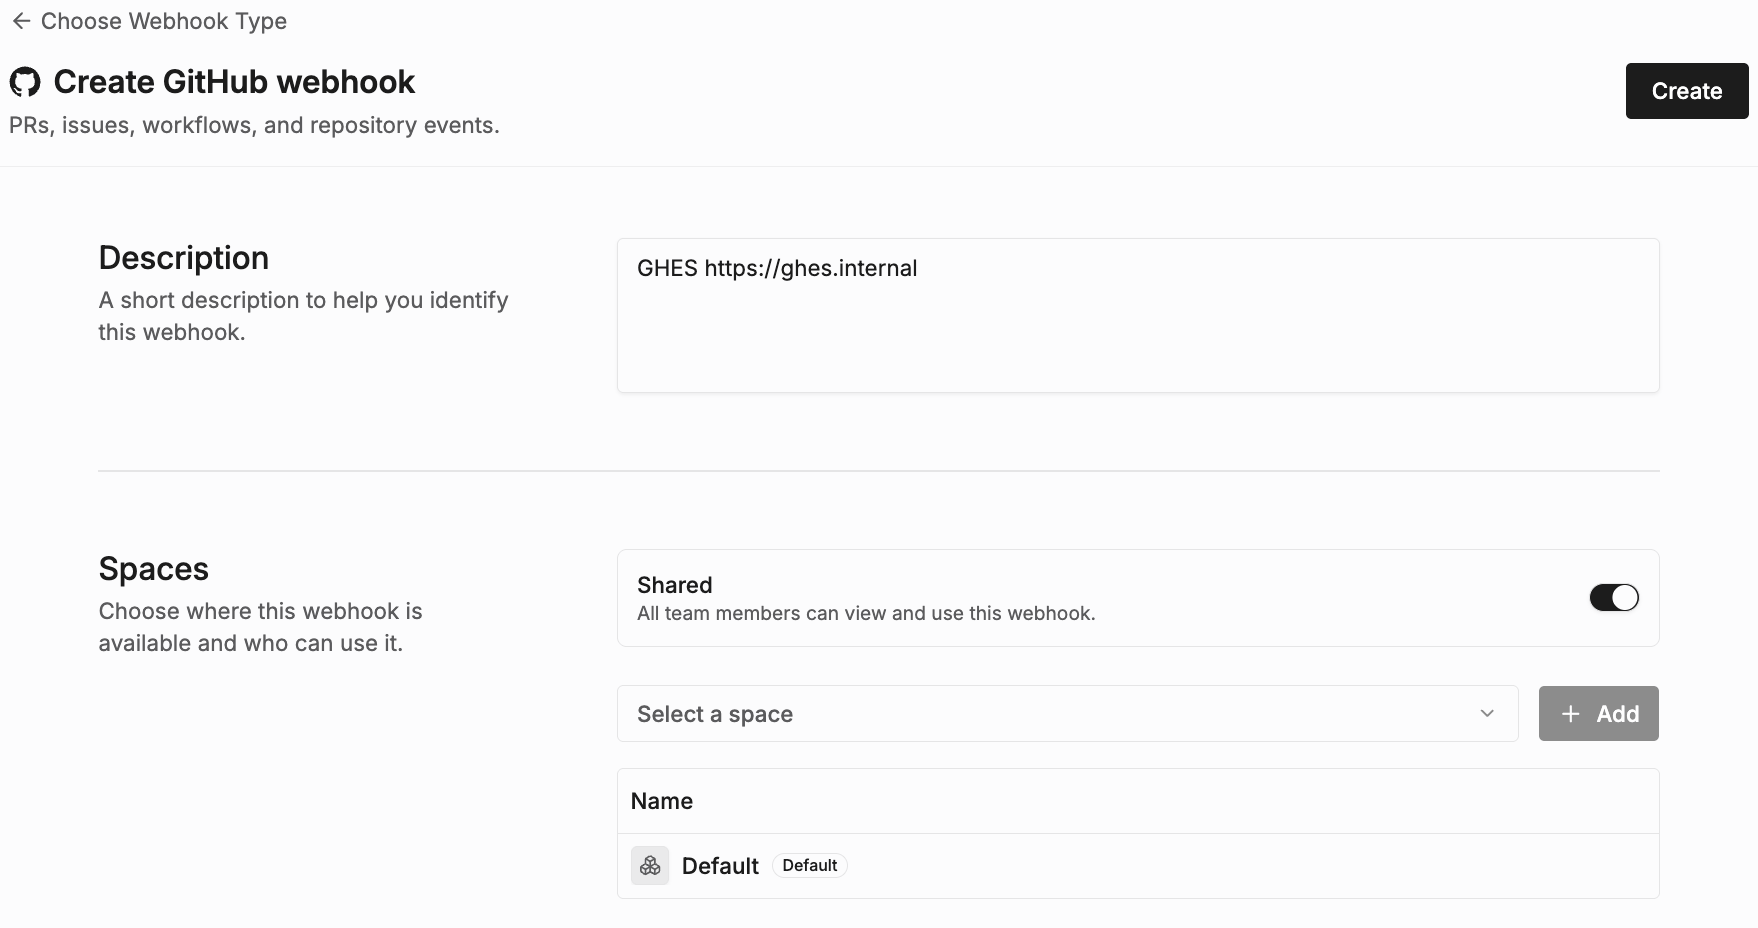
 * Enter Description: **GHES + \** > Click on Create
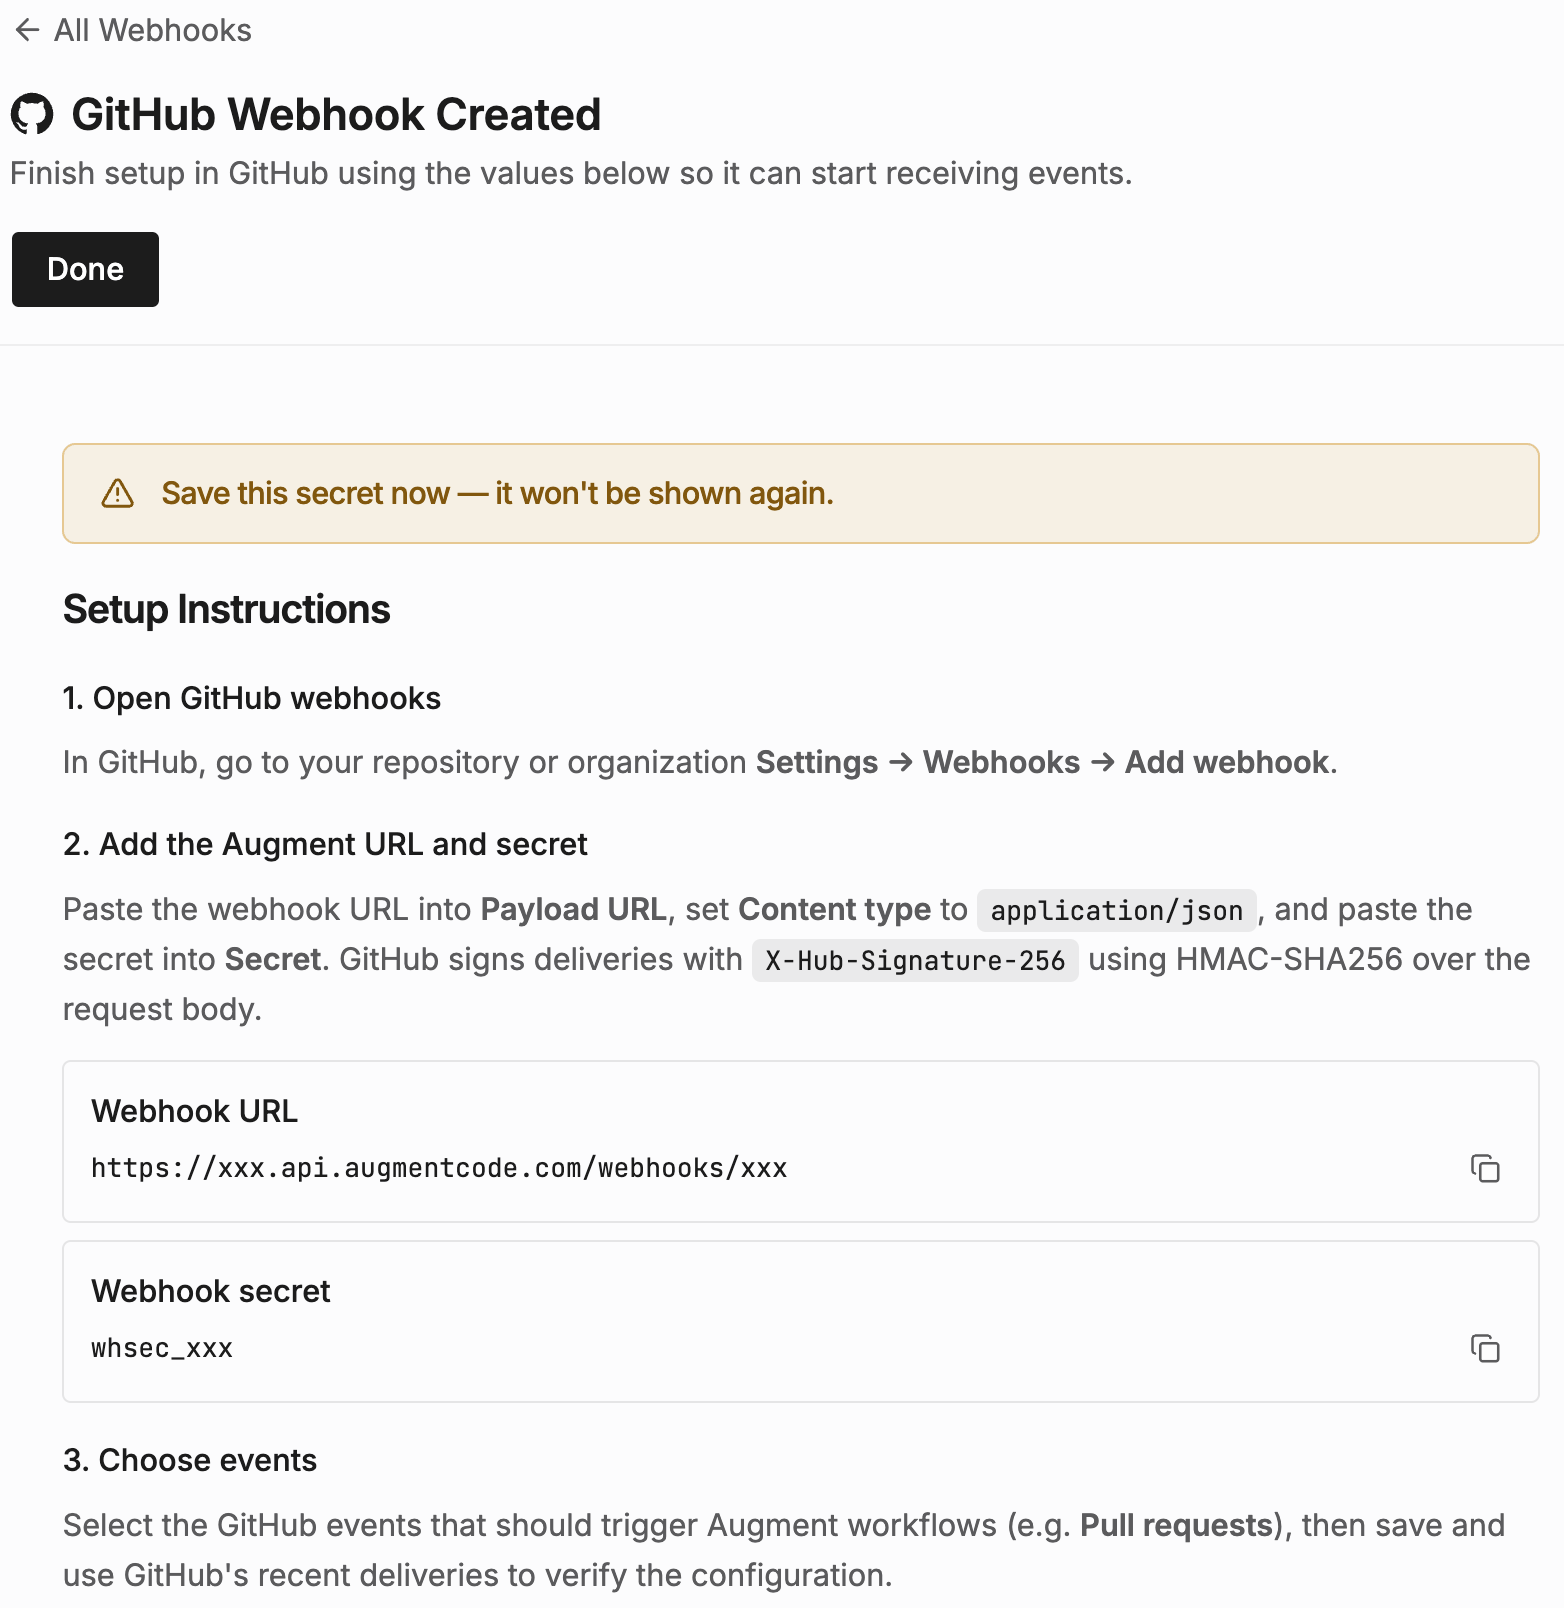
 You'll obtain a Webhook URL and a Secret token. Copy them and click on Done:
 ### Webhook sender in GHES
GHES enterprise owners can create a global webhook to subscribe to events that occur within their enterprise (recommended). Alternatively you can create a global webhook per organization in your enterprise.
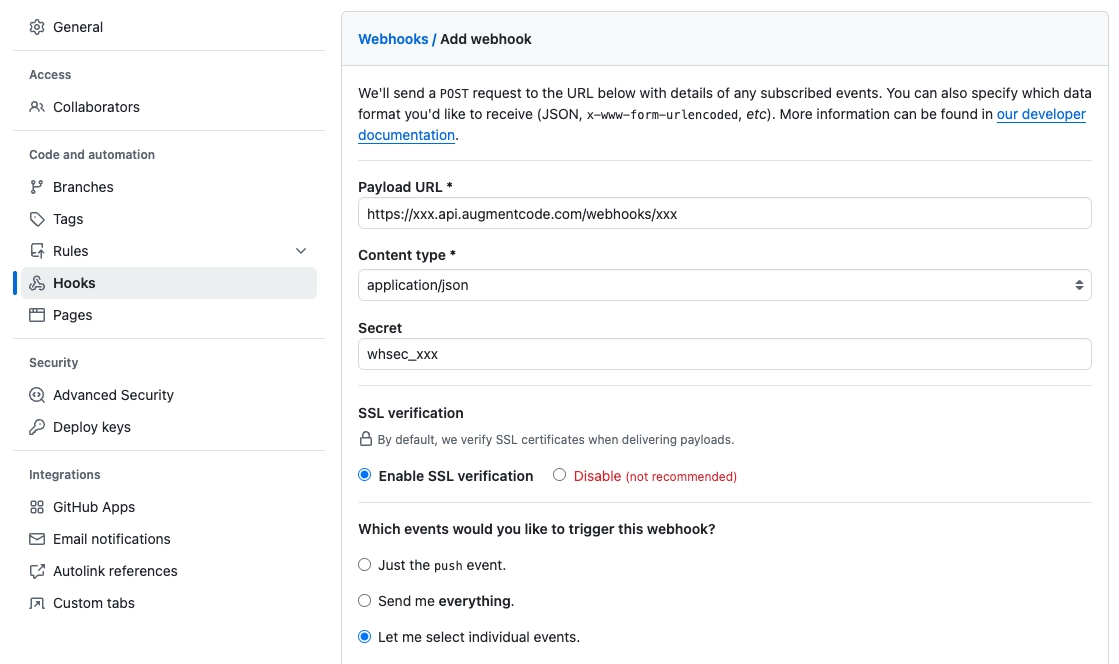
Create a new webhook config in GHES (so GHES can POST to a given url when certain GHES events occur): as an Enterprise Owner, go to your GHES instance > click on your profile picture > click on Enterprise settings > Settings > Hooks > Add webhook > Add those details:
* Payload URL: the webhook url provided by Cosmos
* Content-Type: **application/json**
* Secret token: the secret provided by Cosmos
* Enable SSL verification: **keep it selected**
* Which events would you like to trigger this webhook?: select **Let me select individual events**
* Select those events:
* **Check runs**
* **Commit comments**
* **Issue comment**
* **Pull request review comments**
* **Pull requests**
* **Pull request reviews**
* **Pushes**
* **Statuses**
* **Workflow runs**
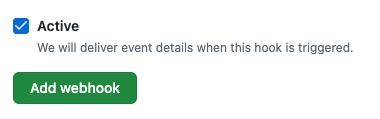
* Active: **keep it selected**
* Click on Add webhook
### Webhook sender in GHES
GHES enterprise owners can create a global webhook to subscribe to events that occur within their enterprise (recommended). Alternatively you can create a global webhook per organization in your enterprise.
Create a new webhook config in GHES (so GHES can POST to a given url when certain GHES events occur): as an Enterprise Owner, go to your GHES instance > click on your profile picture > click on Enterprise settings > Settings > Hooks > Add webhook > Add those details:
* Payload URL: the webhook url provided by Cosmos
* Content-Type: **application/json**
* Secret token: the secret provided by Cosmos
* Enable SSL verification: **keep it selected**
* Which events would you like to trigger this webhook?: select **Let me select individual events**
* Select those events:
* **Check runs**
* **Commit comments**
* **Issue comment**
* **Pull request review comments**
* **Pull requests**
* **Pull request reviews**
* **Pushes**
* **Statuses**
* **Workflow runs**
* Active: **keep it selected**
* Click on Add webhook
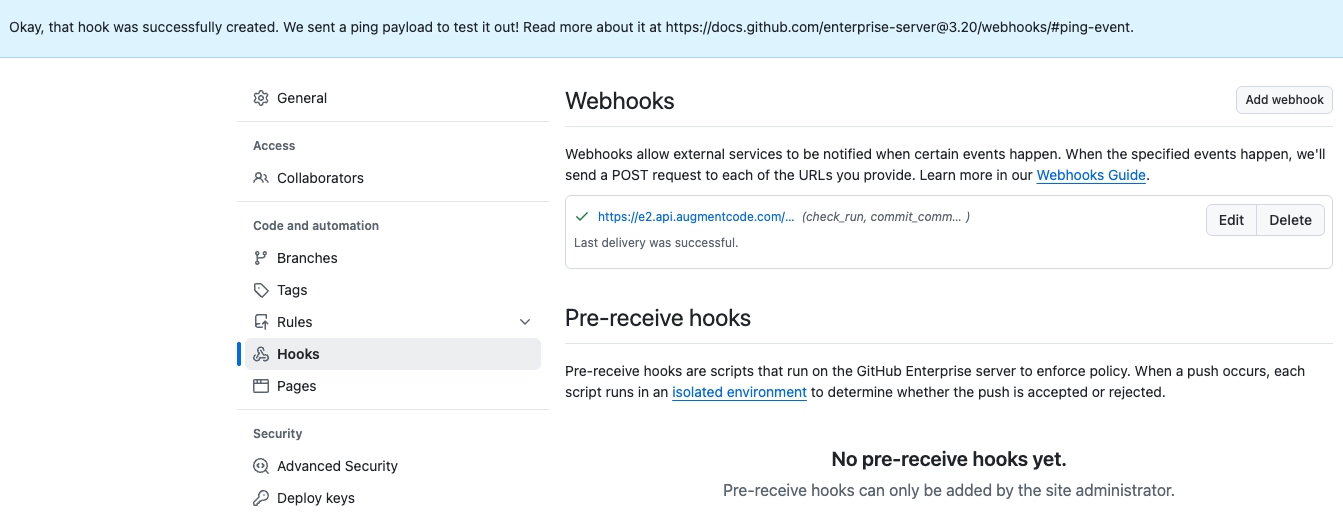
 You should see a banner confirming the hook has been created and a test payload has been sent:
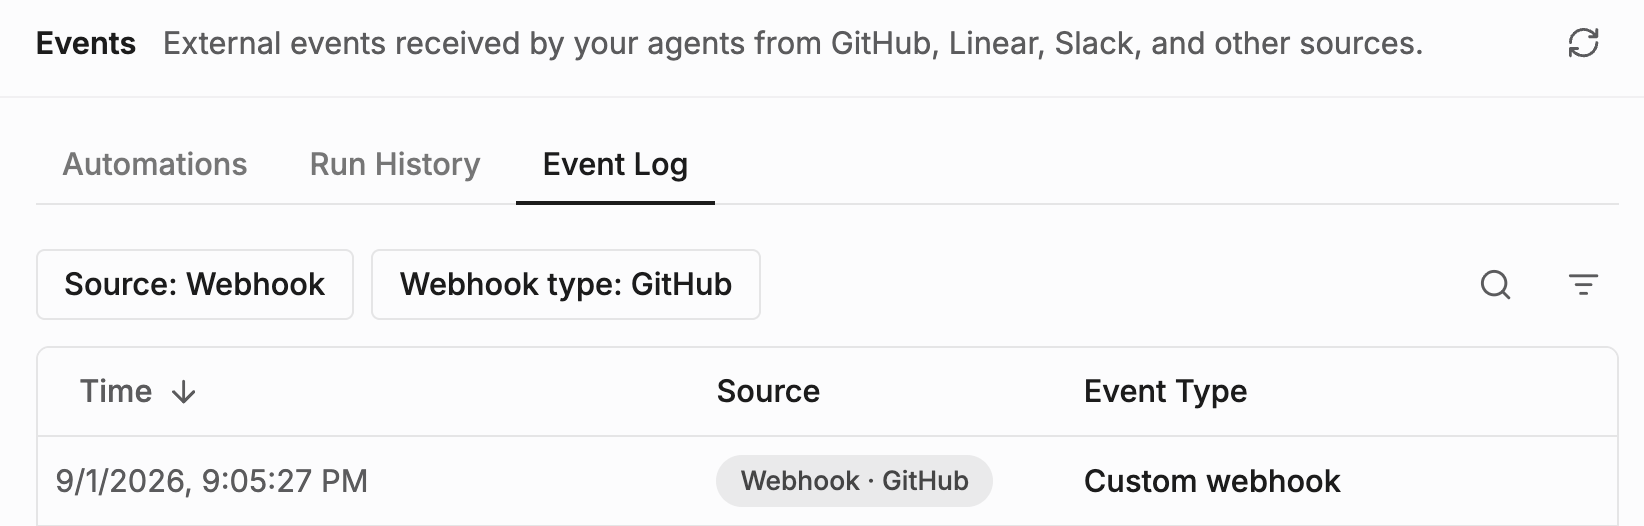
 Now go back to Cosmos and check that Cosmos received the event: [cosmos.augmentcode.com](https://cosmos.augmentcode.com/) > Settings > Automations > Events Log. You should see your event with source “Webhook · Github”:
 Click on the event to inspect the test payload:
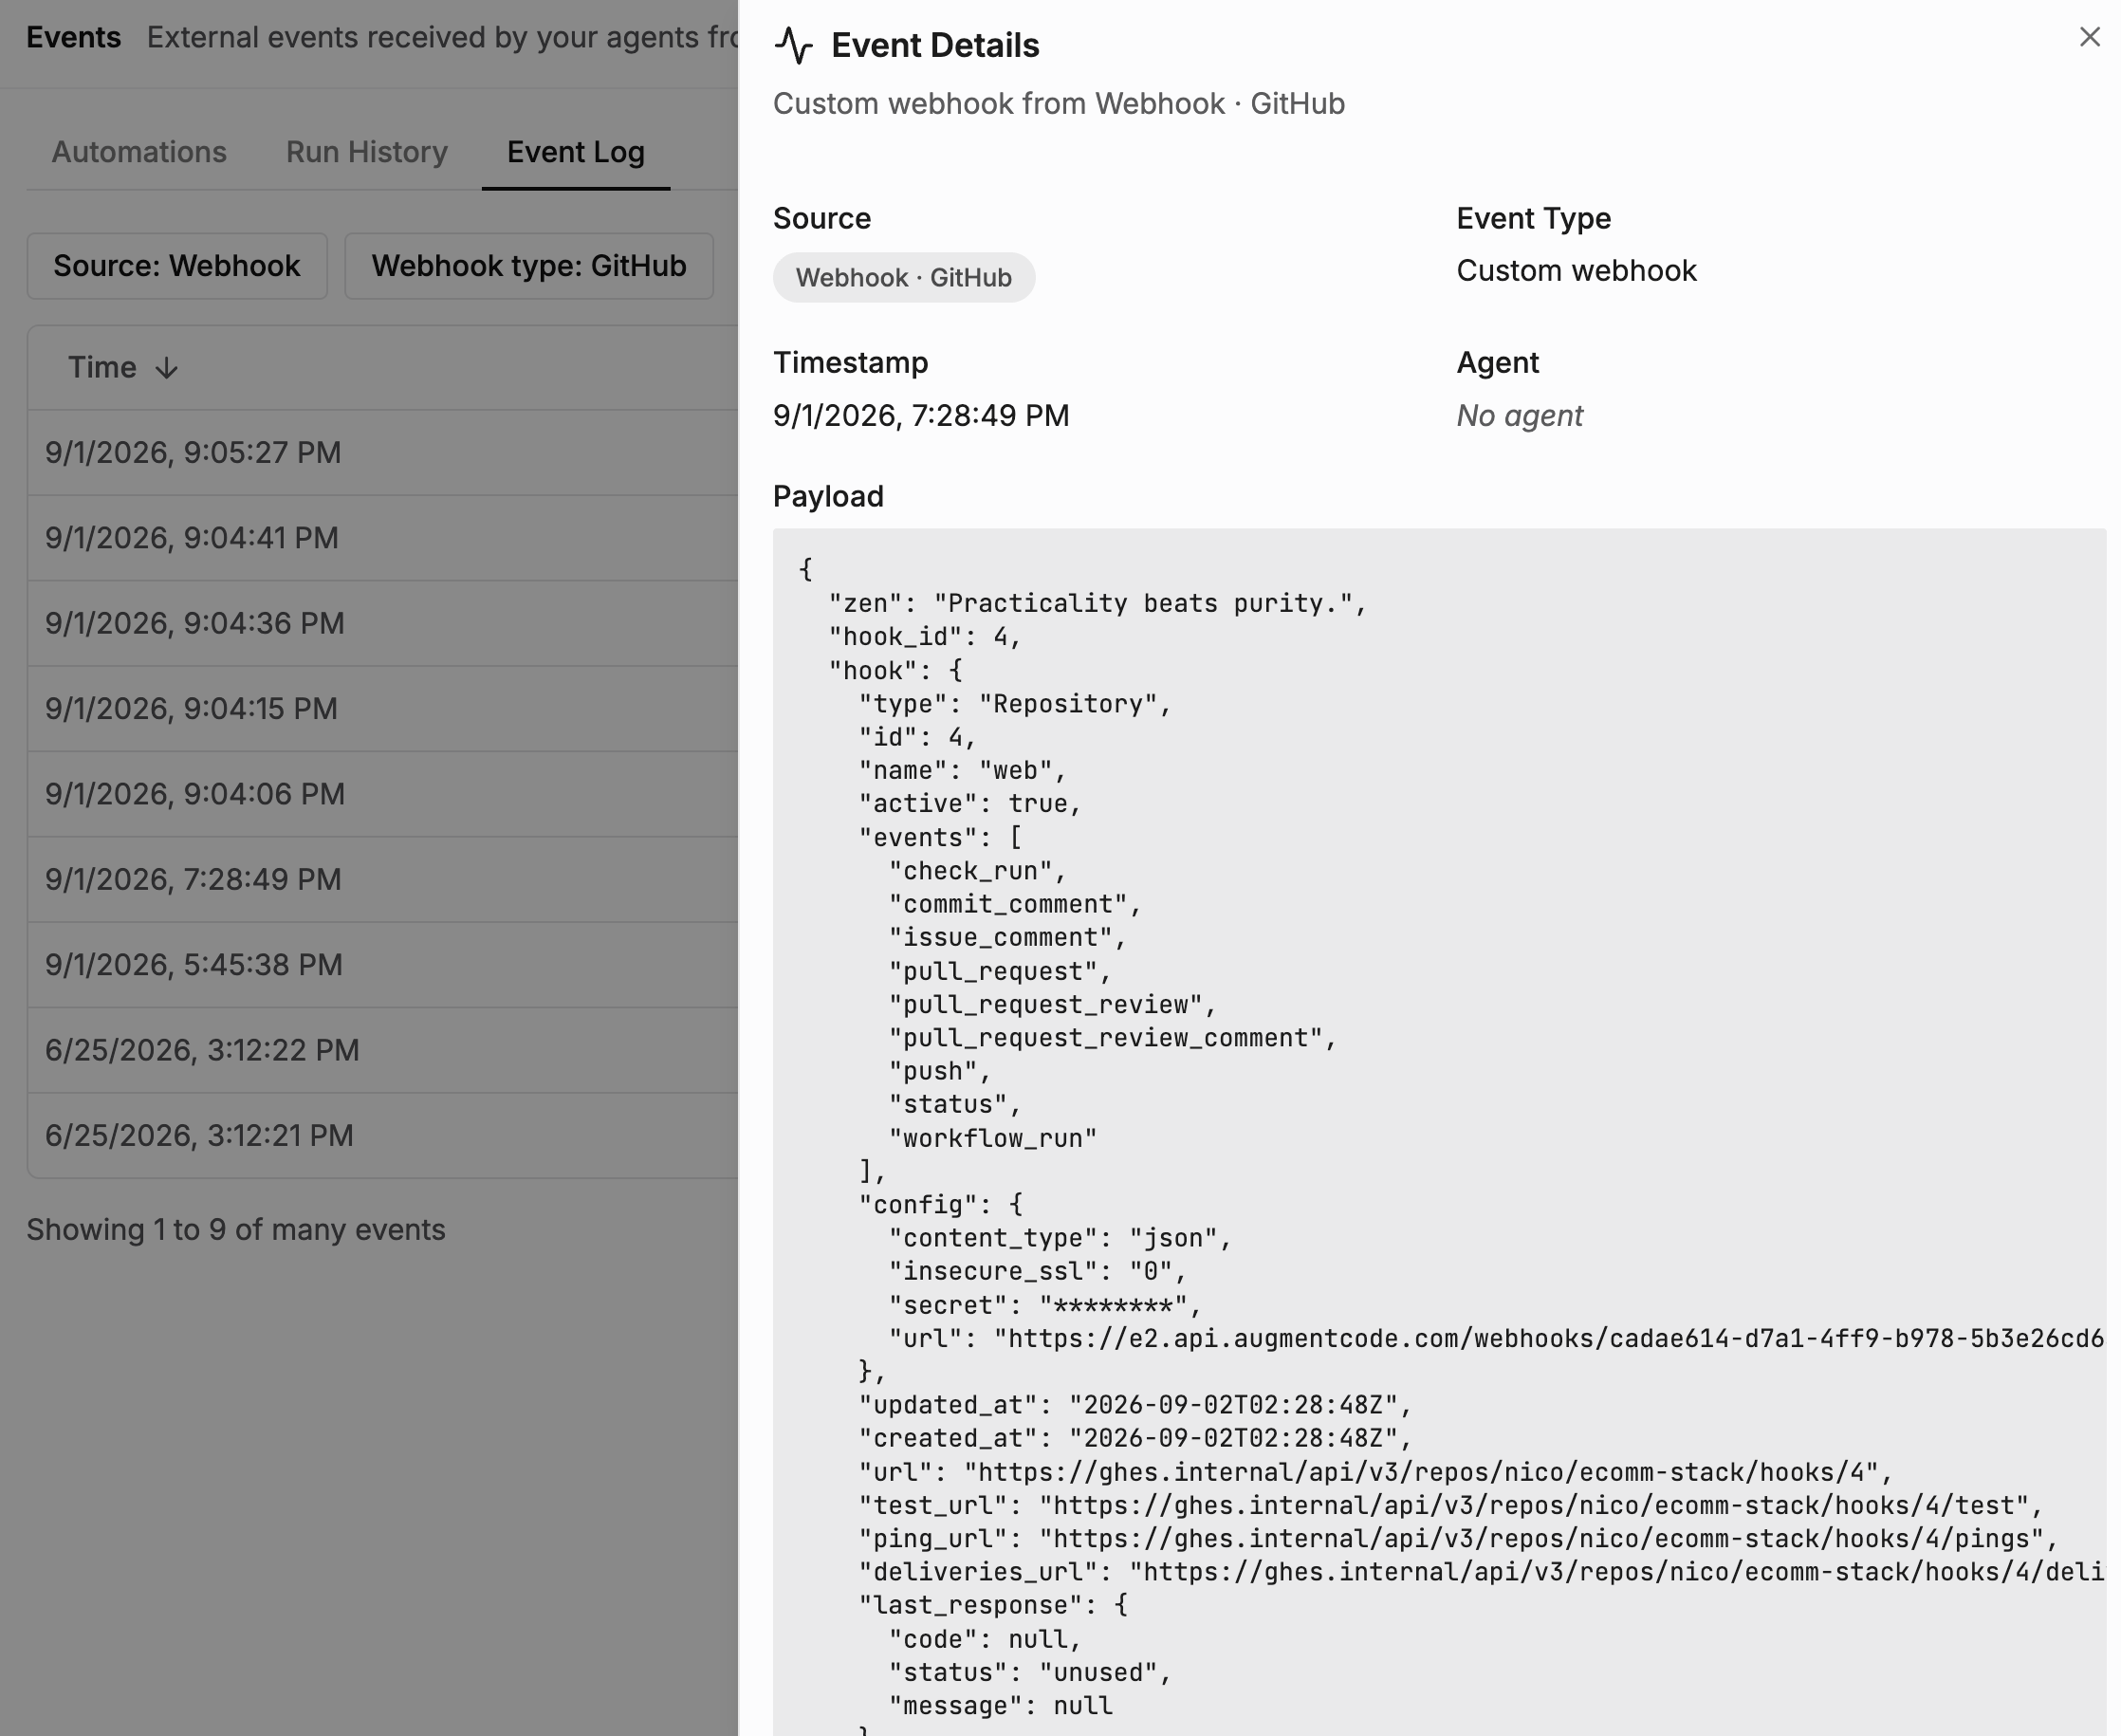 At this point GHES will automatically notify Cosmos whenever a PR is created/updated/commented on ✅
## Step 2 - Create a GHES Service Account
For headless automation and to start agentic workflows based on GHES events, you’ll create a dedicated GHES user acting as service account. Cosmos will use its access token to authenticate to GHES.
Here we'll assume you've configured SSO authentication for all your GHES users. Two steps to create your GHES dedicated service account user:
* first, you need to provision the new user **[cosmos@yourcompanydomain.com](mailto:cosmos@yourcompanydomain.com)** in your identity provider (Okta, EntraID)
* then in a separate browser, authenticate to GHES as **[cosmos@yourcompanydomain.com](mailto:cosmos@yourcompanydomain.com)**: you'll be redirected to SSO, and then back to GHES (your GHES account is automatically created when you sign in the first time)
Now, this service account needs to be granted access to the GHES repos in scope, either at the enterprise level, or at the organization level, or per repo. If per repo: ask a human repo owner to navigate to the repo > Settings tab > Collaborators > Add people > invite the service account. The repo owner should now see the service account as a collaborator:
At this point GHES will automatically notify Cosmos whenever a PR is created/updated/commented on ✅
## Step 2 - Create a GHES Service Account
For headless automation and to start agentic workflows based on GHES events, you’ll create a dedicated GHES user acting as service account. Cosmos will use its access token to authenticate to GHES.
Here we'll assume you've configured SSO authentication for all your GHES users. Two steps to create your GHES dedicated service account user:
* first, you need to provision the new user **[cosmos@yourcompanydomain.com](mailto:cosmos@yourcompanydomain.com)** in your identity provider (Okta, EntraID)
* then in a separate browser, authenticate to GHES as **[cosmos@yourcompanydomain.com](mailto:cosmos@yourcompanydomain.com)**: you'll be redirected to SSO, and then back to GHES (your GHES account is automatically created when you sign in the first time)
Now, this service account needs to be granted access to the GHES repos in scope, either at the enterprise level, or at the organization level, or per repo. If per repo: ask a human repo owner to navigate to the repo > Settings tab > Collaborators > Add people > invite the service account. The repo owner should now see the service account as a collaborator:
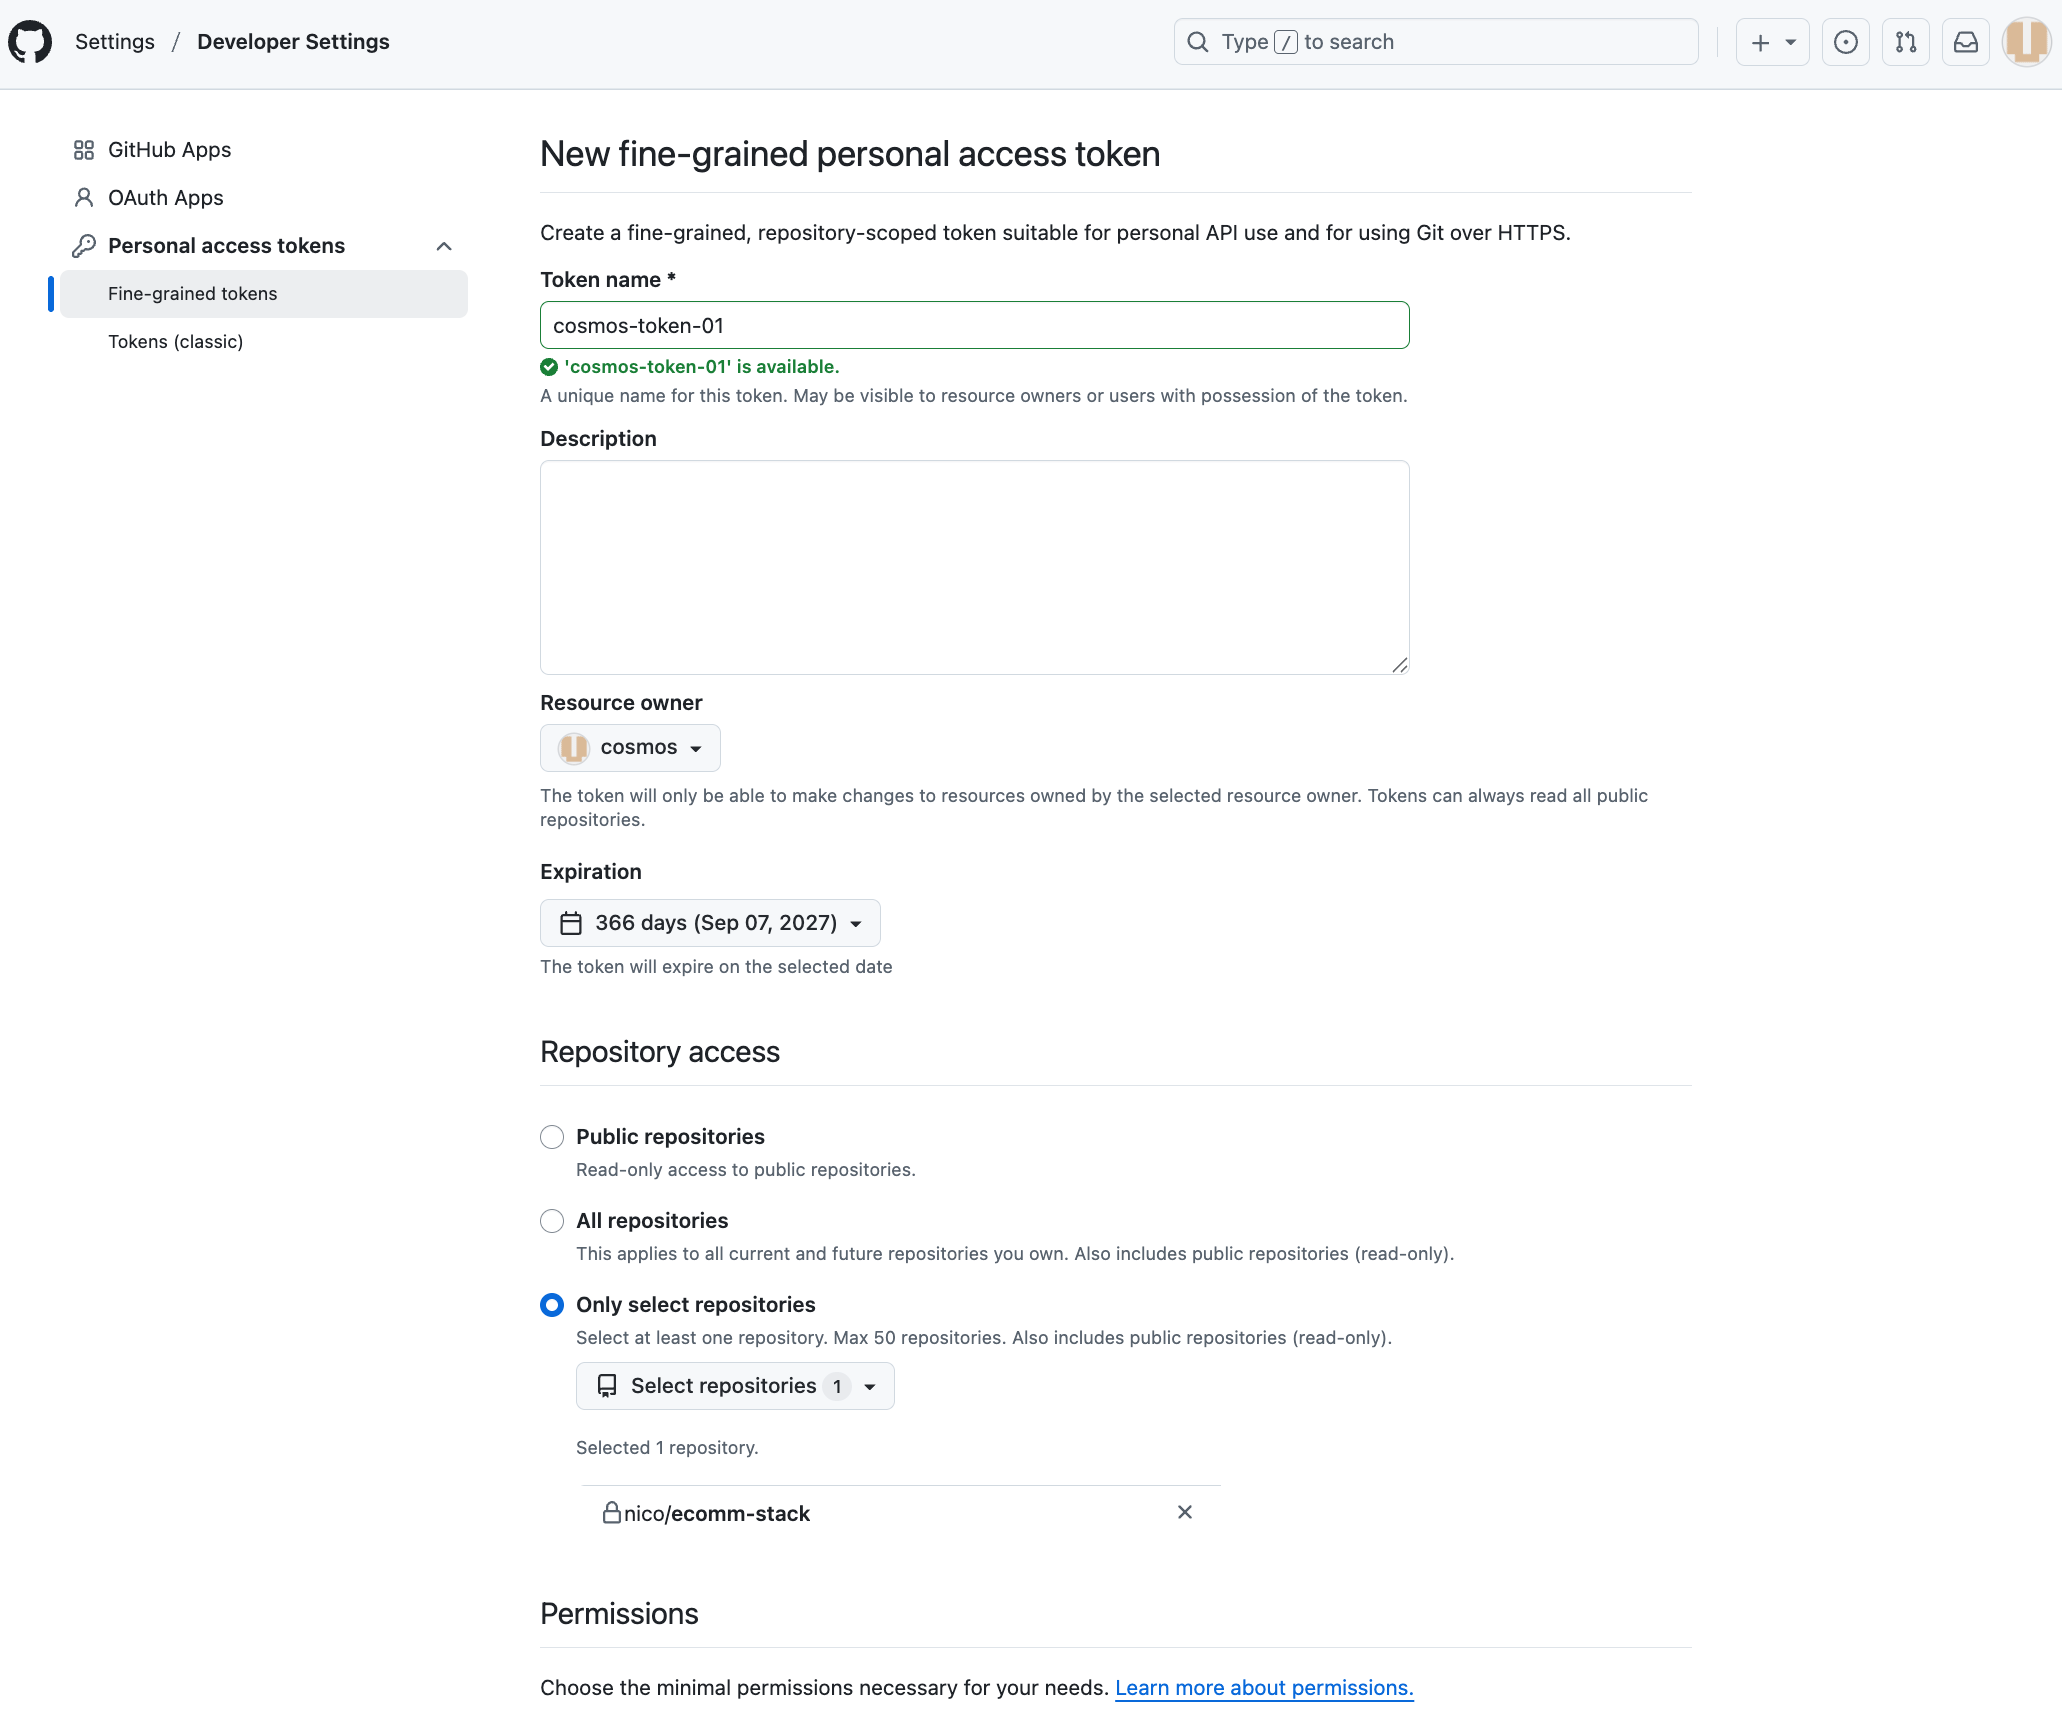
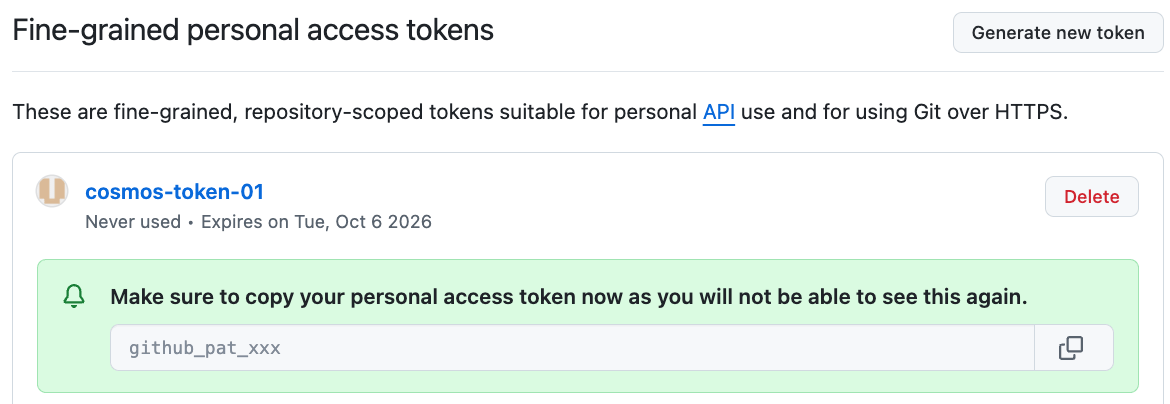
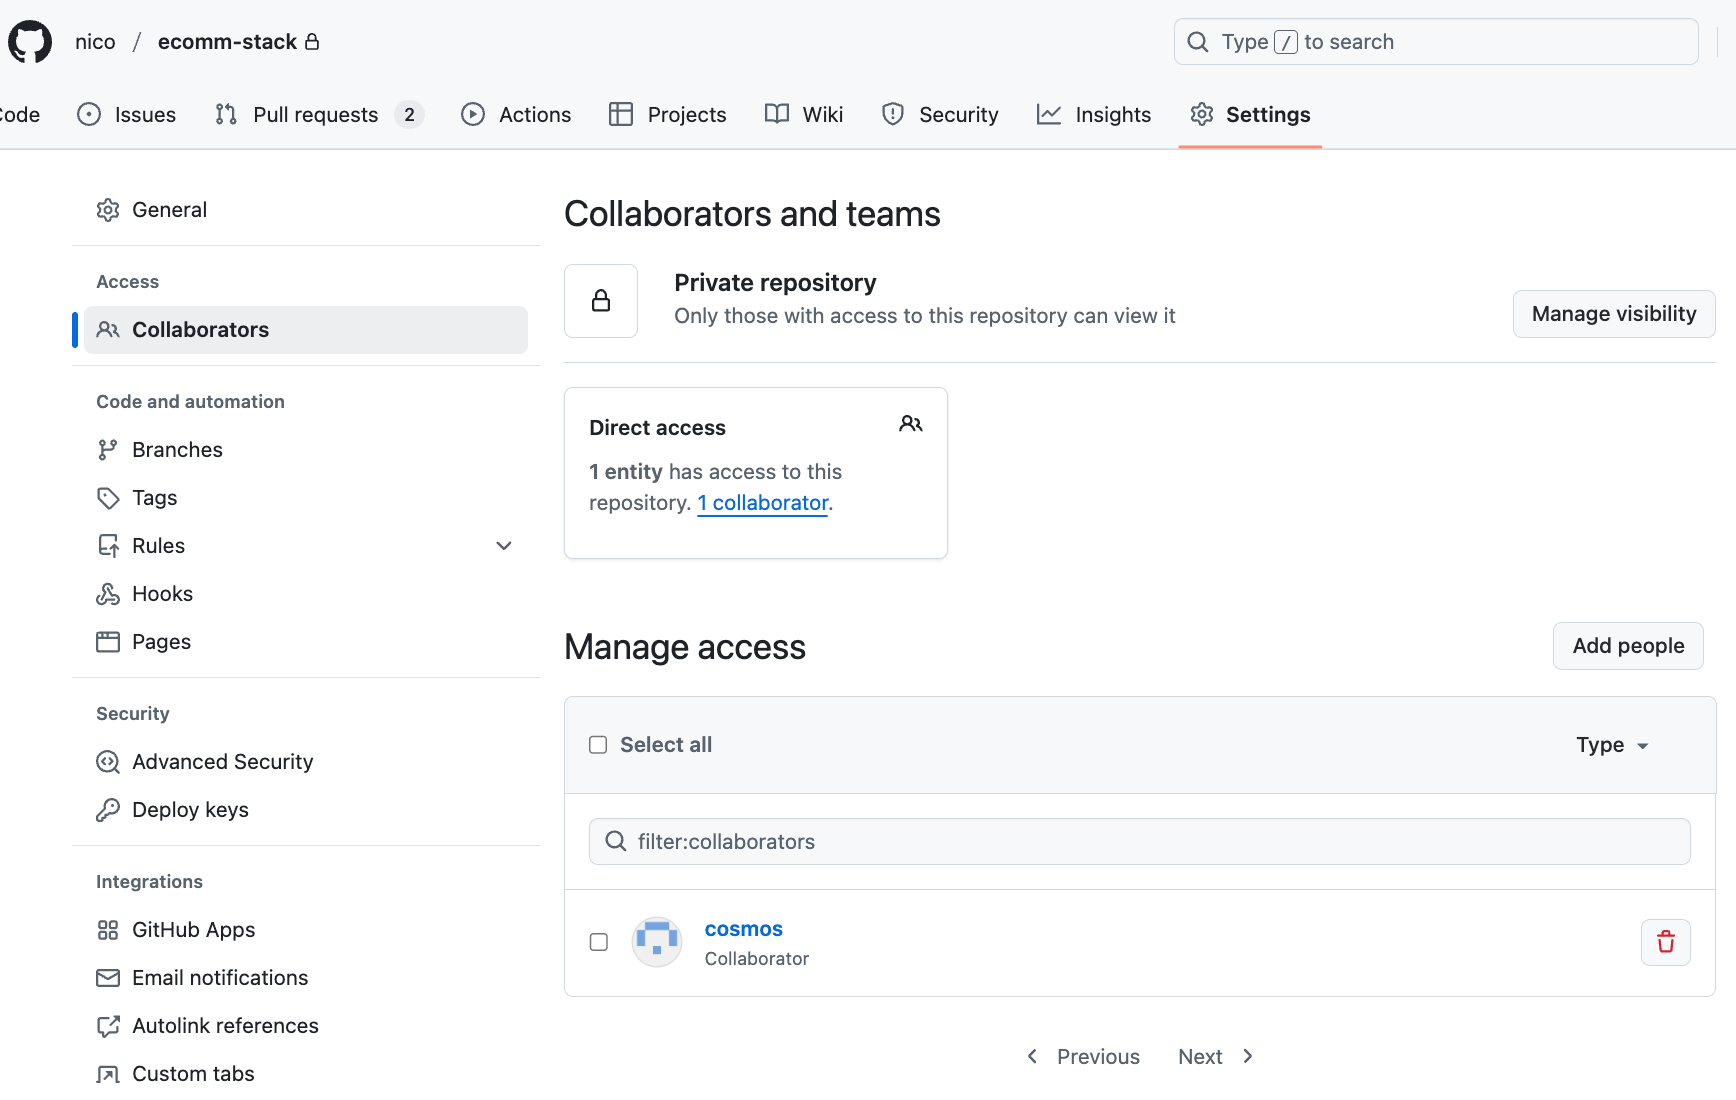 As you're signed-in using that GHES service account user, click on your avatar top right > Settings > Developer settings > Personal access tokens > Fine-grained tokens > Generate new token, with those details:
* Token name: **cosmos-token-01**
* Resource owner: keep the selection as the GHES dedicated service account user **[cosmos@yourcompanydomain.com](mailto:cosmos@yourcompanydomain.com)**
* Expiration: pick the furthest date possible
* Repository access: select the repos where **[cosmos@yourcompanydomain.com](mailto:cosmos@yourcompanydomain.com)** was added as collaborator earlier.
* Permissions:
* **Content**: `Read and write`
* **Issues**: `Read and write`
* **Metadata**: `Read-only`
* **Pull requests**: `Read and write`
* Click on Generate token
As you're signed-in using that GHES service account user, click on your avatar top right > Settings > Developer settings > Personal access tokens > Fine-grained tokens > Generate new token, with those details:
* Token name: **cosmos-token-01**
* Resource owner: keep the selection as the GHES dedicated service account user **[cosmos@yourcompanydomain.com](mailto:cosmos@yourcompanydomain.com)**
* Expiration: pick the furthest date possible
* Repository access: select the repos where **[cosmos@yourcompanydomain.com](mailto:cosmos@yourcompanydomain.com)** was added as collaborator earlier.
* Permissions:
* **Content**: `Read and write`
* **Issues**: `Read and write`
* **Metadata**: `Read-only`
* **Pull requests**: `Read and write`
* Click on Generate token
 You should see this popup:
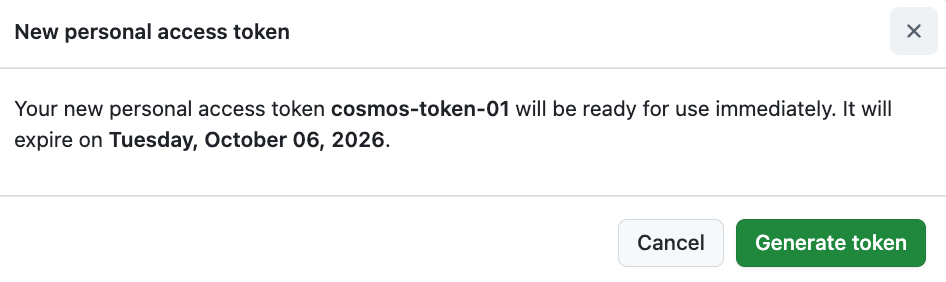 Click on Generate token, you'll see your PAT token value. Copy it you'll need it later:
 ## Step 3 - Create a Augment service account
Before we start the websocket tunnel from your VM to Cosmos, you’ll need to create a dedicated Augment service account, which will be used to authenticate and start the tunnel.
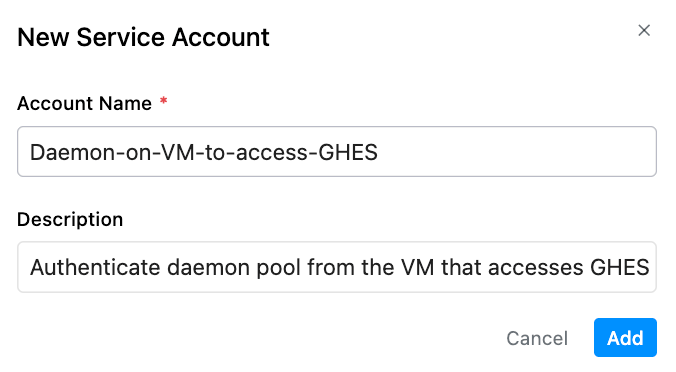
As an admin go to [https://app.augmentcode.com](https://app.augmentcode.com) > Global Settings > Service accounts > Add Service Account > Enter:
* Account Name: **Daemon-on-VM-to-access-GHES**
* Description: **Authenticate daemon pool from the VM that accesses GHES**
Click on Add:
## Step 3 - Create a Augment service account
Before we start the websocket tunnel from your VM to Cosmos, you’ll need to create a dedicated Augment service account, which will be used to authenticate and start the tunnel.
As an admin go to [https://app.augmentcode.com](https://app.augmentcode.com) > Global Settings > Service accounts > Add Service Account > Enter:
* Account Name: **Daemon-on-VM-to-access-GHES**
* Description: **Authenticate daemon pool from the VM that accesses GHES**
Click on Add:
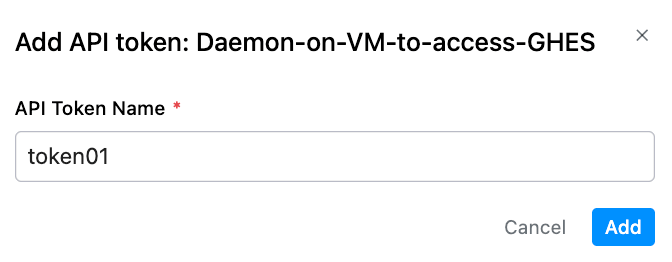
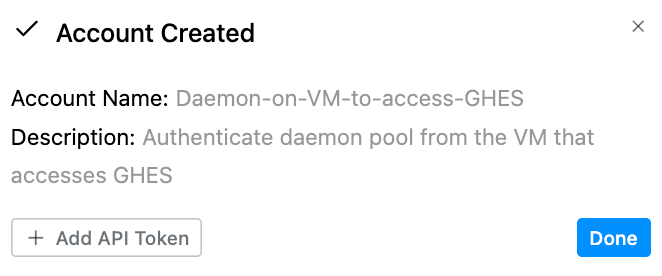 Click on Add API Token > token name: **token01** > Click on Add:
 Click on Download JSON:
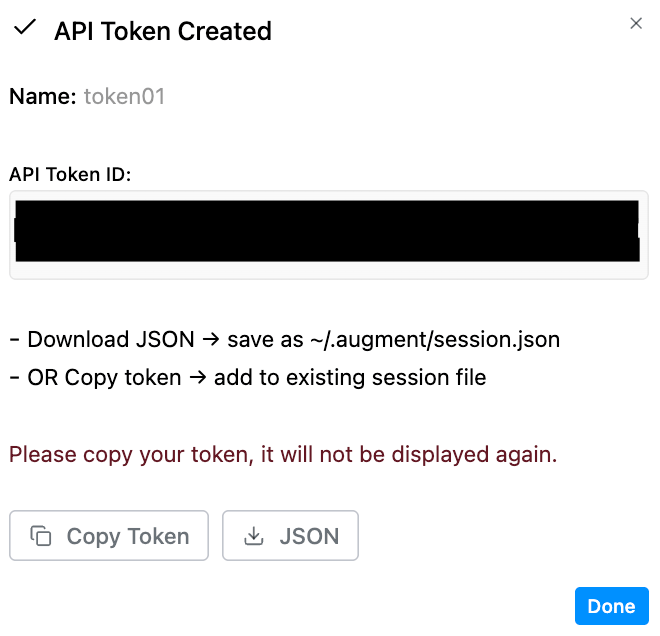 You'll obtain a session.json, it will be used to authenticate the Cosmos daemon pool later on.
## Step 4 - Create a Cosmos daemon pool
Since you’ll be leveraging a VM to host your daemon, it’s important to think about uptime and resilience: your VM could loose network connectivity or have an outage. The best practice is to create a daemon pool and attach your daemons to that daemon pool. Then you can later have N daemons (1 per VM) all tied to the same daemon pool, and Cosmos will use that pool which will automatically route to the next available daemon. In this guide you’ll create 1 daemon pool and 1 daemon running in 1 VM, but you can extend that approach to spin up 2 more VMs (and their respective daemons) for max resilience. More VMs and daemons also mean scaling horizontally the number of Cosmos sessions running at a given time.
Go to [cosmos.augmentcode.com](https://cosmos.augmentcode.com/) > Settings > Environments > Create an environment > Daemon Pool:
You'll obtain a session.json, it will be used to authenticate the Cosmos daemon pool later on.
## Step 4 - Create a Cosmos daemon pool
Since you’ll be leveraging a VM to host your daemon, it’s important to think about uptime and resilience: your VM could loose network connectivity or have an outage. The best practice is to create a daemon pool and attach your daemons to that daemon pool. Then you can later have N daemons (1 per VM) all tied to the same daemon pool, and Cosmos will use that pool which will automatically route to the next available daemon. In this guide you’ll create 1 daemon pool and 1 daemon running in 1 VM, but you can extend that approach to spin up 2 more VMs (and their respective daemons) for max resilience. More VMs and daemons also mean scaling horizontally the number of Cosmos sessions running at a given time.
Go to [cosmos.augmentcode.com](https://cosmos.augmentcode.com/) > Settings > Environments > Create an environment > Daemon Pool:
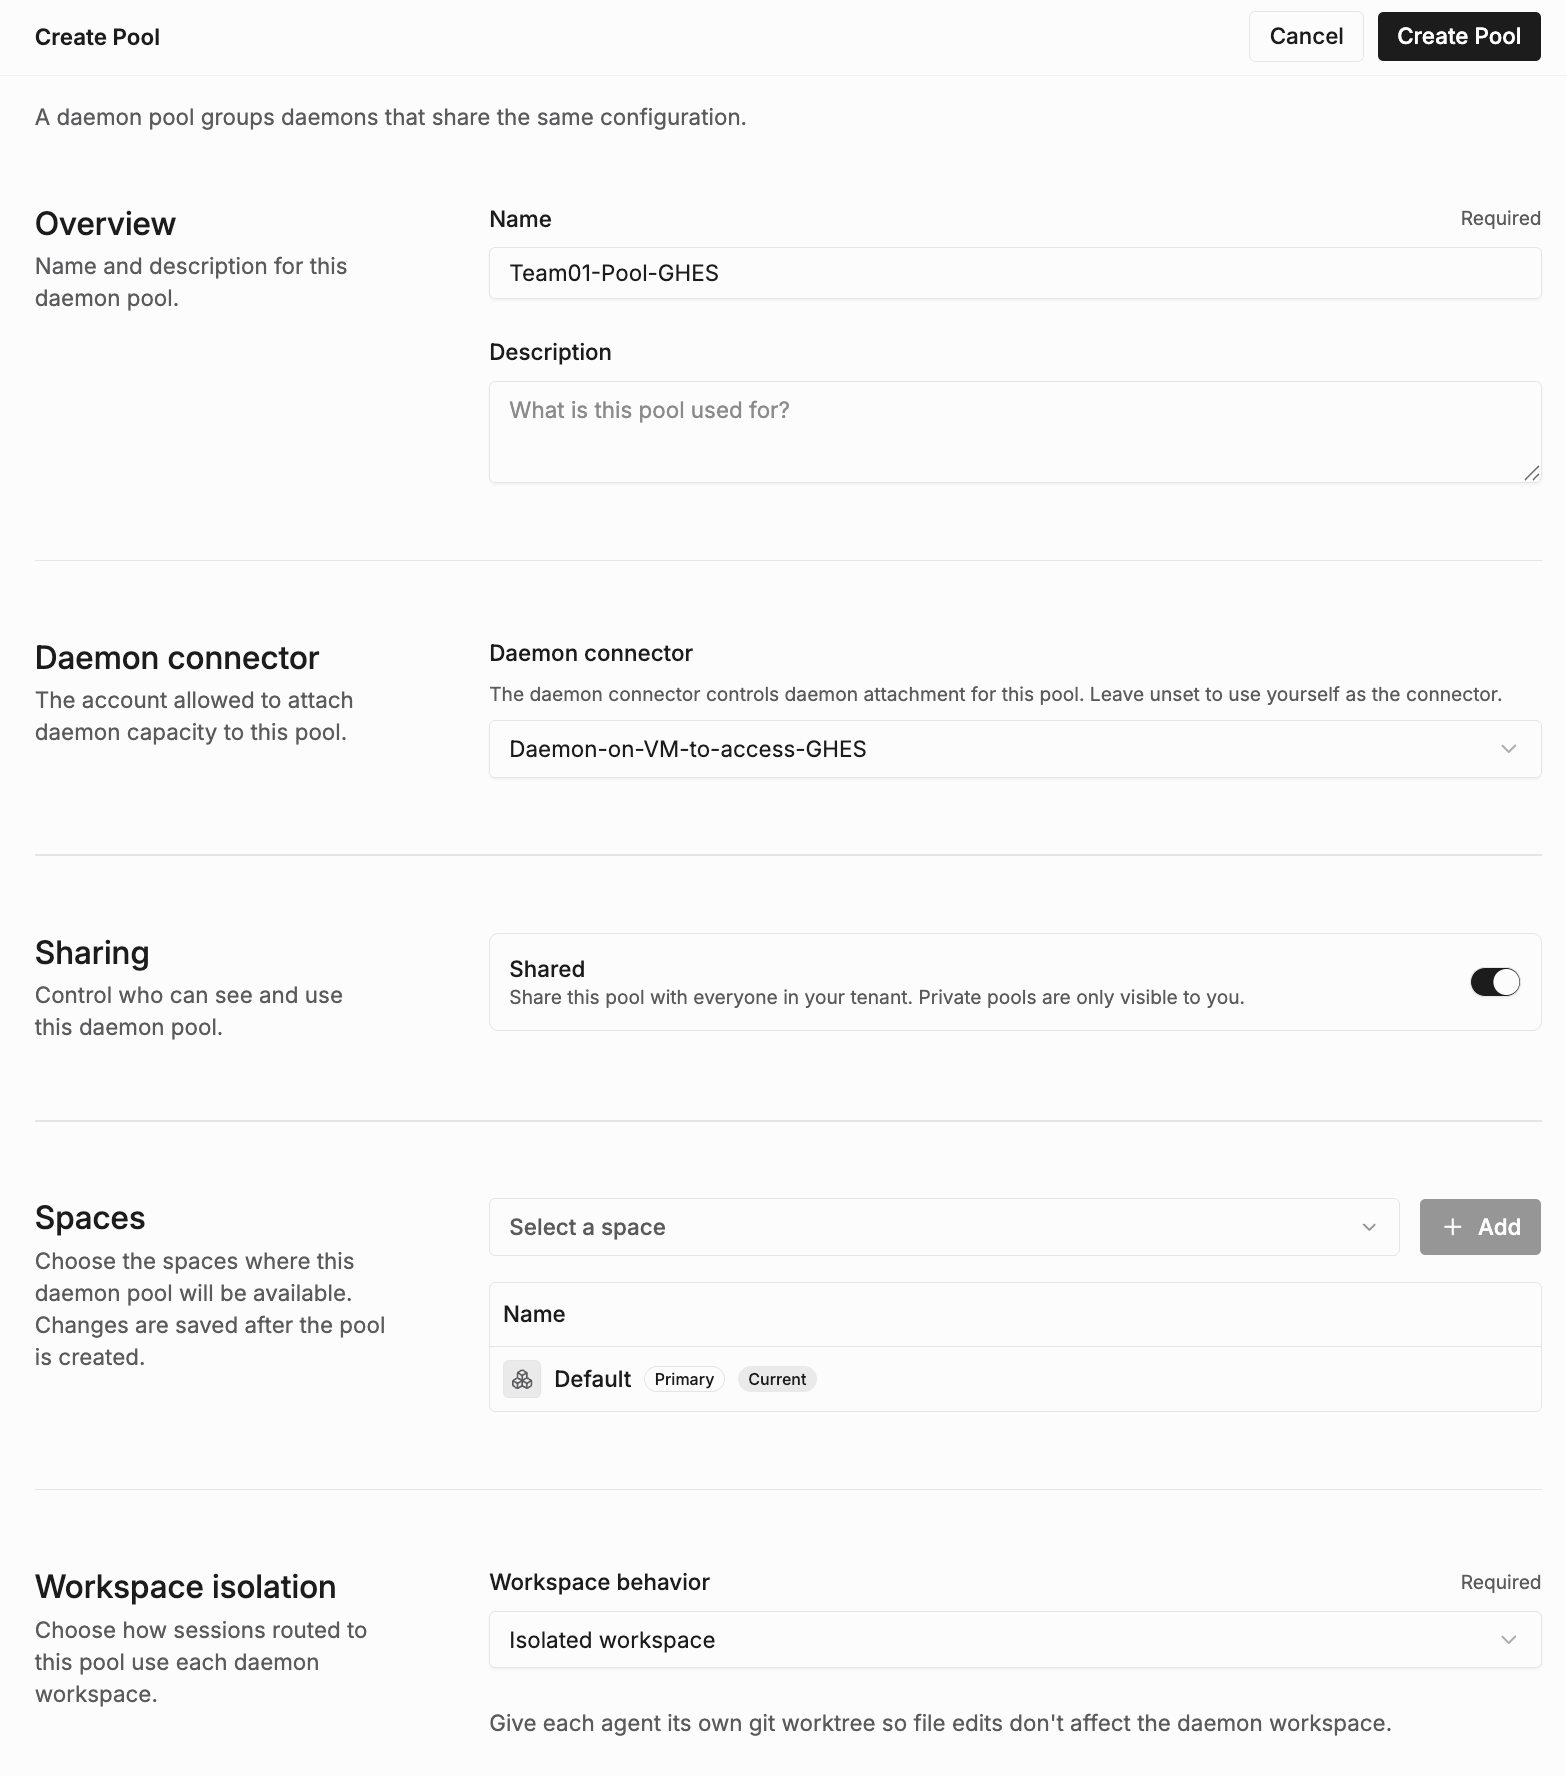
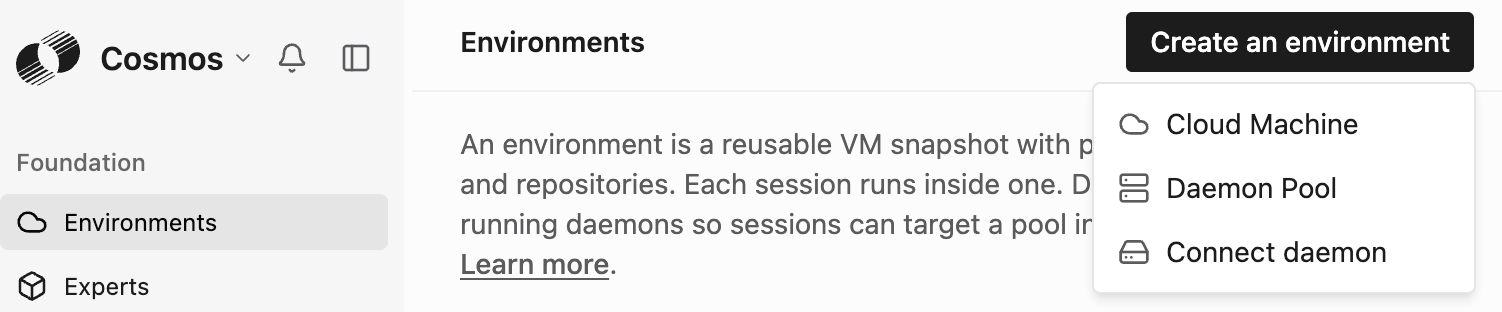 Configure the pool with:
* Name: **Team01-Pool-GHES**
* Daemon connector: select the dedicated service account you created in the section earlier (**Daemon-on-VM-to-access-GHES)**
* Shared: **toggle on**
* Workspace behavior: `Isolated workspace`
Then click on Create Pool:
Configure the pool with:
* Name: **Team01-Pool-GHES**
* Daemon connector: select the dedicated service account you created in the section earlier (**Daemon-on-VM-to-access-GHES)**
* Shared: **toggle on**
* Workspace behavior: `Isolated workspace`
Then click on Create Pool:
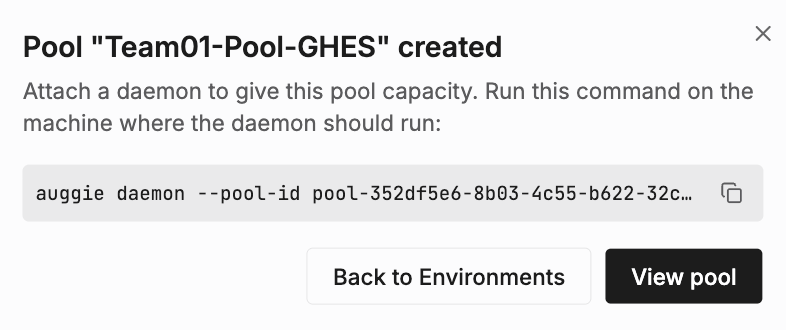
 You’ll get the confirmation that the pool has been created, note the pool-id:
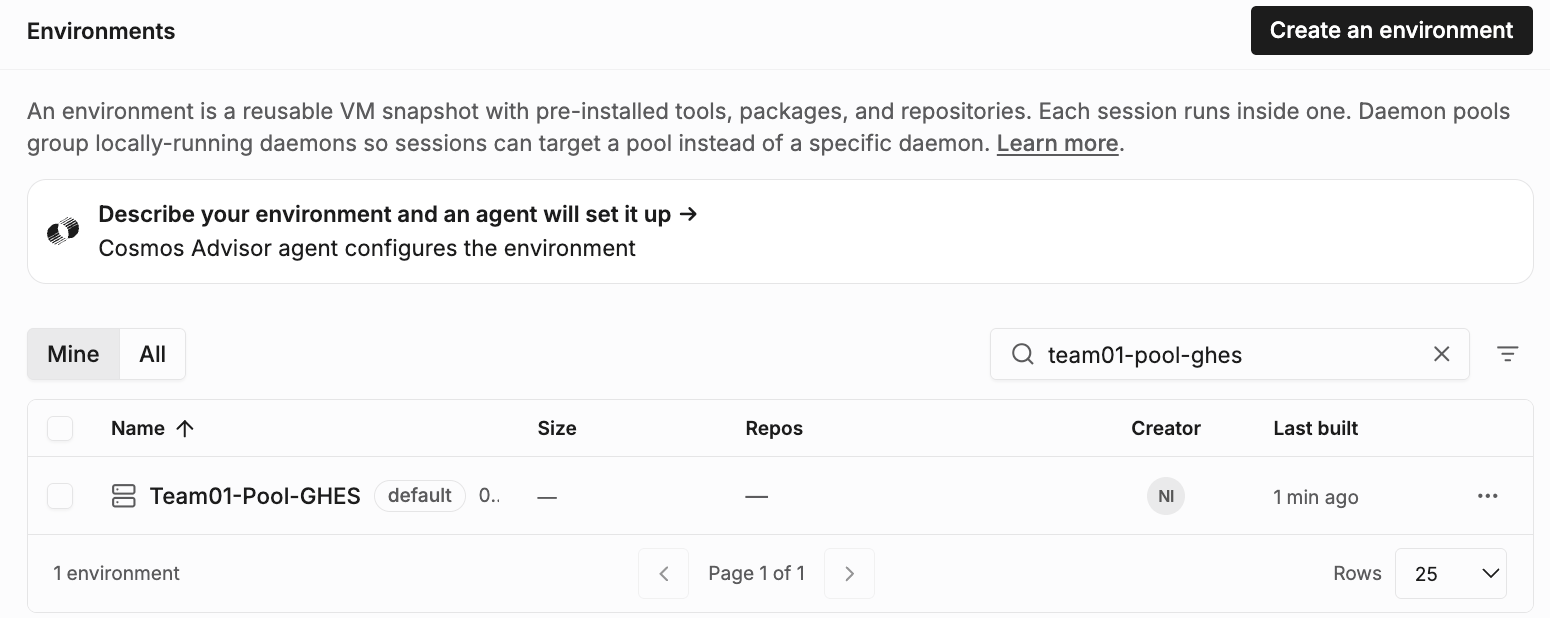
 Go back to your list of environments, you should see your pool (with no daemon online yet):
 ## Step 5 - Configure your VM with local GHES repos, gh cli and Cosmos daemon
In this section you’ll configure a VM with the following:
* locally cloned GHES repos
* `gh` cli so Cosmos local agents can communicate to GHES
* a Cosmos pool + daemon (to establish an outbound websocket tunnel from the VM to Cosmos)
### Create the VM, with git and NVM/node
Create a new Linux VM (ex: Ubuntu x86\_64) in a VPC that will be able to reach your GHES instance.
Minimum config recommended: **4 vCPU, 16 GB RAM, 100 GB SSD.**
Then SSH onto the VM.
Install git:
```shellscript theme={null}
sudo apt update && sudo apt install git -y
```
Verify the installation
```bash theme={null}
which git
git --version
```
You should get:
```text theme={null}
nico@gcp-vm-behind-firewall:~$ which git
/usr/bin/git
nico@gcp-vm-behind-firewall:~$ git --version
git version 2.34.1
```
Install NVM
```shellscript wrap theme={null}
curl -o- https://raw.githubusercontent.com/nvm-sh/nvm/v0.40.1/install.sh | bash
```
Refresh the terminal profile
```shellscript theme={null}
source ~/.bashrc
```
Install the latest Long-Term Support (LTS) version of Node & NPM
```shellscript theme={null}
nvm install --lts
```
Verify the node install
```bash theme={null}
node -v
npm -v
```
You should get:
```text theme={null}
nico@gcp-vm-behind-firewall:~$ node -v
v24.20.0
nico@gcp-vm-behind-firewall:~$ npm -v
11.19.0
```
### Git clone your GHES repos locally
Create a local \~/workspace/ folder
In that workspace folder create folders for your GHES organizations
In the corresponding organization folders, git clone your repos (you need at a minimum an empty git repo with at least one commit for the git worktree configuration to be valid and for the agent to start)
You should have a “2 layers” folder structure like this:
* \~/workspace/\/\/.git
* \~/workspace/\/\/.git
* \~/workspace/\/\/.git
* \~/workspace/\/\/.git
Note: at this moment you have to own making sure that the git repos are locally cloned and are kept up to date regularly. In a future release, daemons will be able to handle that on your behalf - stay tuned
### Install and authenticate the gh CLI
Install the `gh` cli: make sure you’re in your root folder, install the `gh` cli using this command (source [https://cli.github.com/](https://cli.github.com/)):
```shell wrap theme={null}
(type -p wget >/dev/null || (sudo apt update && sudo apt install wget -y)) \
&& sudo mkdir -p -m 755 /etc/apt/keyrings \
&& out=$(mktemp) && wget -nv -O$out https://cli.github.com/packages/githubcli-archive-keyring.gpg \
&& cat $out | sudo tee /etc/apt/keyrings/githubcli-archive-keyring.gpg > /dev/null \
&& sudo chmod go+r /etc/apt/keyrings/githubcli-archive-keyring.gpg \
&& sudo mkdir -p -m 755 /etc/apt/sources.list.d \
&& echo "deb [arch=$(dpkg --print-architecture) signed-by=/etc/apt/keyrings/githubcli-archive-keyring.gpg] https://cli.github.com/packages stable main" | sudo tee /etc/apt/sources.list.d/github-cli.list > /dev/null \
&& sudo apt update \
&& sudo apt install gh -y
```
Verify the version, run:
```shellscript theme={null}
gh --version
```
You should get:
```text theme={null}
nico@gcp-vm-behind-firewall:~$ gh --version
gh version 2.100.0 (2026-09-03)
https://github.com/cli/cli/releases/tag/v2.100.0
```
Then authenticate the `gh` cli against your GHES instance, run:
```shellscript wrap theme={null}
echo "" | gh auth login --hostname --with-token
```
Then verify `gh` is properly authenticated, run:
```shellscript theme={null}
gh auth status
```
You should see:
```plain text theme={null}
nico@gcp-vm-behind-firewall:~$ gh auth status
ghes.internal
✓ Logged in to ghes.internal account nico (/home/nico/.config/gh/hosts.yml)
- Active account: true
- Git operations protocol: https
- Token: github_pat_********************************************************
```
### Start the daemon
cd into \~/workspace/
Run
```shell theme={null}
nano ~/.augment/session.json
```
Paste in there the content of session.json you retrieved earlier when creating the Augment service account. Then CTRL-O + RETURN to save the file and CTRL-X + RETURN to exit
Install Auggie
```bash theme={null}
npm install -g @augmentcode/auggie
```
Start the Cosmos daemon using the Augment service account and attach the daemon to the pool, run:
```shell wrap theme={null}
auggie daemon --pool-id --discover-workspaces=2 --allow-indexing
```
That will start the daemon, you should see this:
```text theme={null}
nico@gcp-vm-behind-firewall:~/workspace$ auggie daemon --pool-id pool-352df5e6-8b03-4c55-b622-32ce65e21bf8 --discover-workspaces=2 --allow-indexing
2026-09-07 14:12:41.582 [info] 'daemon': Git version: 2.34.1 (daemon minimum: 2.31.0)
2026-09-07 14:12:41.595 [info] 'git-worktree-support': Git worktree support unavailable; treating workspace as UNSUPPORTED
2026-09-07 14:12:41.614 [info] 'git-worktree-support': Git worktree support unavailable; treating workspace as UNSUPPORTED
2026-09-07 14:12:41.625 [info] 'daemon': Launch dir is a non-git container; adopting 1 discovered git repo(s) as workspaces:
2026-09-07 14:12:41.626 [info] 'daemon': Discovered workspace: /home/nico/workspace/nico/ecomm-stack (git)
2026-09-07 14:12:41.626 [info] 'daemon': Git worktree support: supported
2026-09-07 14:12:41.634 [info] 'DaemonState': Loaded existing daemon state with VM ID: 7f6ae36c-f3a6-4e06-93ea-946d3a43a70b
2026-09-07 14:12:41.635 [info] 'daemon': Loaded VM ID from state: 7f6ae36c-f3a6-4e06-93ea-946d3a43a70b
2026-09-07 14:12:41.635 [info] 'daemon': Joining daemon pool: pool-352df5e6-8b03-4c55-b622-32ce65e21bf8
2026-09-07 14:12:41.645 [info] 'daemon': Daemon auto-update is DISABLED because it is gated by the cli_daemon_auto_update_enabled feature flag, which is off for this account
2026-09-07 14:12:41.646 [info] 'daemon': Configured 1 additional workspace(s):
2026-09-07 14:12:41.646 [info] 'daemon': Additional workspace: /home/nico/workspace/nico/ecomm-stack (git)
2026-09-07 14:12:41.649 [info] 'daemon': Indexing enabled for workspace: /home/nico/workspace
2026-09-07 14:12:41.649 [info] 'daemon': Indexing enabled for workspace: /home/nico/workspace/nico/ecomm-stack
2026-09-07 14:12:41.650 [info] 'daemon': Starting Auggie Daemon...
2026-09-07 14:12:41.650 [info] 'daemon': VM ID: 7f6ae36c-f3a6-4e06-93ea-946d3a43a70b
2026-09-07 14:12:41.650 [info] 'daemon': Name: gcp-vm-behind-firewall:workspace
2026-09-07 14:12:41.650 [info] 'daemon': Workspace: /home/nico/workspace
2026-09-07 14:12:41.650 [info] 'daemon': Max Agents: 100
2026-09-07 14:12:41.650 [info] 'daemon': Additional Workspaces: 1
2026-09-07 14:12:41.650 [info] 'daemon': - /home/nico/workspace/nico/ecomm-stack
2026-09-07 14:12:41.652 [info] 'daemon': Connecting to Cosmos...
2026-09-07 14:12:41.652 [info] 'daemon': URL: wss://e2.api.augmentcode.com/cloudagents/vm/ws?vm_id=7f6ae36c-f3a6-4e06-93ea-946d3a43a70b&last_seq_id=0&connection_type=AUGGIE_DAEMON&daemon_name=gcp-vm-behind-firewall%3Aworkspace&max_agents=100&workspace_path=%2Fhome%2Fnico%2Fworkspace&additional_workspace_path=%2Fhome%2Fnico%2Fworkspace%2Fnico%2Fecomm-stack&git_worktree_support=1&git_credential_mode=1&pool_id=pool-352df5e6-8b03-4c55-b622-32ce65e21bf8&cli_version=0.36.0&supports_diff=1&client_capabilities=worktree_cleanup&client_capabilities=git-user-oauth-v1&client_capabilities=git-github-app-v1&client_capabilities=pty&command_capability=EXECUTE_DAEMON_DIFF_OP&command_capability=EXECUTE_DAEMON_FS_OP
2026-09-07 14:12:41.696 [info] 'daemon': WebSocket connected
2026-09-07 14:12:41.779 [info] 'daemon': Daemon registered with Cosmos (multi-workspace: 2 repos)
2026-09-07 14:12:41.779 [info] 'daemon': Heartbeat enabled (5000ms interval)
2026-09-07 14:12:41.780 [info] 'daemon': Received command: CONNECTED (seq: 0)
2026-09-07 14:12:41.781 [info] 'daemon': --> Processing command: CONNECTED
```
Note in your daemon logs:
* “Launch dir is a non-git container; adopting N discovered git repo(s) as workspaces \[…]” ⇒ check that all your local git repos have been discovered under /workspace/
* “Git worktree support: supported”
* “Joining daemon pool: \”
* “Indexing enabled for workspace: \[…]”
* “Starting Auggie Daemon \[…]”
* “Connecting to Cosmos...”
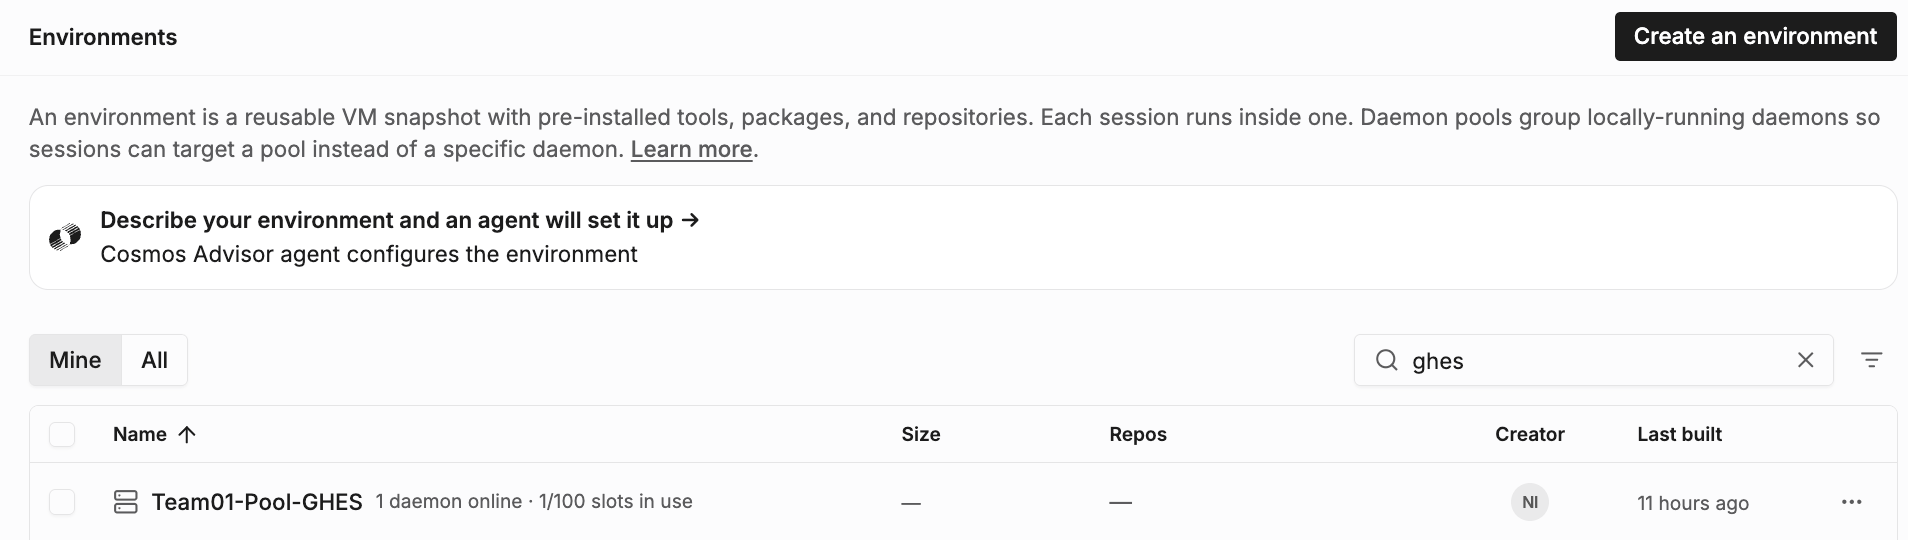
You can now see the daemon running from Cosmos: [cosmos.augmentcode.com](https://cosmos.augmentcode.com/) > Settings > Environments:
## Step 5 - Configure your VM with local GHES repos, gh cli and Cosmos daemon
In this section you’ll configure a VM with the following:
* locally cloned GHES repos
* `gh` cli so Cosmos local agents can communicate to GHES
* a Cosmos pool + daemon (to establish an outbound websocket tunnel from the VM to Cosmos)
### Create the VM, with git and NVM/node
Create a new Linux VM (ex: Ubuntu x86\_64) in a VPC that will be able to reach your GHES instance.
Minimum config recommended: **4 vCPU, 16 GB RAM, 100 GB SSD.**
Then SSH onto the VM.
Install git:
```shellscript theme={null}
sudo apt update && sudo apt install git -y
```
Verify the installation
```bash theme={null}
which git
git --version
```
You should get:
```text theme={null}
nico@gcp-vm-behind-firewall:~$ which git
/usr/bin/git
nico@gcp-vm-behind-firewall:~$ git --version
git version 2.34.1
```
Install NVM
```shellscript wrap theme={null}
curl -o- https://raw.githubusercontent.com/nvm-sh/nvm/v0.40.1/install.sh | bash
```
Refresh the terminal profile
```shellscript theme={null}
source ~/.bashrc
```
Install the latest Long-Term Support (LTS) version of Node & NPM
```shellscript theme={null}
nvm install --lts
```
Verify the node install
```bash theme={null}
node -v
npm -v
```
You should get:
```text theme={null}
nico@gcp-vm-behind-firewall:~$ node -v
v24.20.0
nico@gcp-vm-behind-firewall:~$ npm -v
11.19.0
```
### Git clone your GHES repos locally
Create a local \~/workspace/ folder
In that workspace folder create folders for your GHES organizations
In the corresponding organization folders, git clone your repos (you need at a minimum an empty git repo with at least one commit for the git worktree configuration to be valid and for the agent to start)
You should have a “2 layers” folder structure like this:
* \~/workspace/\/\/.git
* \~/workspace/\/\/.git
* \~/workspace/\/\/.git
* \~/workspace/\/\/.git
Note: at this moment you have to own making sure that the git repos are locally cloned and are kept up to date regularly. In a future release, daemons will be able to handle that on your behalf - stay tuned
### Install and authenticate the gh CLI
Install the `gh` cli: make sure you’re in your root folder, install the `gh` cli using this command (source [https://cli.github.com/](https://cli.github.com/)):
```shell wrap theme={null}
(type -p wget >/dev/null || (sudo apt update && sudo apt install wget -y)) \
&& sudo mkdir -p -m 755 /etc/apt/keyrings \
&& out=$(mktemp) && wget -nv -O$out https://cli.github.com/packages/githubcli-archive-keyring.gpg \
&& cat $out | sudo tee /etc/apt/keyrings/githubcli-archive-keyring.gpg > /dev/null \
&& sudo chmod go+r /etc/apt/keyrings/githubcli-archive-keyring.gpg \
&& sudo mkdir -p -m 755 /etc/apt/sources.list.d \
&& echo "deb [arch=$(dpkg --print-architecture) signed-by=/etc/apt/keyrings/githubcli-archive-keyring.gpg] https://cli.github.com/packages stable main" | sudo tee /etc/apt/sources.list.d/github-cli.list > /dev/null \
&& sudo apt update \
&& sudo apt install gh -y
```
Verify the version, run:
```shellscript theme={null}
gh --version
```
You should get:
```text theme={null}
nico@gcp-vm-behind-firewall:~$ gh --version
gh version 2.100.0 (2026-09-03)
https://github.com/cli/cli/releases/tag/v2.100.0
```
Then authenticate the `gh` cli against your GHES instance, run:
```shellscript wrap theme={null}
echo "" | gh auth login --hostname --with-token
```
Then verify `gh` is properly authenticated, run:
```shellscript theme={null}
gh auth status
```
You should see:
```plain text theme={null}
nico@gcp-vm-behind-firewall:~$ gh auth status
ghes.internal
✓ Logged in to ghes.internal account nico (/home/nico/.config/gh/hosts.yml)
- Active account: true
- Git operations protocol: https
- Token: github_pat_********************************************************
```
### Start the daemon
cd into \~/workspace/
Run
```shell theme={null}
nano ~/.augment/session.json
```
Paste in there the content of session.json you retrieved earlier when creating the Augment service account. Then CTRL-O + RETURN to save the file and CTRL-X + RETURN to exit
Install Auggie
```bash theme={null}
npm install -g @augmentcode/auggie
```
Start the Cosmos daemon using the Augment service account and attach the daemon to the pool, run:
```shell wrap theme={null}
auggie daemon --pool-id --discover-workspaces=2 --allow-indexing
```
That will start the daemon, you should see this:
```text theme={null}
nico@gcp-vm-behind-firewall:~/workspace$ auggie daemon --pool-id pool-352df5e6-8b03-4c55-b622-32ce65e21bf8 --discover-workspaces=2 --allow-indexing
2026-09-07 14:12:41.582 [info] 'daemon': Git version: 2.34.1 (daemon minimum: 2.31.0)
2026-09-07 14:12:41.595 [info] 'git-worktree-support': Git worktree support unavailable; treating workspace as UNSUPPORTED
2026-09-07 14:12:41.614 [info] 'git-worktree-support': Git worktree support unavailable; treating workspace as UNSUPPORTED
2026-09-07 14:12:41.625 [info] 'daemon': Launch dir is a non-git container; adopting 1 discovered git repo(s) as workspaces:
2026-09-07 14:12:41.626 [info] 'daemon': Discovered workspace: /home/nico/workspace/nico/ecomm-stack (git)
2026-09-07 14:12:41.626 [info] 'daemon': Git worktree support: supported
2026-09-07 14:12:41.634 [info] 'DaemonState': Loaded existing daemon state with VM ID: 7f6ae36c-f3a6-4e06-93ea-946d3a43a70b
2026-09-07 14:12:41.635 [info] 'daemon': Loaded VM ID from state: 7f6ae36c-f3a6-4e06-93ea-946d3a43a70b
2026-09-07 14:12:41.635 [info] 'daemon': Joining daemon pool: pool-352df5e6-8b03-4c55-b622-32ce65e21bf8
2026-09-07 14:12:41.645 [info] 'daemon': Daemon auto-update is DISABLED because it is gated by the cli_daemon_auto_update_enabled feature flag, which is off for this account
2026-09-07 14:12:41.646 [info] 'daemon': Configured 1 additional workspace(s):
2026-09-07 14:12:41.646 [info] 'daemon': Additional workspace: /home/nico/workspace/nico/ecomm-stack (git)
2026-09-07 14:12:41.649 [info] 'daemon': Indexing enabled for workspace: /home/nico/workspace
2026-09-07 14:12:41.649 [info] 'daemon': Indexing enabled for workspace: /home/nico/workspace/nico/ecomm-stack
2026-09-07 14:12:41.650 [info] 'daemon': Starting Auggie Daemon...
2026-09-07 14:12:41.650 [info] 'daemon': VM ID: 7f6ae36c-f3a6-4e06-93ea-946d3a43a70b
2026-09-07 14:12:41.650 [info] 'daemon': Name: gcp-vm-behind-firewall:workspace
2026-09-07 14:12:41.650 [info] 'daemon': Workspace: /home/nico/workspace
2026-09-07 14:12:41.650 [info] 'daemon': Max Agents: 100
2026-09-07 14:12:41.650 [info] 'daemon': Additional Workspaces: 1
2026-09-07 14:12:41.650 [info] 'daemon': - /home/nico/workspace/nico/ecomm-stack
2026-09-07 14:12:41.652 [info] 'daemon': Connecting to Cosmos...
2026-09-07 14:12:41.652 [info] 'daemon': URL: wss://e2.api.augmentcode.com/cloudagents/vm/ws?vm_id=7f6ae36c-f3a6-4e06-93ea-946d3a43a70b&last_seq_id=0&connection_type=AUGGIE_DAEMON&daemon_name=gcp-vm-behind-firewall%3Aworkspace&max_agents=100&workspace_path=%2Fhome%2Fnico%2Fworkspace&additional_workspace_path=%2Fhome%2Fnico%2Fworkspace%2Fnico%2Fecomm-stack&git_worktree_support=1&git_credential_mode=1&pool_id=pool-352df5e6-8b03-4c55-b622-32ce65e21bf8&cli_version=0.36.0&supports_diff=1&client_capabilities=worktree_cleanup&client_capabilities=git-user-oauth-v1&client_capabilities=git-github-app-v1&client_capabilities=pty&command_capability=EXECUTE_DAEMON_DIFF_OP&command_capability=EXECUTE_DAEMON_FS_OP
2026-09-07 14:12:41.696 [info] 'daemon': WebSocket connected
2026-09-07 14:12:41.779 [info] 'daemon': Daemon registered with Cosmos (multi-workspace: 2 repos)
2026-09-07 14:12:41.779 [info] 'daemon': Heartbeat enabled (5000ms interval)
2026-09-07 14:12:41.780 [info] 'daemon': Received command: CONNECTED (seq: 0)
2026-09-07 14:12:41.781 [info] 'daemon': --> Processing command: CONNECTED
```
Note in your daemon logs:
* “Launch dir is a non-git container; adopting N discovered git repo(s) as workspaces \[…]” ⇒ check that all your local git repos have been discovered under /workspace/
* “Git worktree support: supported”
* “Joining daemon pool: \”
* “Indexing enabled for workspace: \[…]”
* “Starting Auggie Daemon \[…]”
* “Connecting to Cosmos...”
You can now see the daemon running from Cosmos: [cosmos.augmentcode.com](https://cosmos.augmentcode.com/) > Settings > Environments:
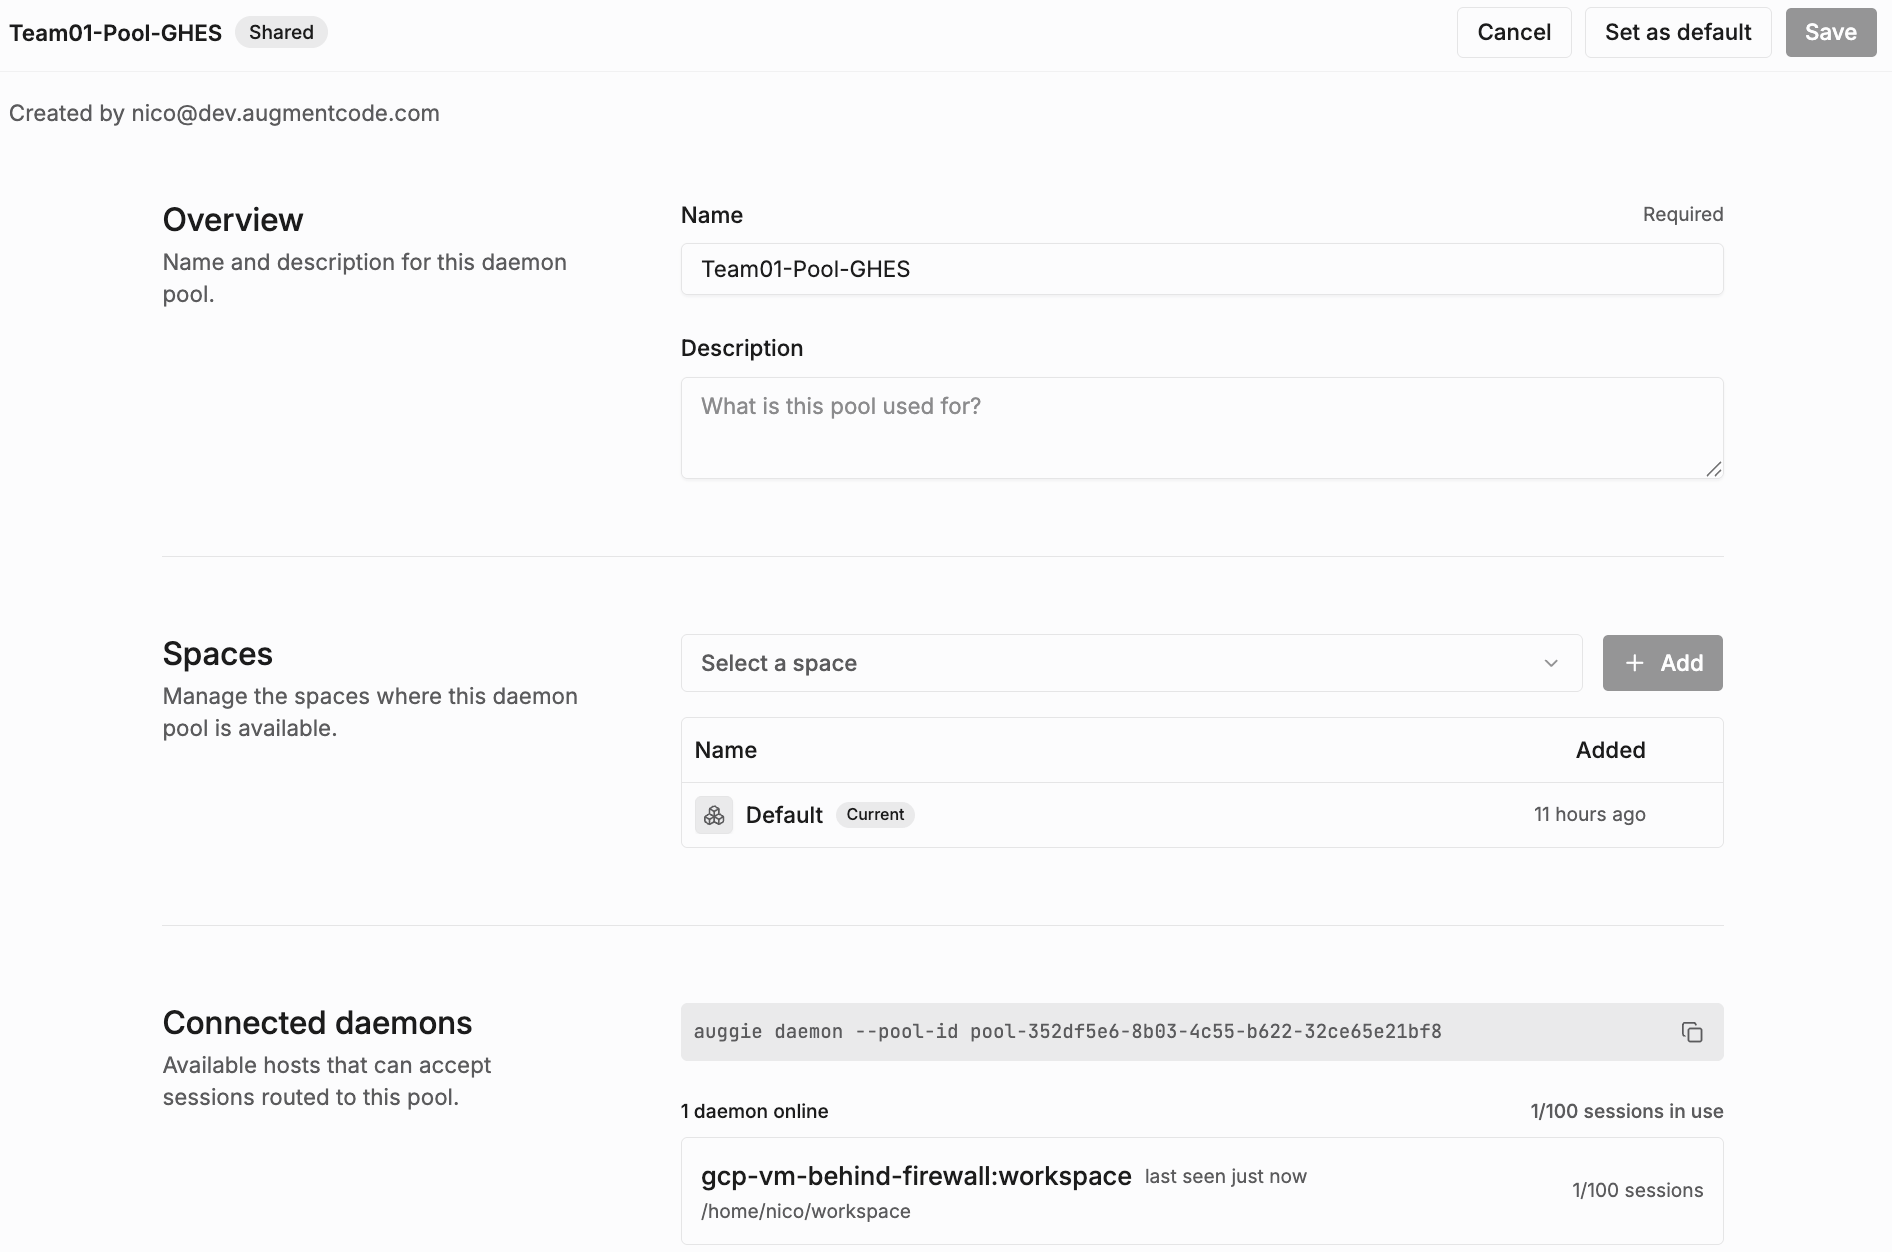
 Click on the pool. Note that 1 daemon is online, and you can see the VM IP/name under Connected daemons. Top right you can set this pool as default environment to run your agents:
 ## Step 6 - Connectivity test
Now you’ll create a session in Cosmos (cloud) and verify it can connect to the VM (internal network), make sense of the local repos and from that VM reach out to GHES via the `gh` CLI.
Go to Cosmos [cosmos.augmentcode.com](https://cosmos.augmentcode.com) > New Session.
Under the prompt, click on the dropdown list with the cloud icon > select Daemon > select your daemon pool:
## Step 6 - Connectivity test
Now you’ll create a session in Cosmos (cloud) and verify it can connect to the VM (internal network), make sense of the local repos and from that VM reach out to GHES via the `gh` CLI.
Go to Cosmos [cosmos.augmentcode.com](https://cosmos.augmentcode.com) > New Session.
Under the prompt, click on the dropdown list with the cloud icon > select Daemon > select your daemon pool:
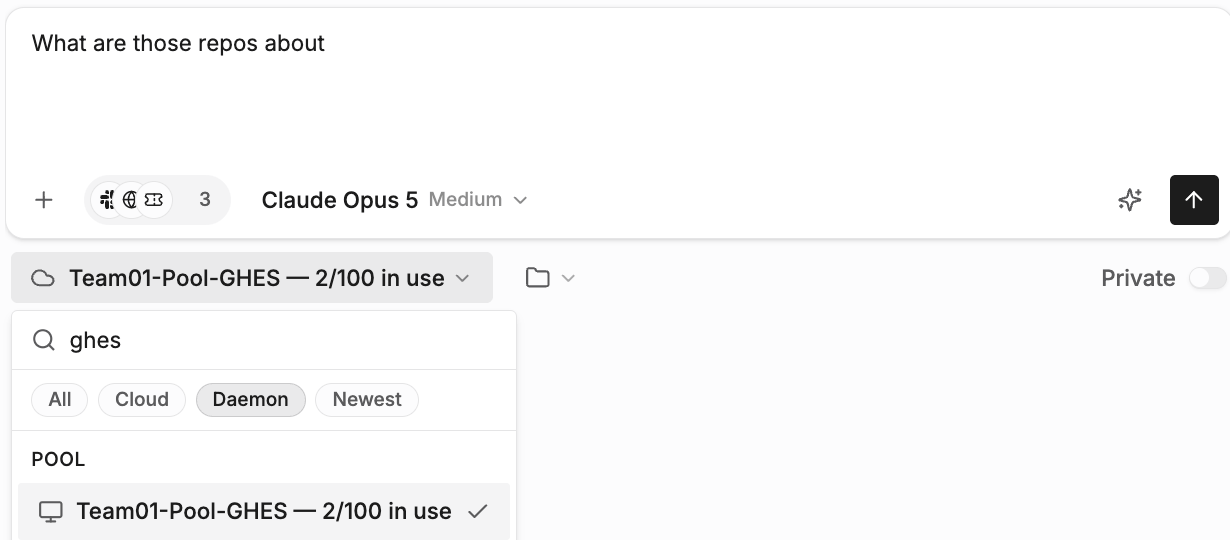 Hover over Integrations and make sure "Github App" isn't selected (that's only for github.com):
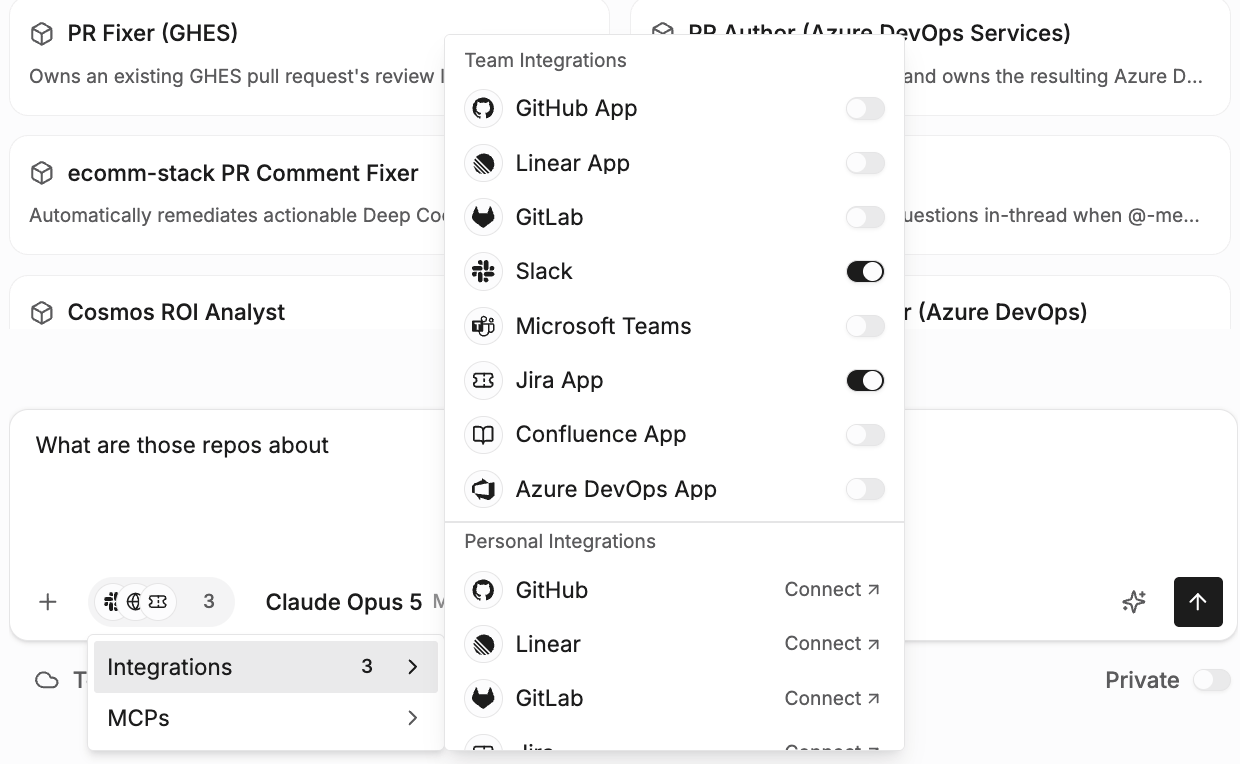 Prompt the session with **What are those repos about?**, you should see a response powered by the Augment Context Engine that already made sense of your repos:
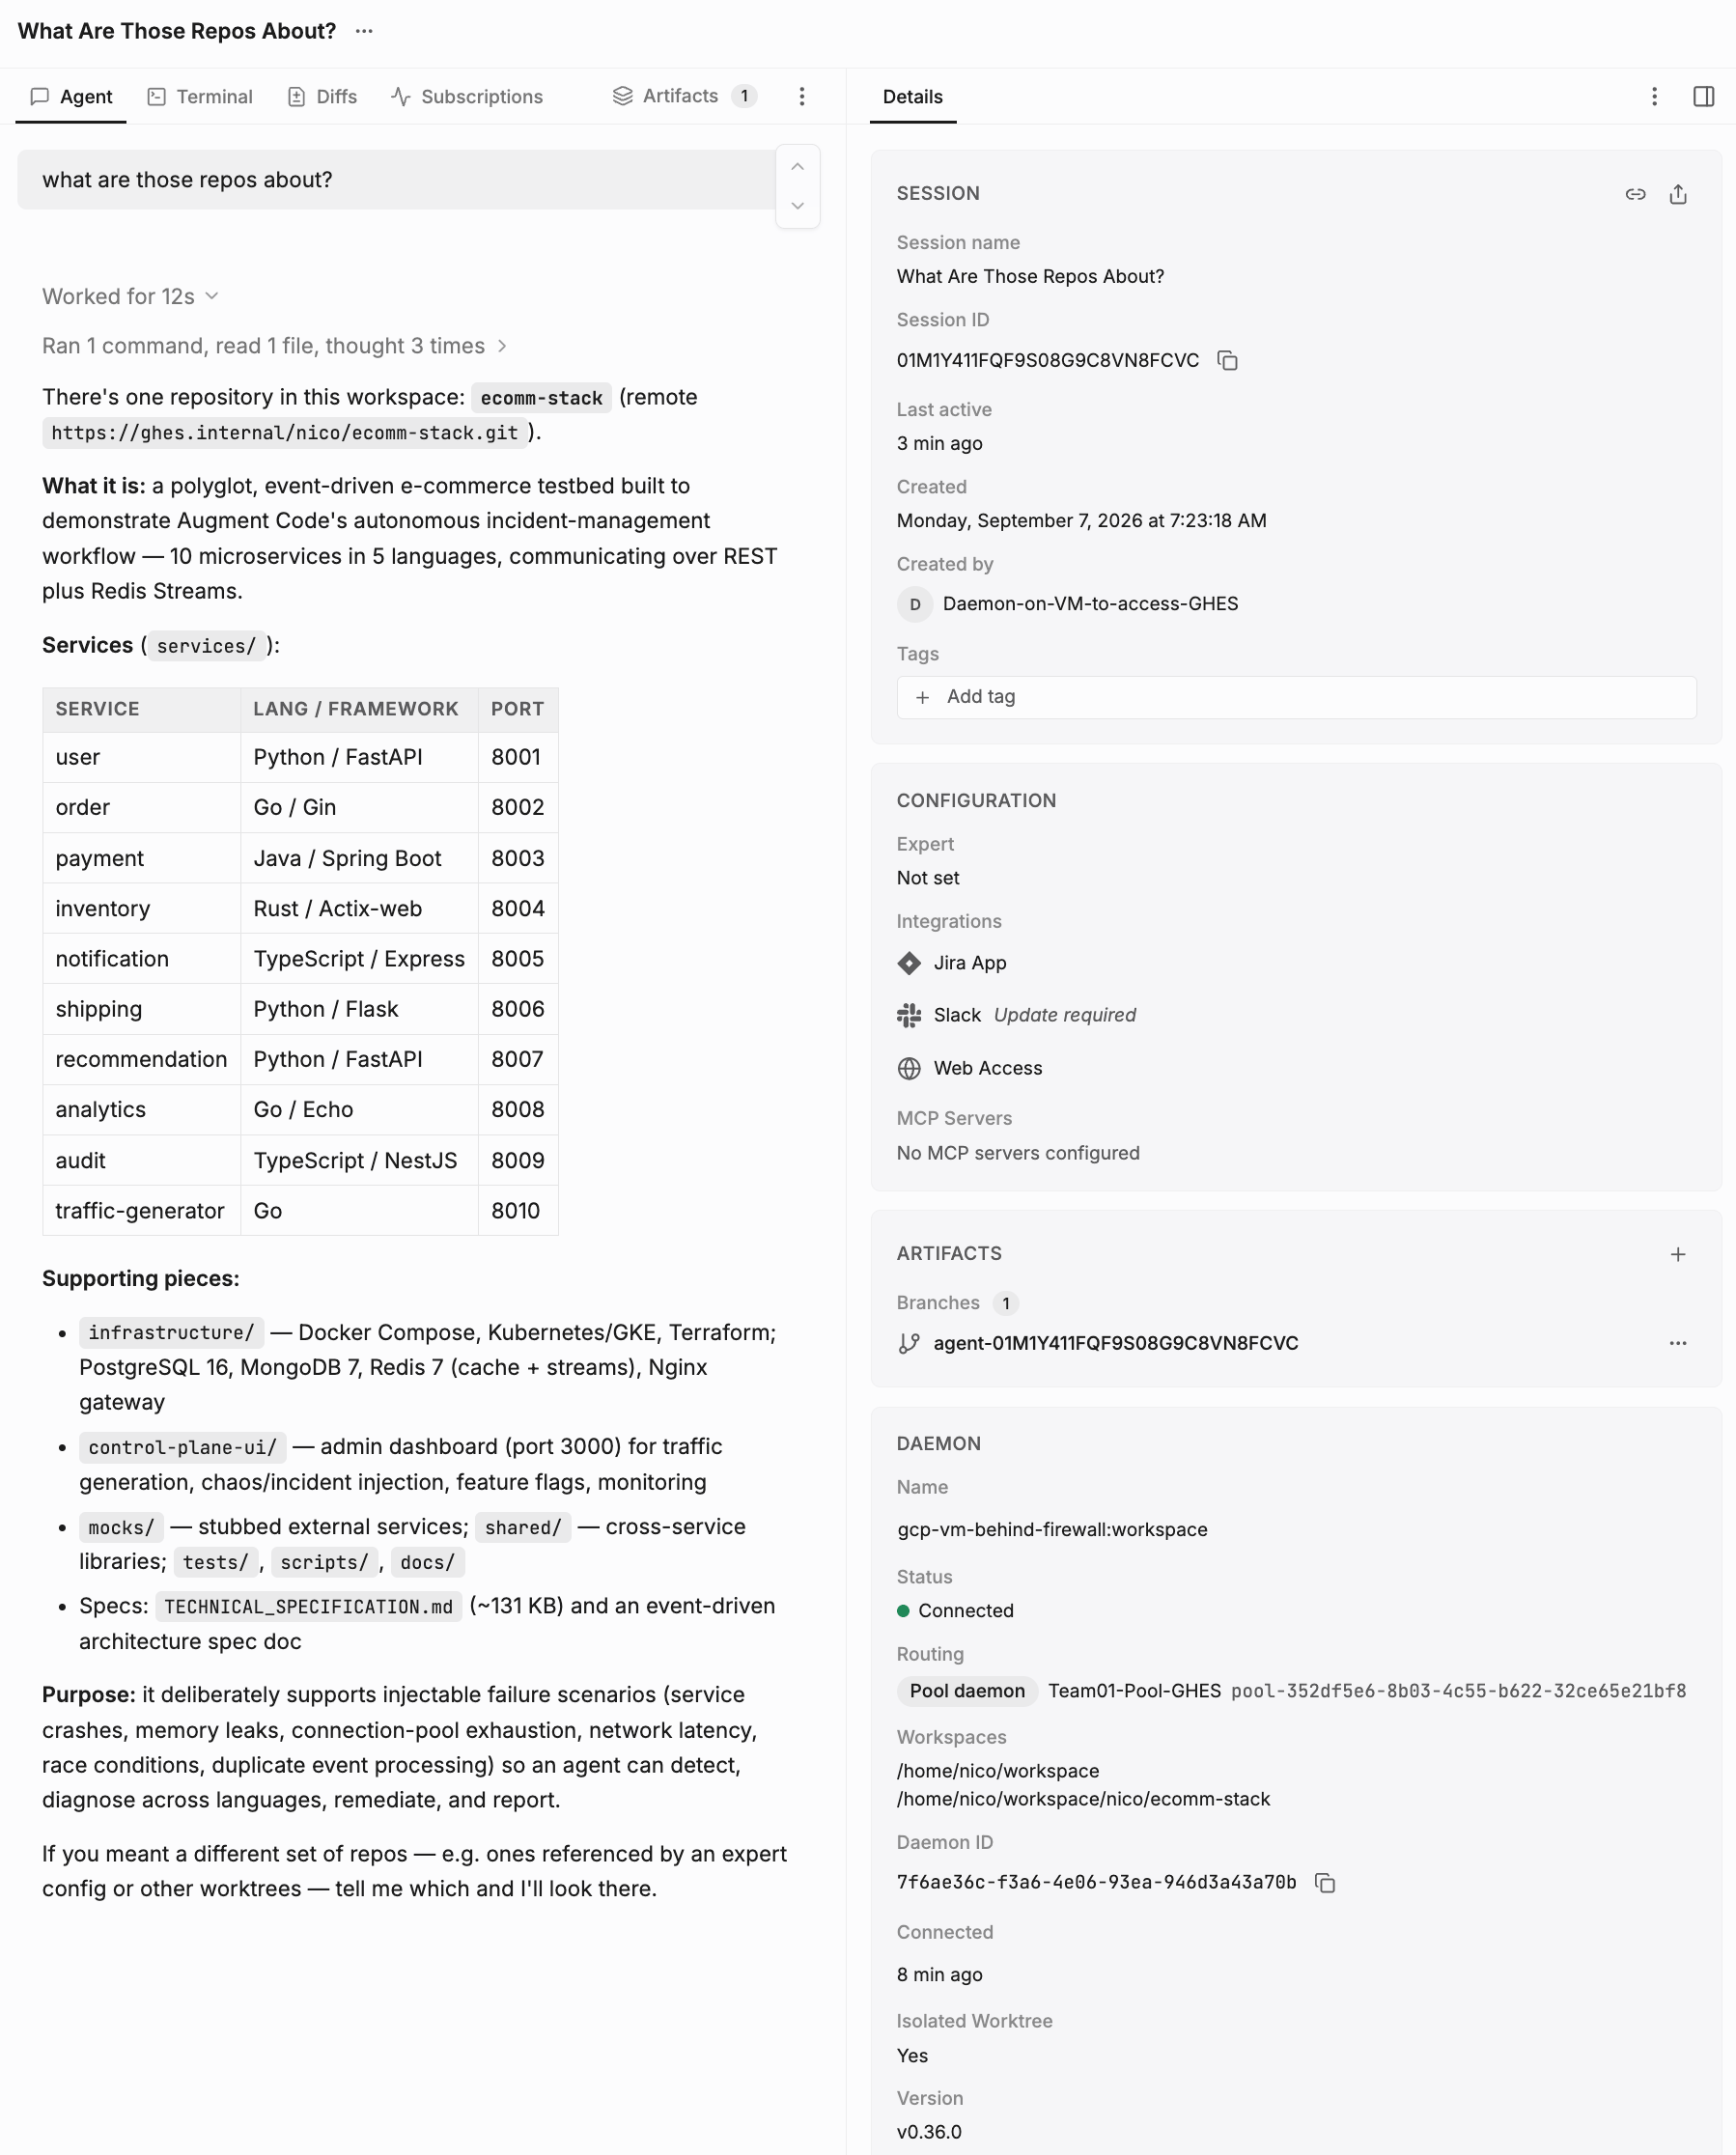 The connectivity between Cosmos (cloud) and your remote VM has been verified ✅
Now prompt the session with:
```text theme={null}
Use the gh cli to look up
```
The connectivity between Cosmos (cloud) and your remote VM has been verified ✅
Now prompt the session with:
```text theme={null}
Use the gh cli to look up
```
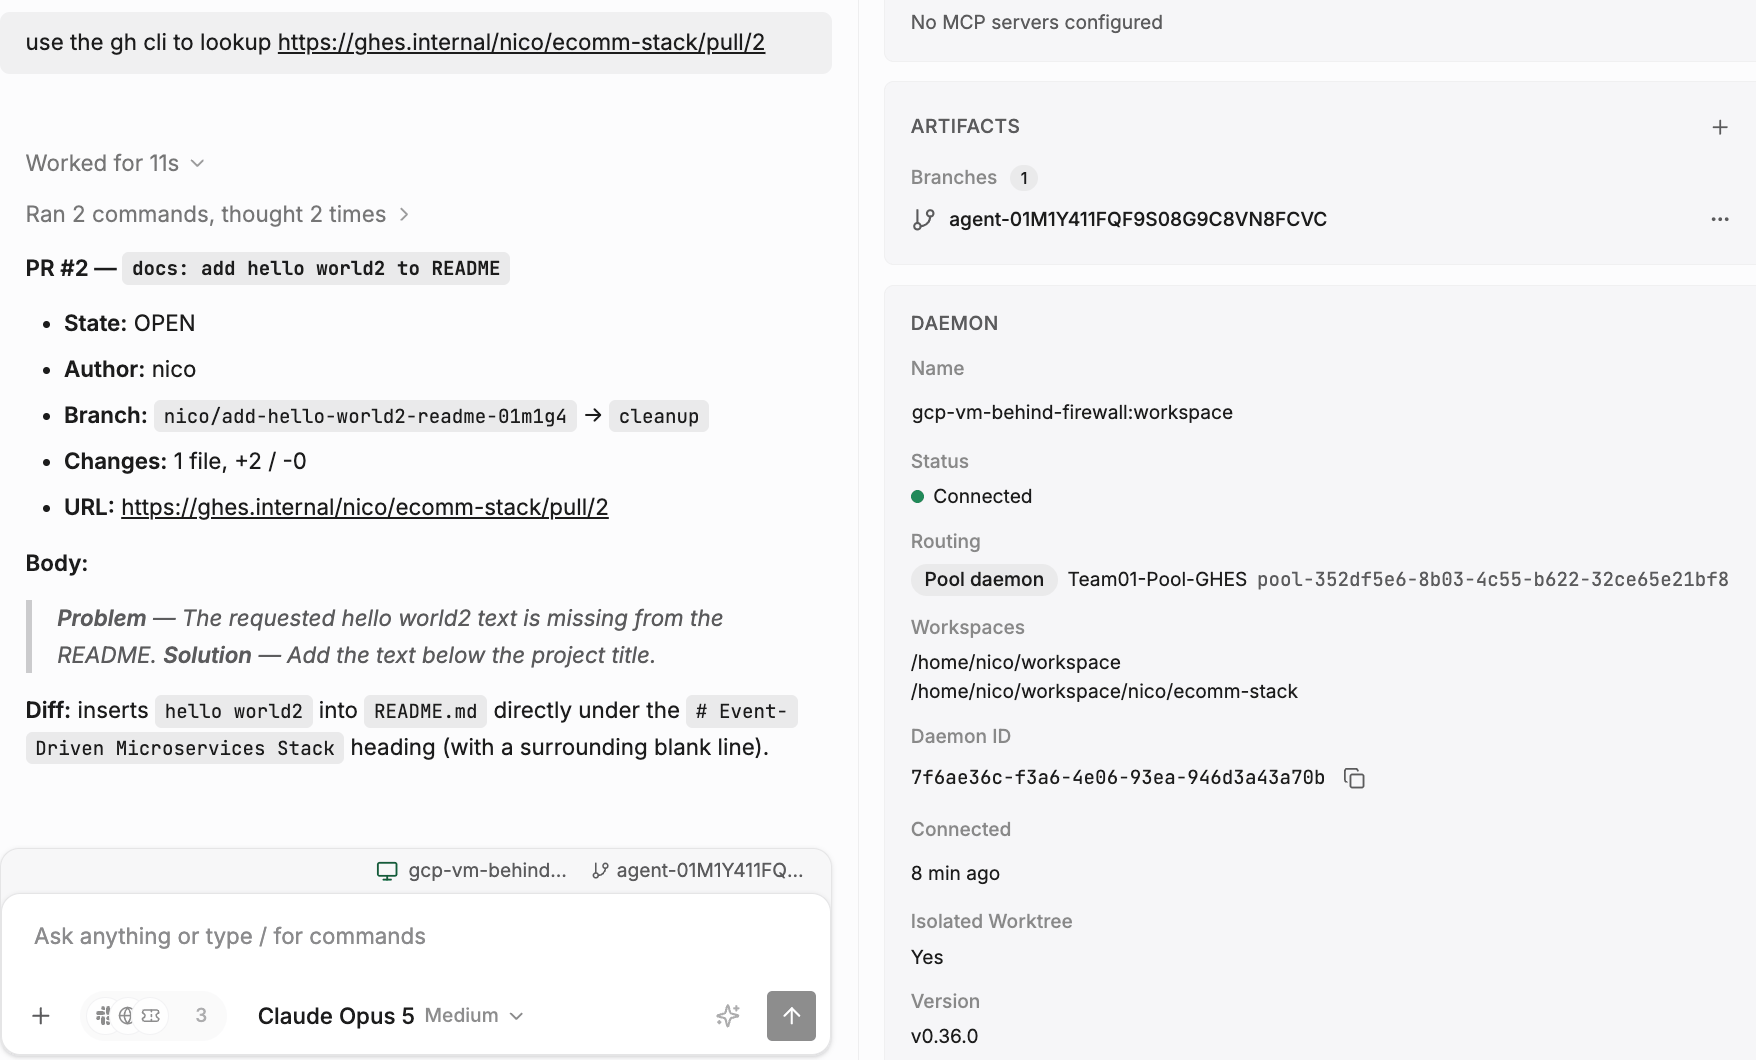 Observe that the Cosmos session was able to use the `gh` cli to lookup the PR.
## Step 7 - Create your Cosmos Experts
Now that connectivity is established, you can focus on creating your Cosmos experts.
You're now ready to deploy the yellow code producing loop of the v1.0 software factory there [https://docs.nicopowered.com/cosmos-core-loops-software-factory](https://docs.nicopowered.com/cosmos-core-loops-software-factory)
Observe that the Cosmos session was able to use the `gh` cli to lookup the PR.
## Step 7 - Create your Cosmos Experts
Now that connectivity is established, you can focus on creating your Cosmos experts.
You're now ready to deploy the yellow code producing loop of the v1.0 software factory there [https://docs.nicopowered.com/cosmos-core-loops-software-factory](https://docs.nicopowered.com/cosmos-core-loops-software-factory)
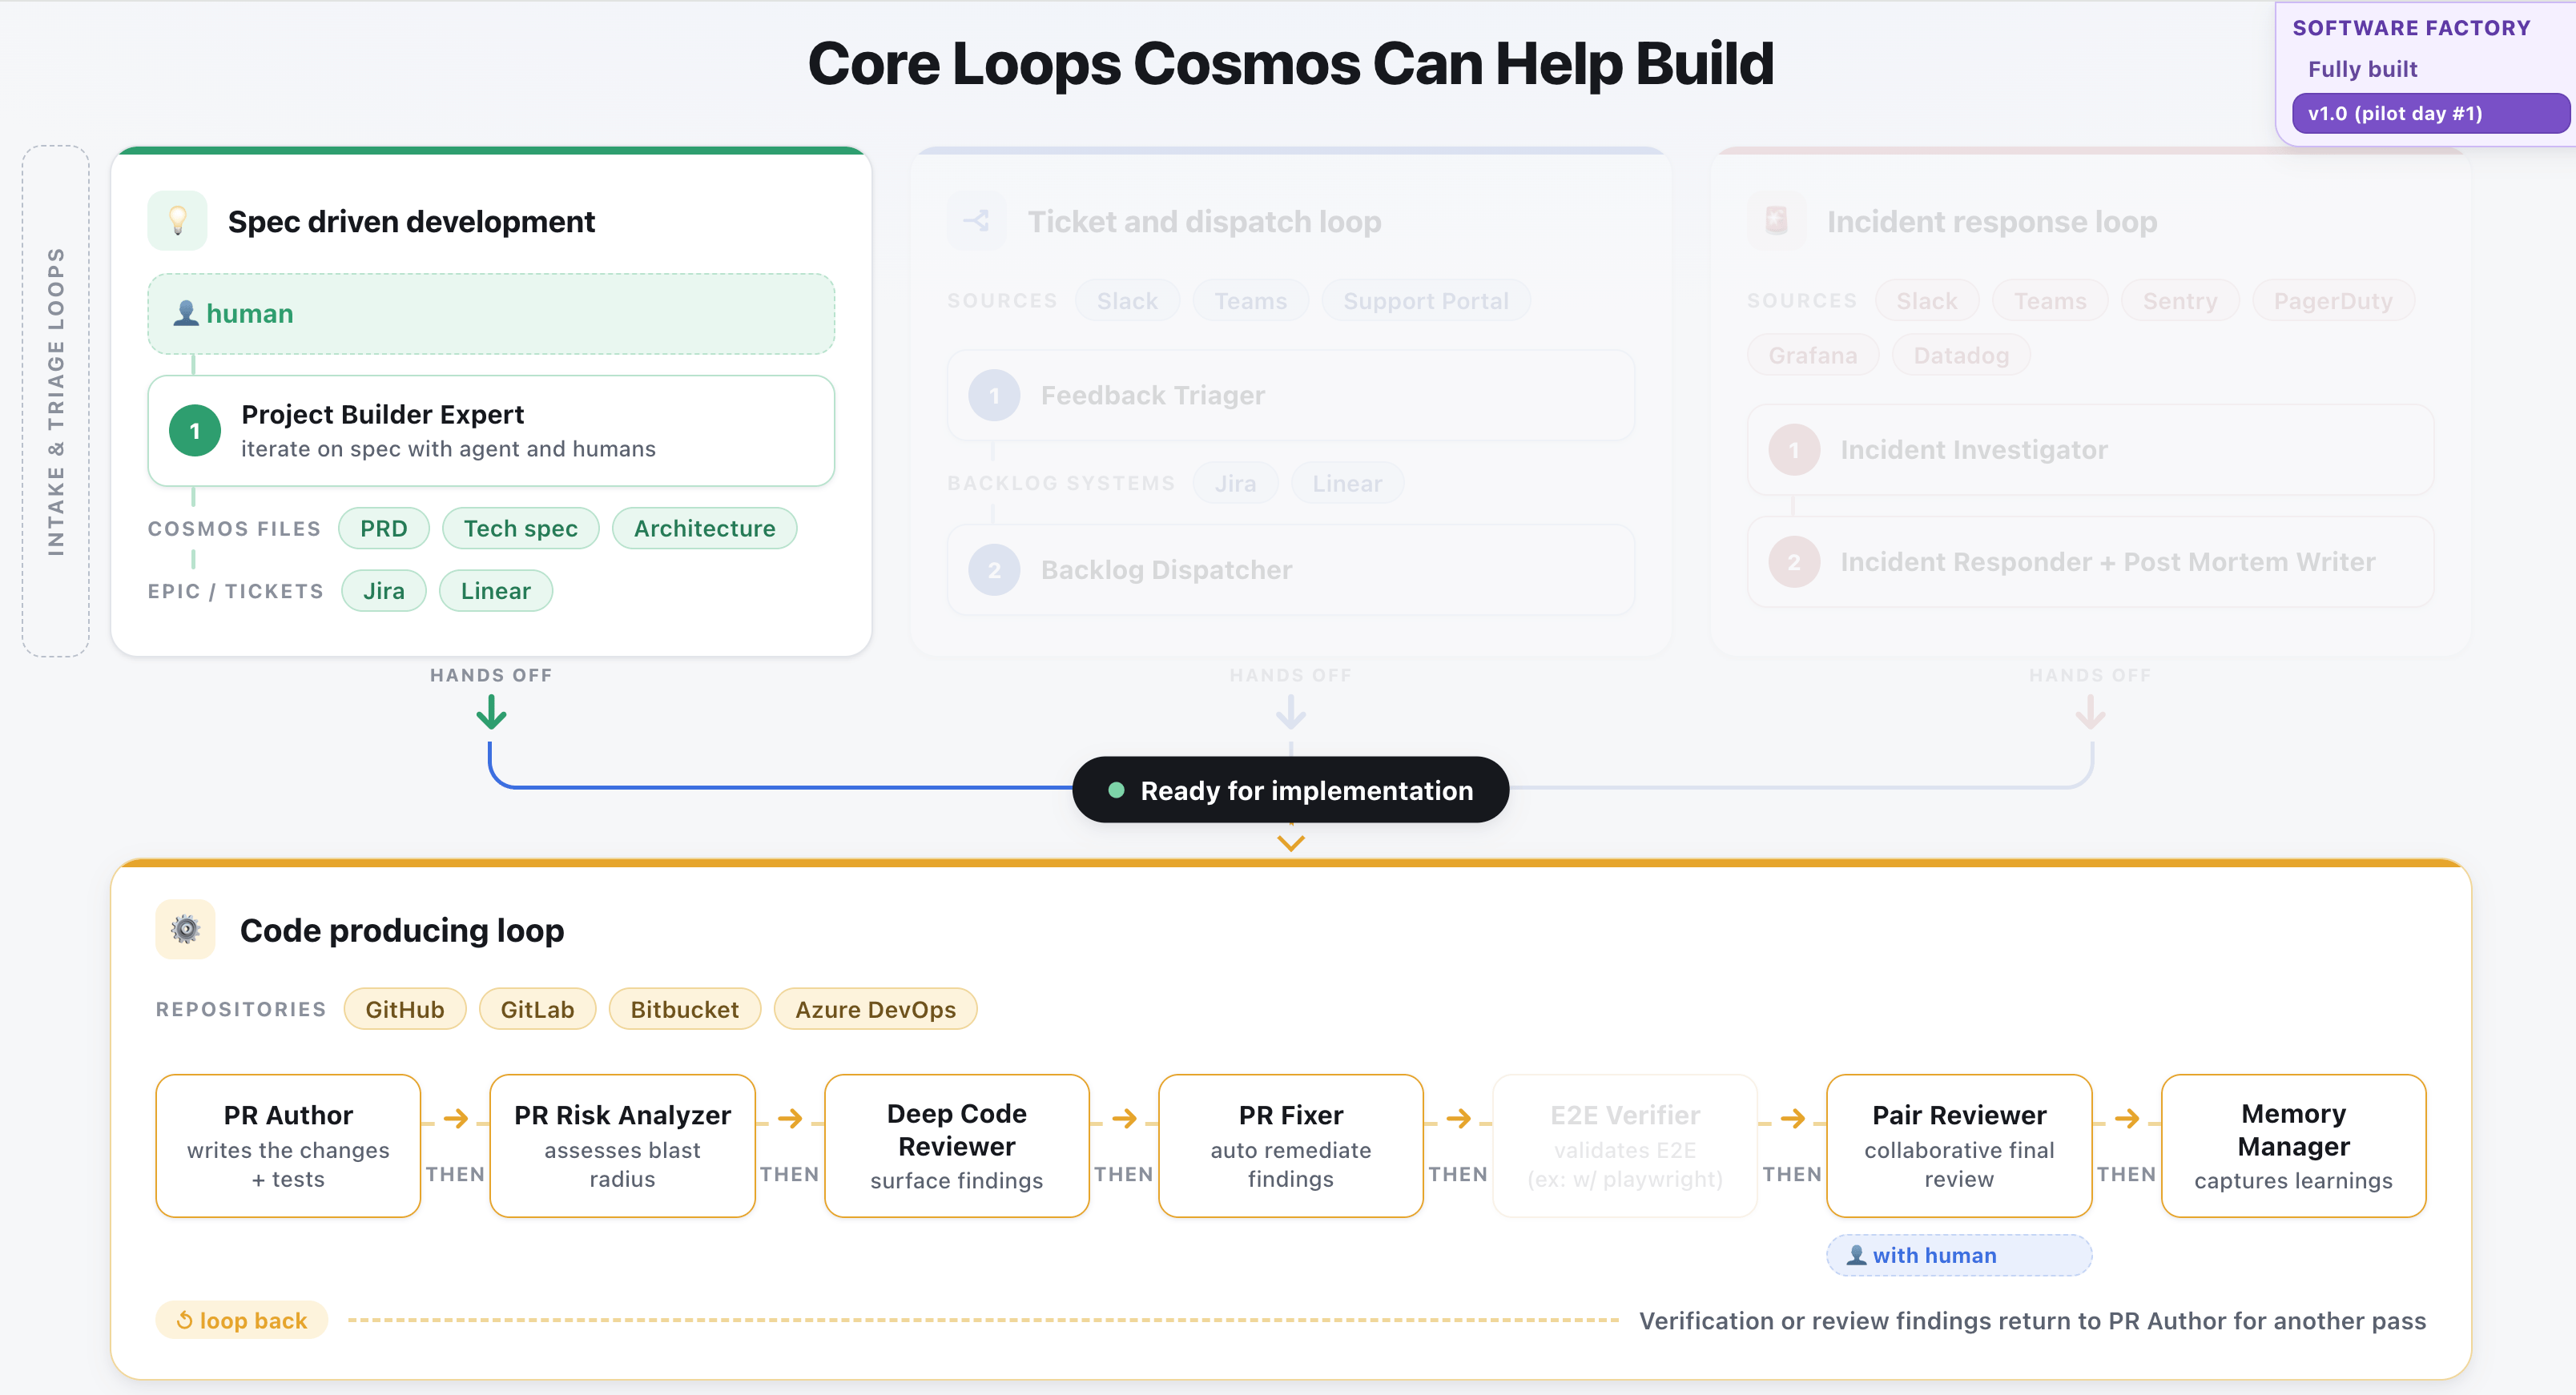 Go to Cosmos [cosmos.augmentcode.com](https://cosmos.augmentcode.com) > New Session > Select Cosmos Advisor > Make sure your GHES daemon pool is selected as environment, then edit and prompt with:
```text wrap theme={null}
Create a PR Author, a PR Risk Analyzer, a Deep Code Reviewer, a PR Fixer, a Pair Reviewer. You must use the gh cli (do not use the github app anywhere. I already configured the webhook that listens to GHES events . My GHES repos are cloned on the VM available via the attached daemon pool. You must use the attached daemon pool for all the experts you're about to deploy. Make sure the experts are shared with as owner, and can-view with the rest of the organization.
```
You should see this before submitting:
Go to Cosmos [cosmos.augmentcode.com](https://cosmos.augmentcode.com) > New Session > Select Cosmos Advisor > Make sure your GHES daemon pool is selected as environment, then edit and prompt with:
```text wrap theme={null}
Create a PR Author, a PR Risk Analyzer, a Deep Code Reviewer, a PR Fixer, a Pair Reviewer. You must use the gh cli (do not use the github app anywhere. I already configured the webhook that listens to GHES events . My GHES repos are cloned on the VM available via the attached daemon pool. You must use the attached daemon pool for all the experts you're about to deploy. Make sure the experts are shared with as owner, and can-view with the rest of the organization.
```
You should see this before submitting:
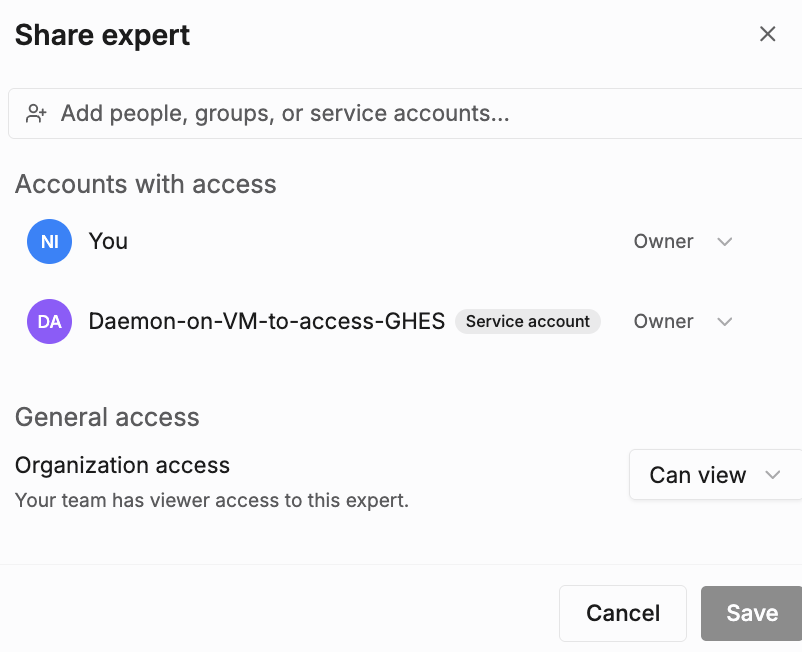
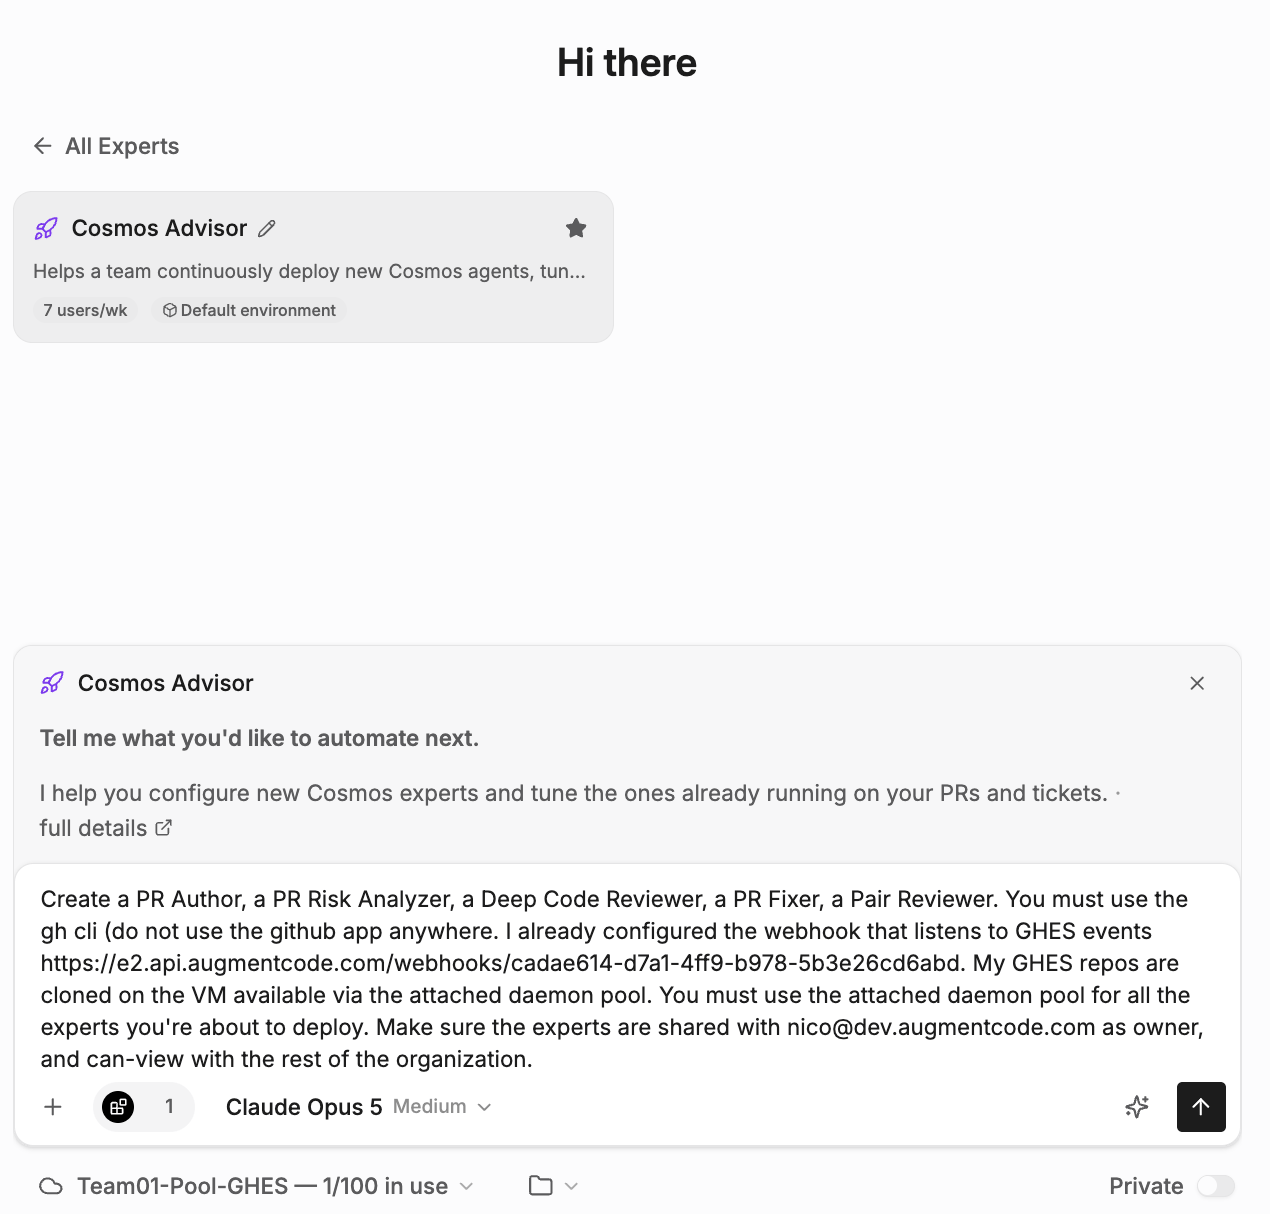 In the prompt you explicitly asked "Make sure the experts are shared with \ as owner" as by default the owner would be the Augment service account you authenticated the daemon pool with
You should see this after submitting:
In the prompt you explicitly asked "Make sure the experts are shared with \ as owner" as by default the owner would be the Augment service account you authenticated the daemon pool with
You should see this after submitting:
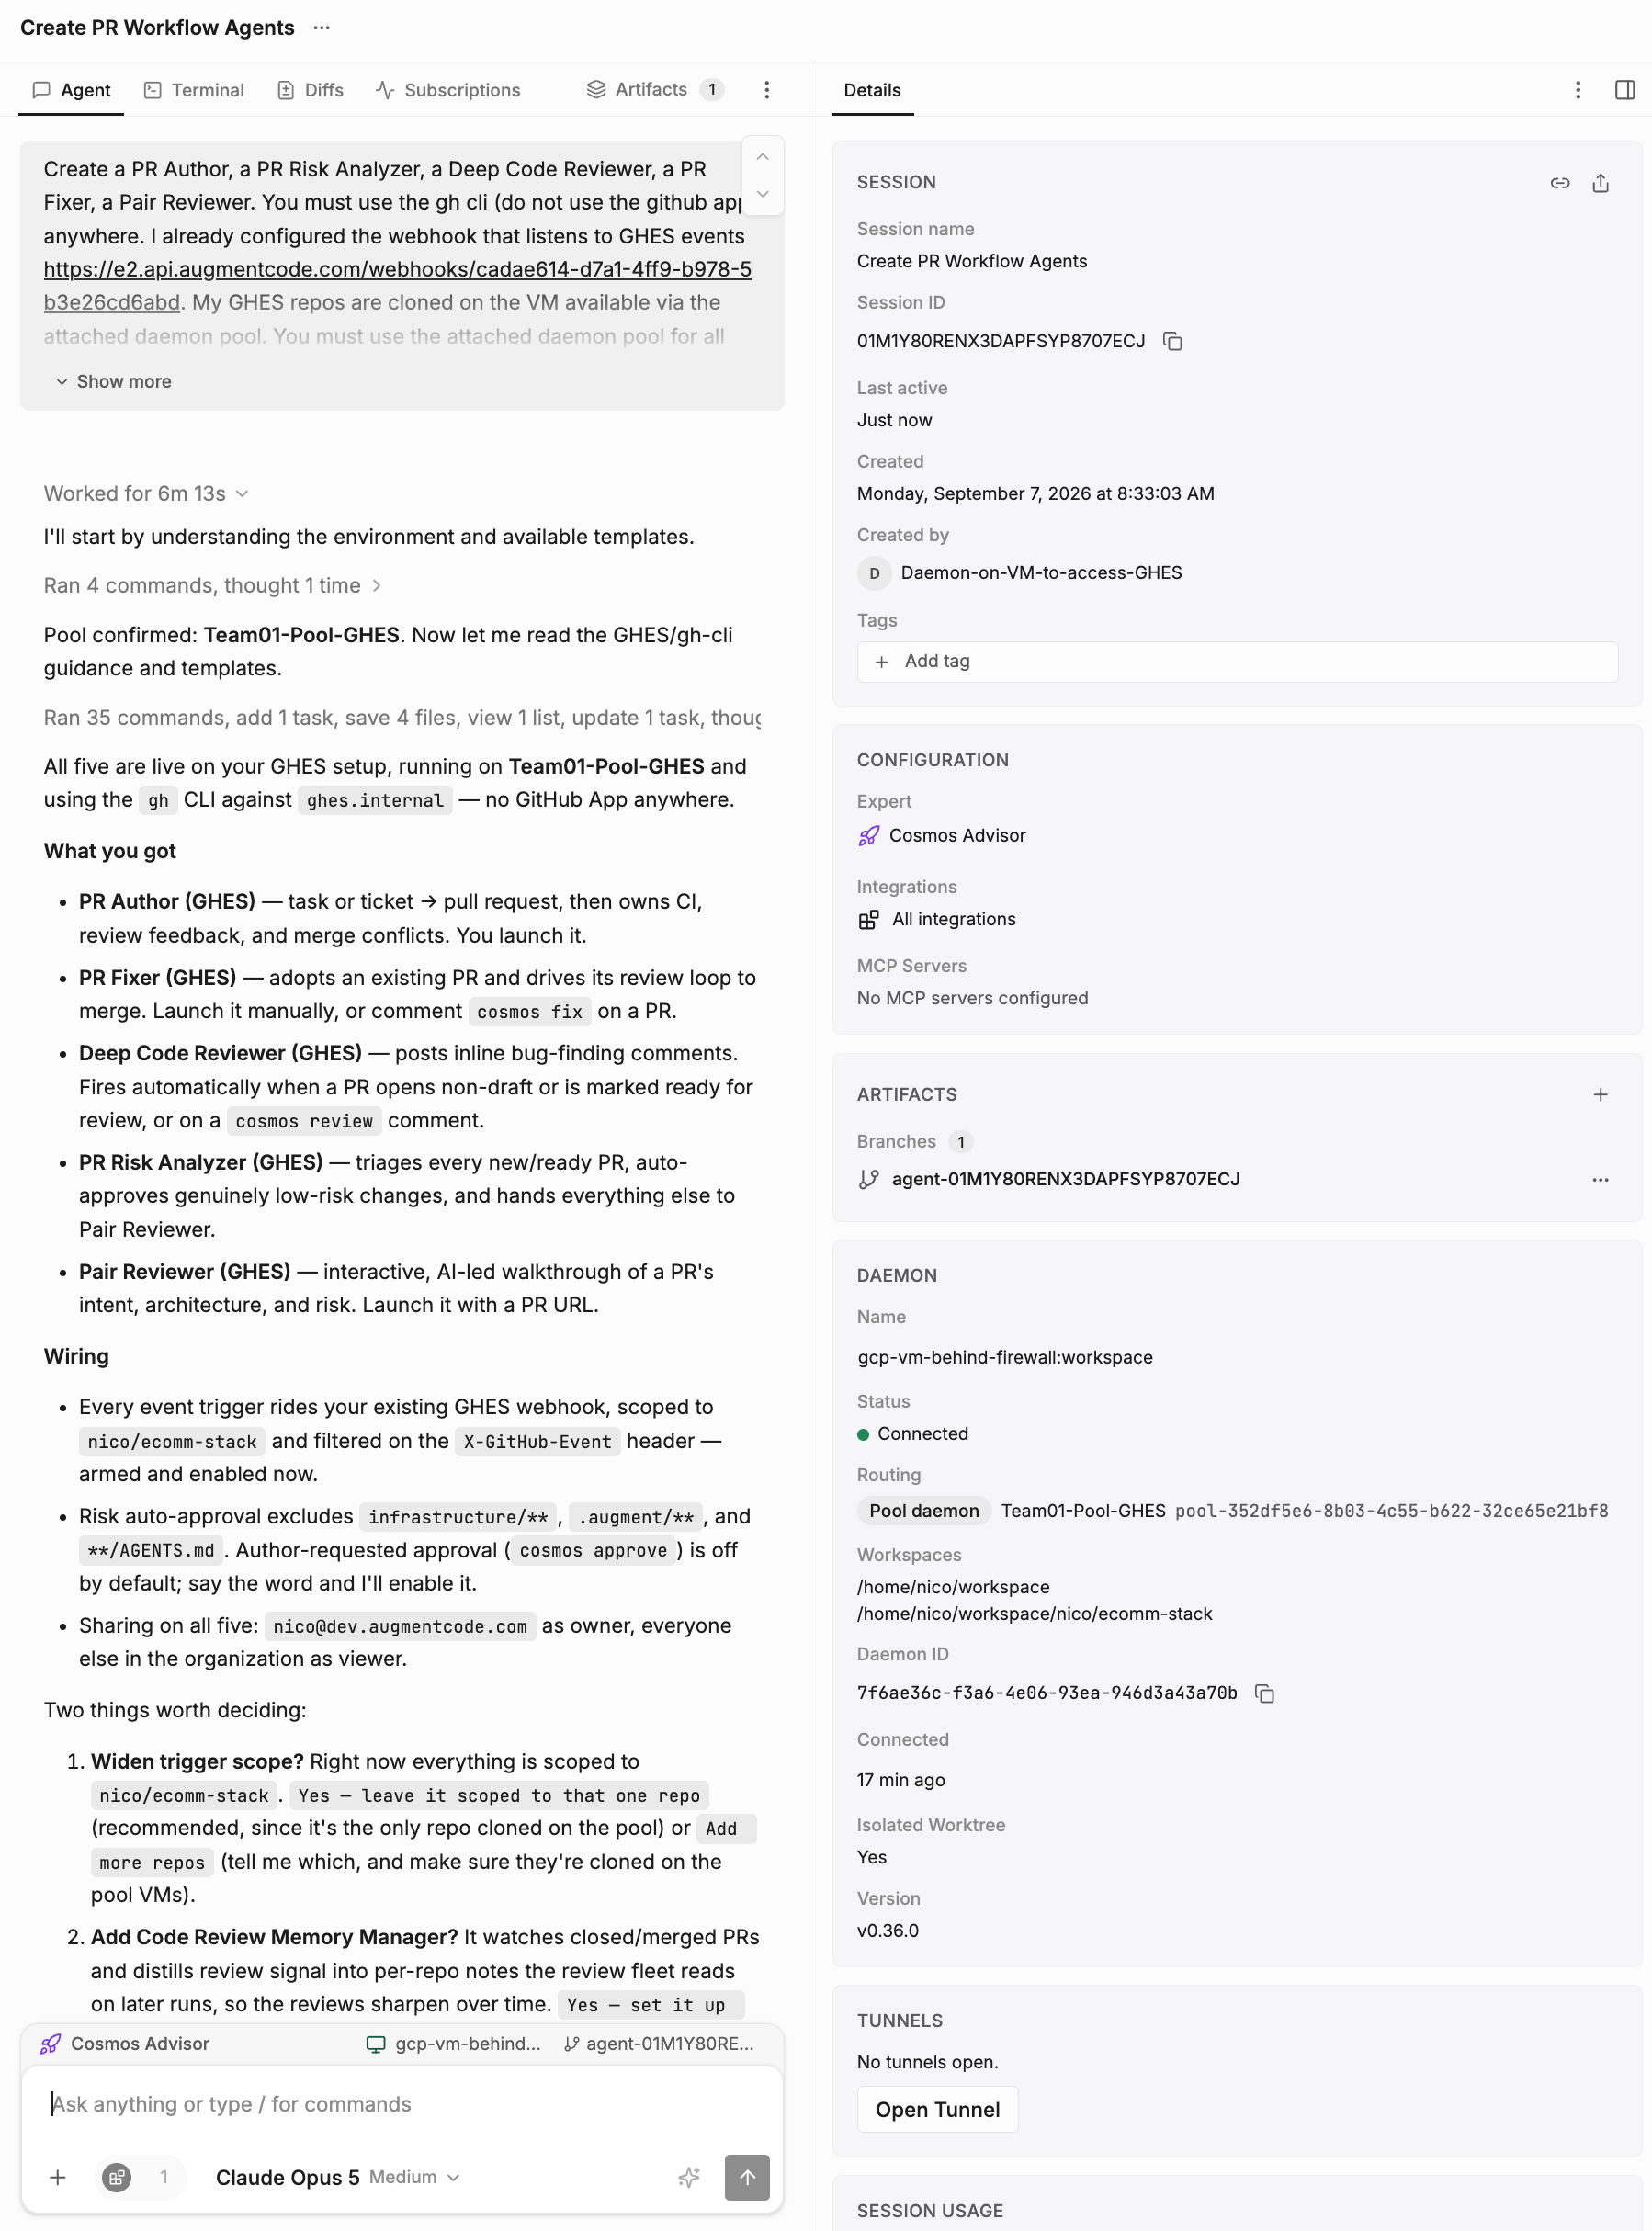 Advisor will also recommend experts you should consider, as it did above for the Code Review Memory Manager. In a separate session you could also ask Advisor "what are all the experts you could help me deploy for my software factory"
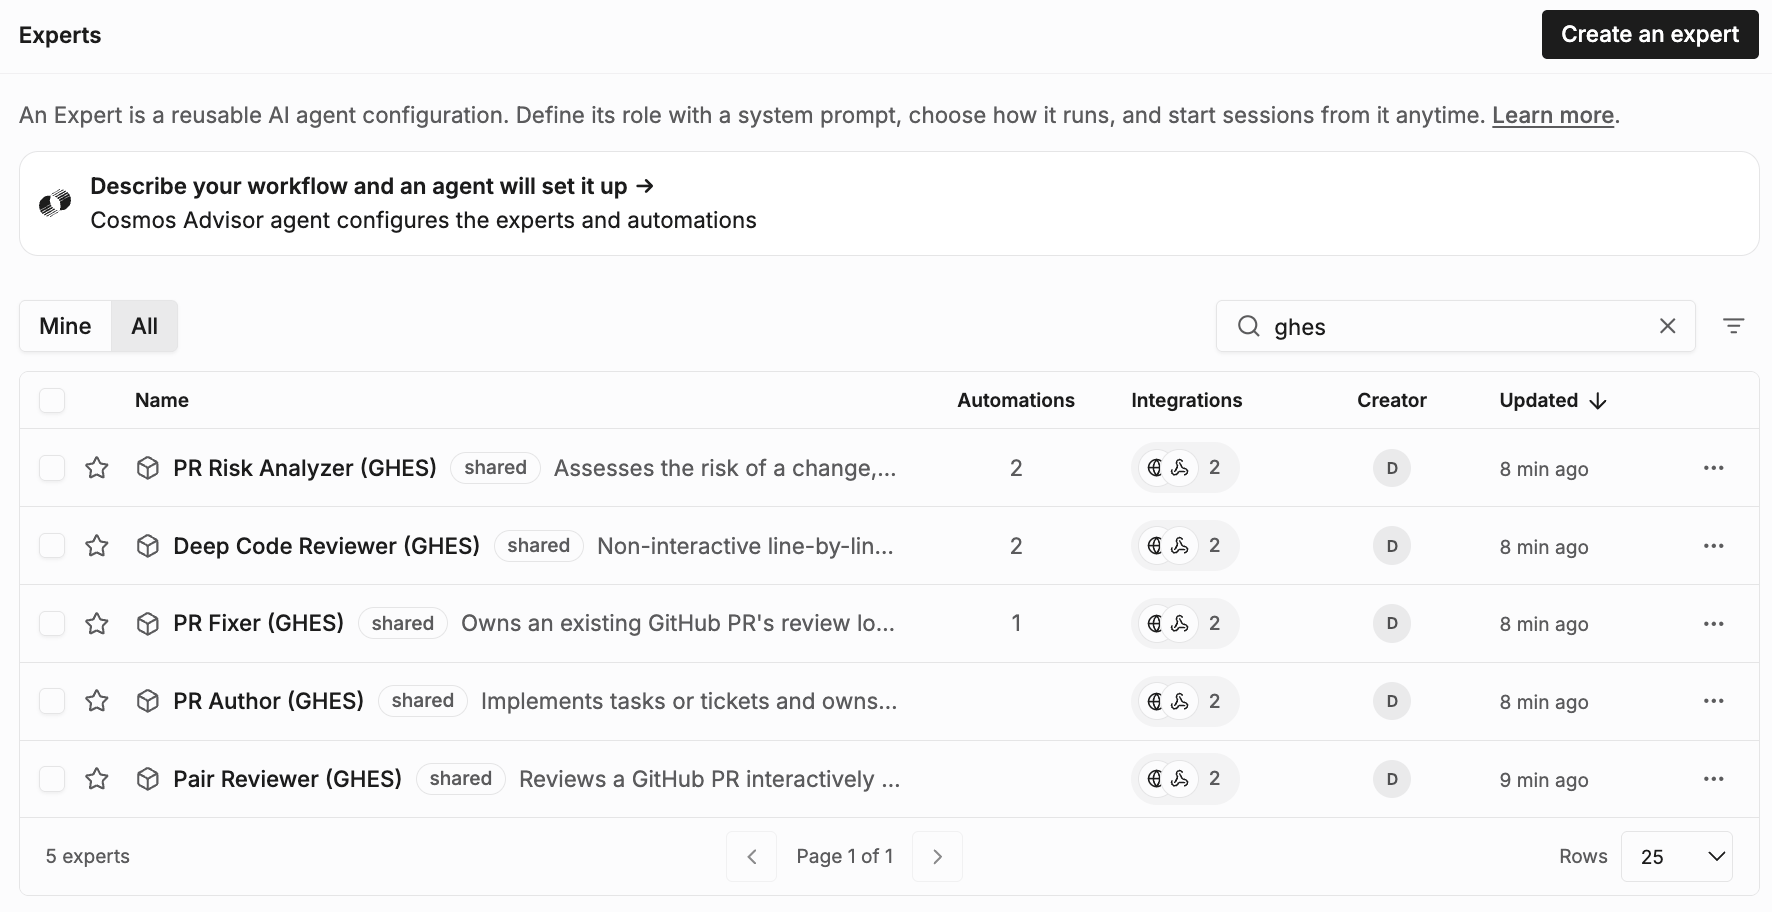
Your experts are now deployed, you can see them under [cosmos.augmentcode.com](https://cosmos.augmentcode.com) > Settings > Experts > All tab:
Advisor will also recommend experts you should consider, as it did above for the Code Review Memory Manager. In a separate session you could also ask Advisor "what are all the experts you could help me deploy for my software factory"
Your experts are now deployed, you can see them under [cosmos.augmentcode.com](https://cosmos.augmentcode.com) > Settings > Experts > All tab:
 When you click on an expert > Share expert you can see Advisor applied the permissions you requested:
 The experts are 'stitched' together under [cosmos.augmentcode.com](https://cosmos.augmentcode.com) > Settings > Automations > All tab. You can expand the first Deep Code Reviewer (GHES) automation and observe the high level events this expert will react to:
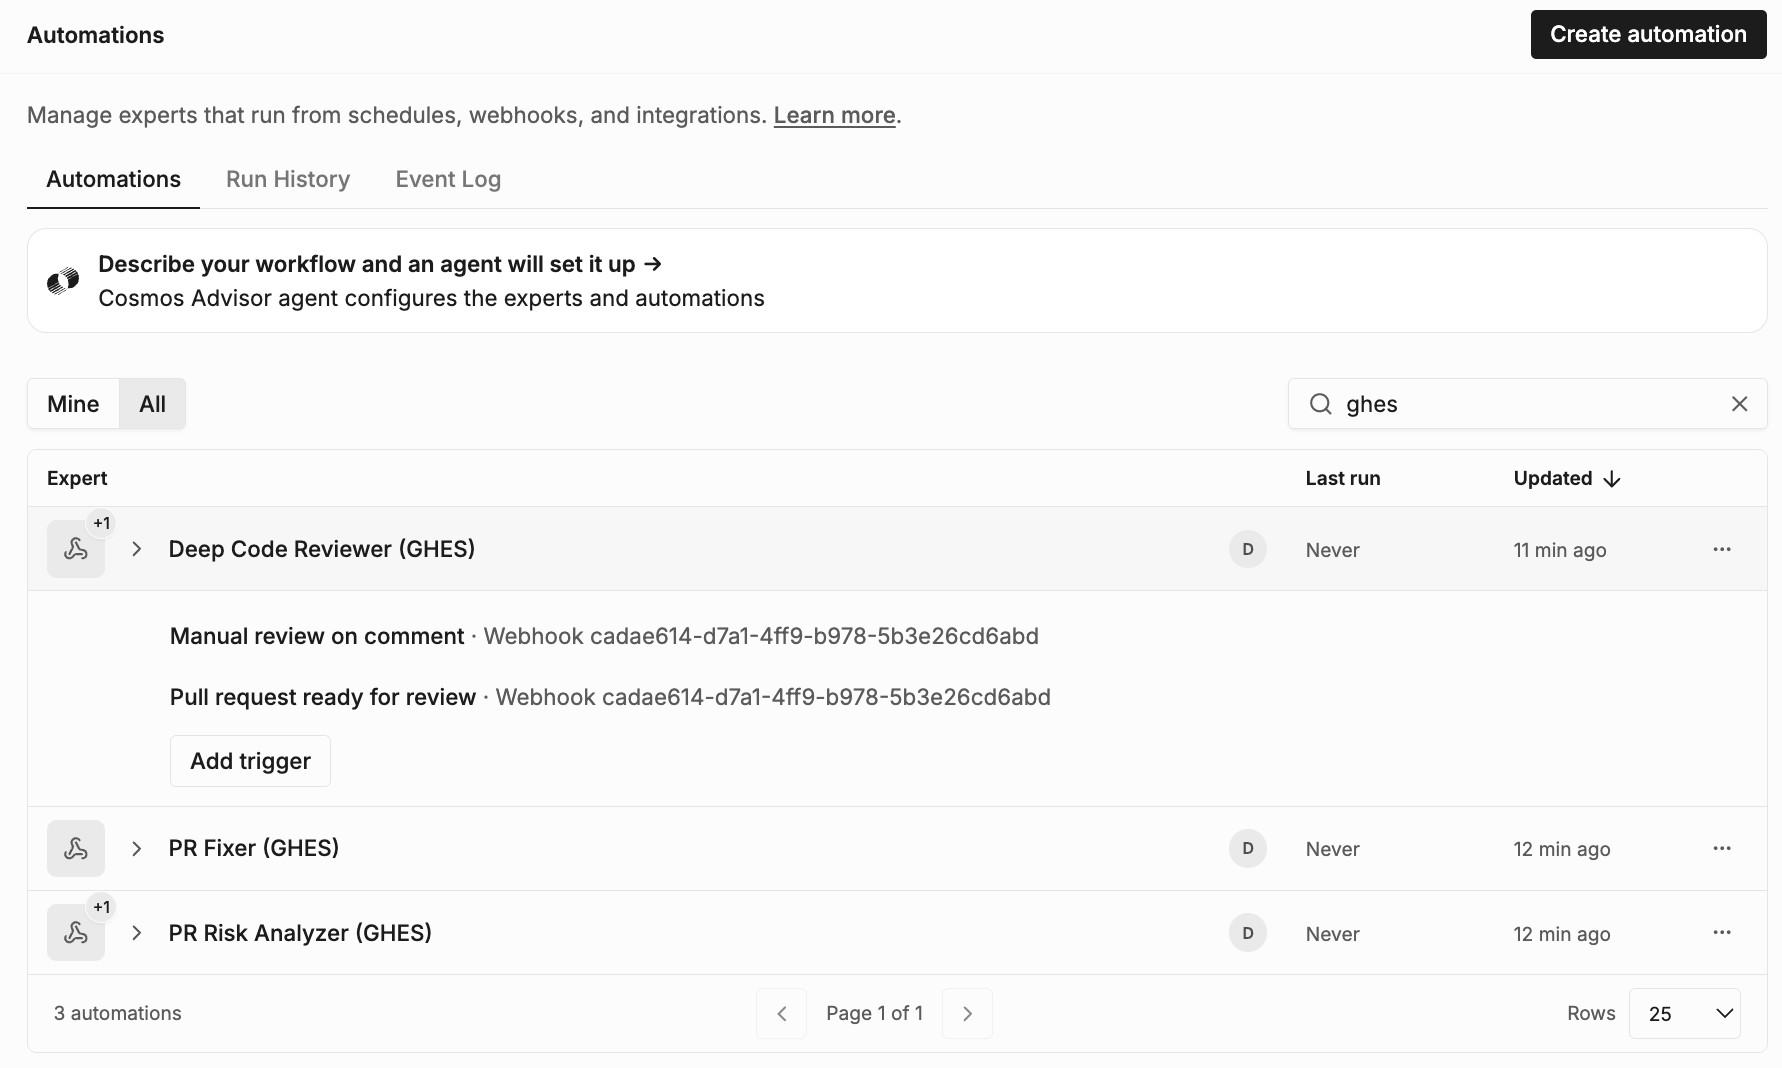 You can instruct Advisor to update your experts and use other native integrations (ex: Jira/Atlassian) as often you'll want to author PRs based on a ticket
## Step 8 - Test your PR author
Create a sample PR to test your PR author. Go to [cosmos.augmentcode.com](https://cosmos.augmentcode.com) > New session > Select PR Author (GHES) and prompt with:
```text theme={null}
create a hello world banner on the top of the main UI
```
or, if you already deployed your experts with the native Jira integration:
```text theme={null}
implement this Jira ticket
```
You can instruct Advisor to update your experts and use other native integrations (ex: Jira/Atlassian) as often you'll want to author PRs based on a ticket
## Step 8 - Test your PR author
Create a sample PR to test your PR author. Go to [cosmos.augmentcode.com](https://cosmos.augmentcode.com) > New session > Select PR Author (GHES) and prompt with:
```text theme={null}
create a hello world banner on the top of the main UI
```
or, if you already deployed your experts with the native Jira integration:
```text theme={null}
implement this Jira ticket
```
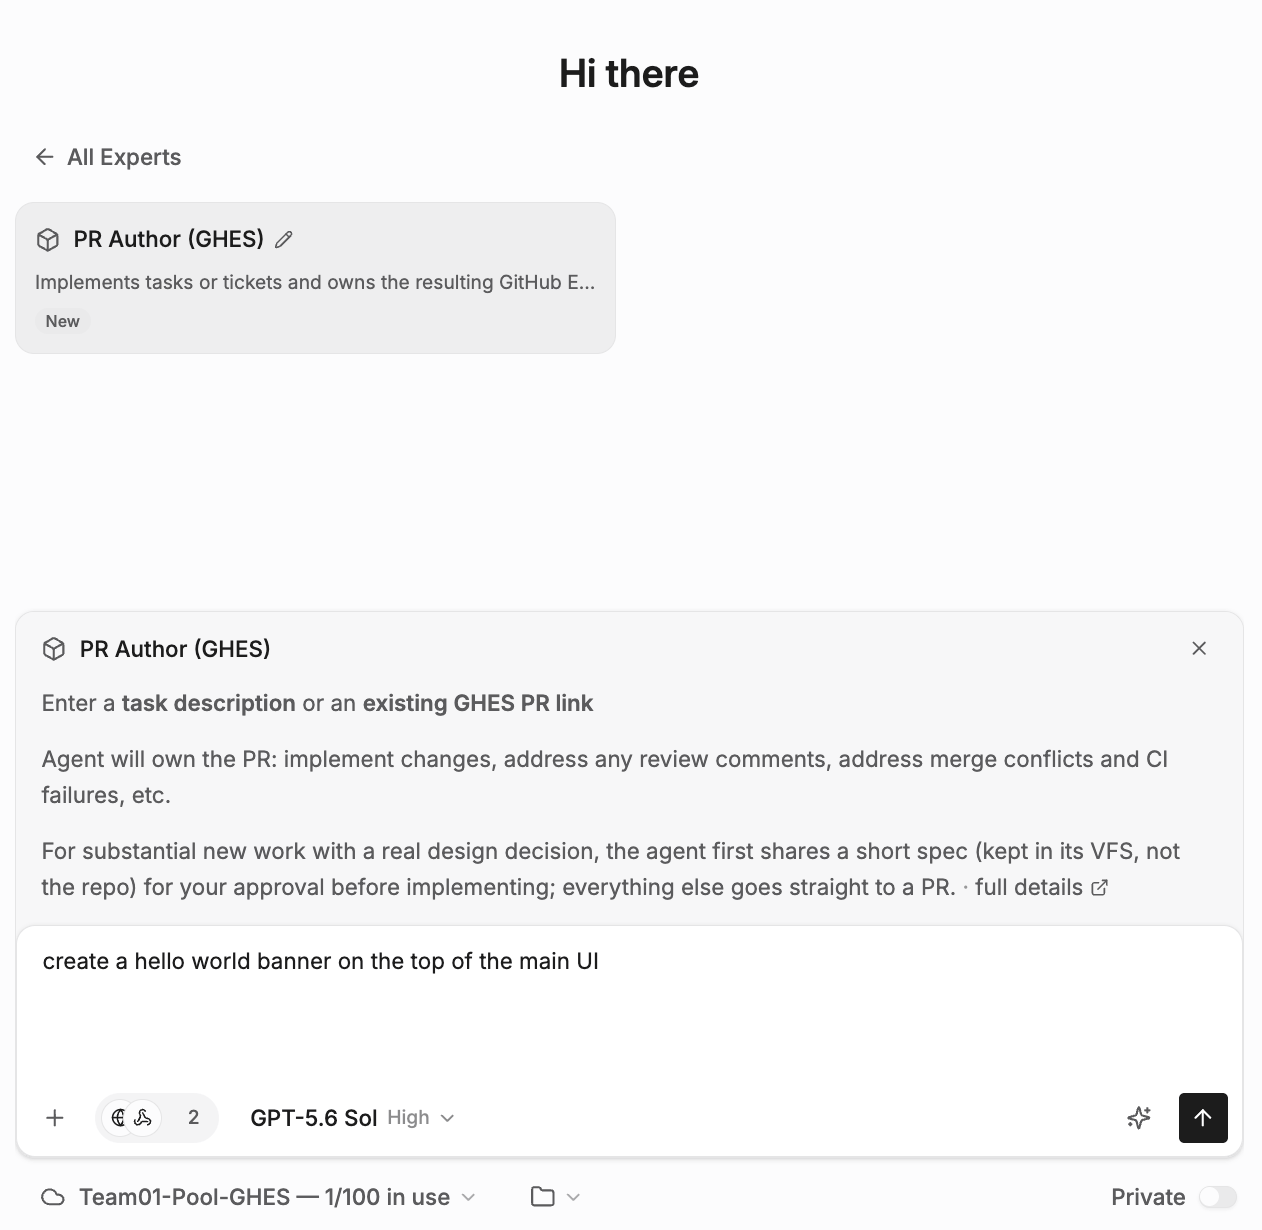 You should see this:
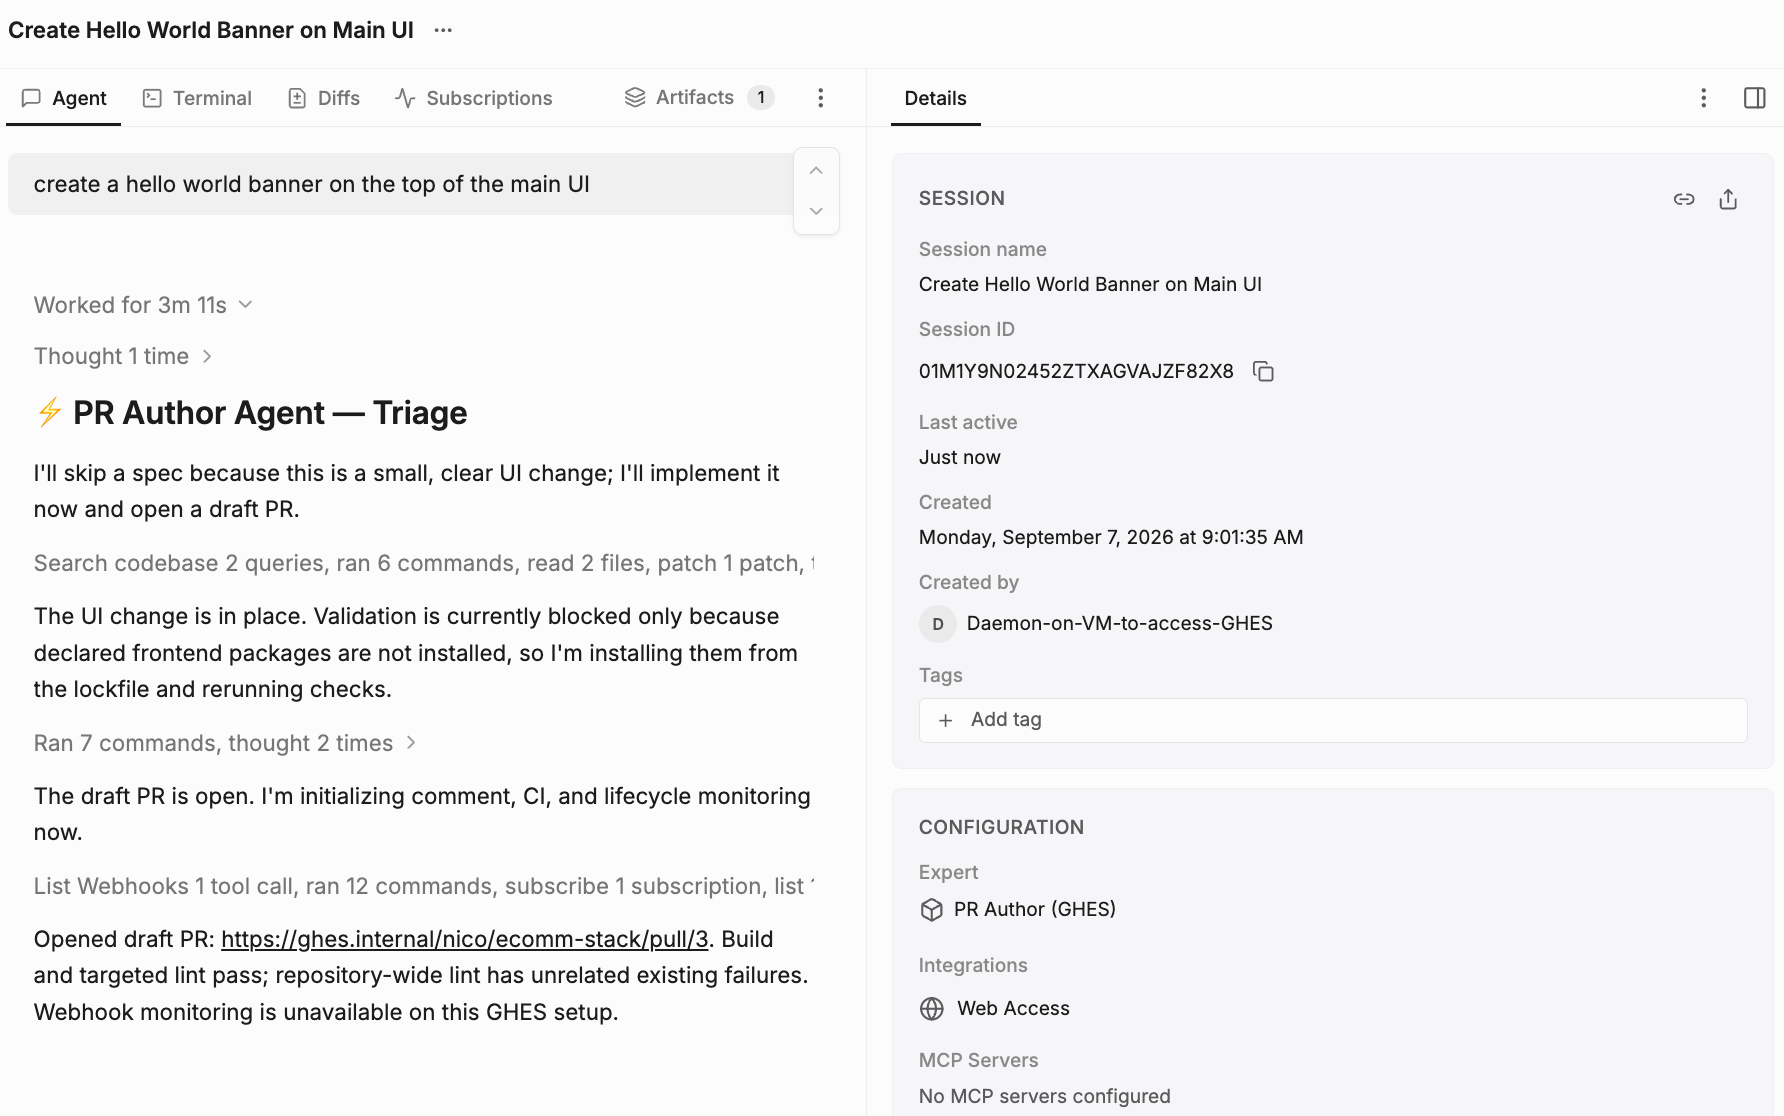 The PR Author created the PR, and downstream the PR Risk Analyzer, Deep Code Reviewer, PR Fixer and Pair Reviewer will trigger automatically. The PR Author is a powerful orchestrator that will handle all that for you, and keep tabs on the comments, CI statuses etc. Click on the PR link that the PR Author created, and you'll see all the code producing experts at play to get the PR ready for a final review:
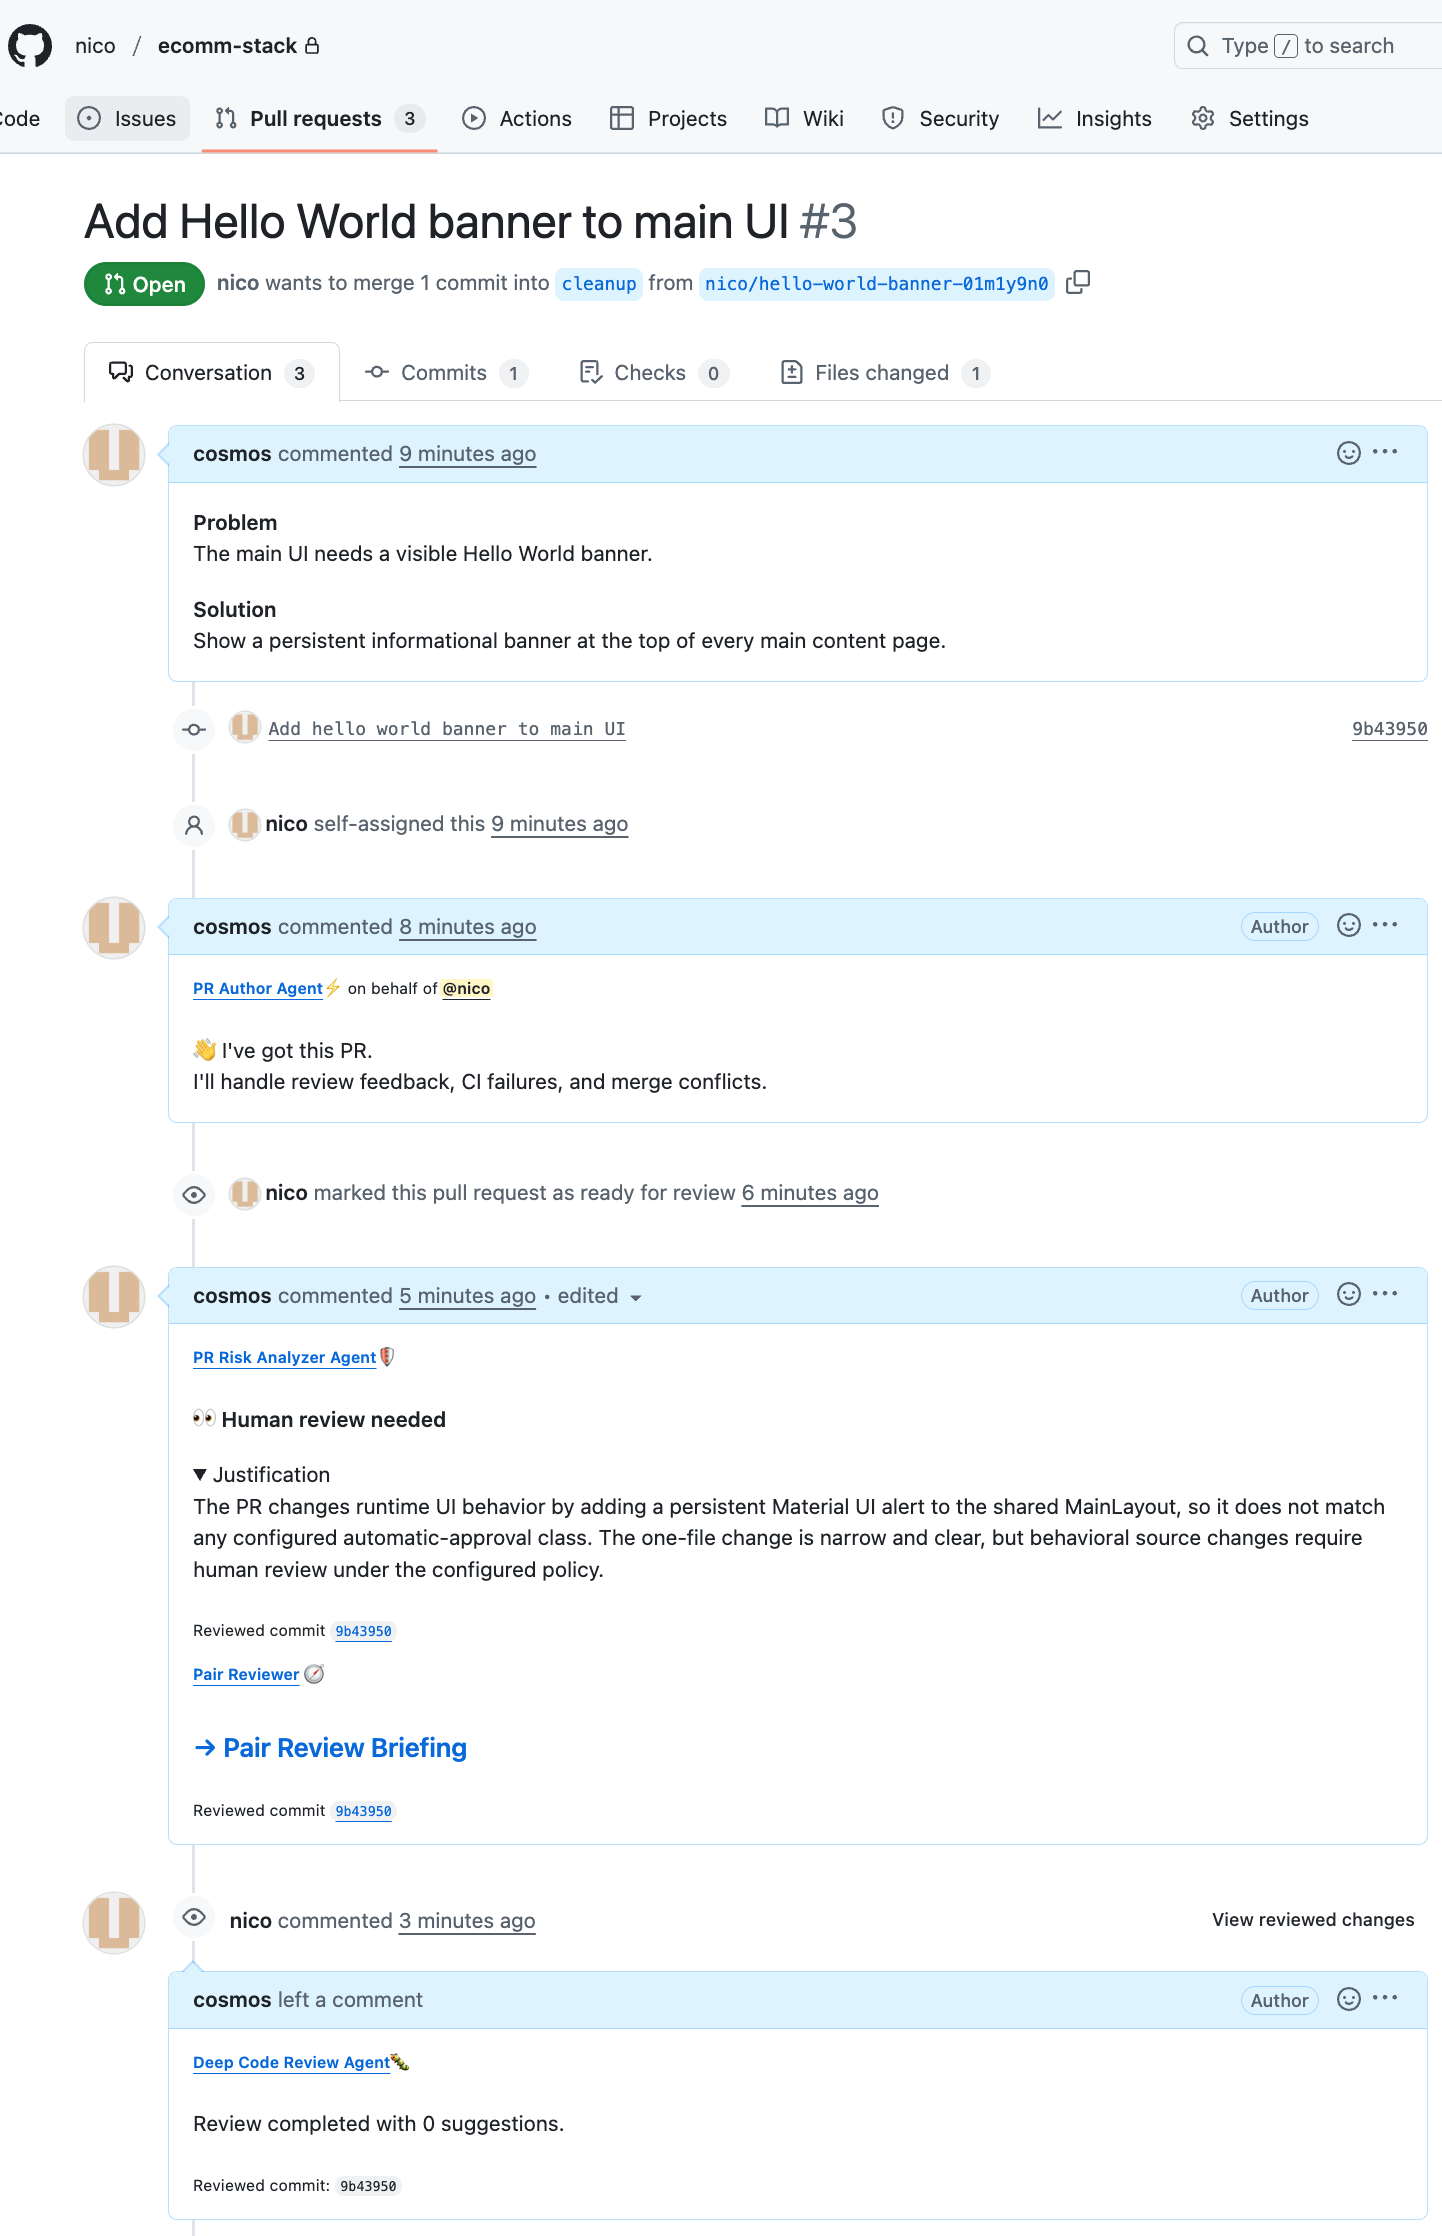 When you start the PR author manually/interactively as you did earlier, it may author the PR in draft. Switch it to ready for review to observe the experts at play. Your PR author can also be invoked via automation and other expert like Project Builder
Congratulations, you’ve deployed your first experts and v1 software factory code producing loop with GHES! 🎉
When you start the PR author manually/interactively as you did earlier, it may author the PR in draft. Switch it to ready for review to observe the experts at play. Your PR author can also be invoked via automation and other expert like Project Builder
Congratulations, you’ve deployed your first experts and v1 software factory code producing loop with GHES! 🎉