> ## Documentation Index
> Fetch the complete documentation index at: https://docs.augmentcode.com/llms.txt
> Use this file to discover all available pages before exploring further.
# Integrate GitLab Self-Hosted
## Introduction
In this page we’ll learn how to configure those items:
1. Get Gitlab to push events (ex: “new MR created”) to Augment Cosmos via webhooks
2. Configure a Cosmos Daemon on a AWS EC2 instance/VM (where the Gitlab local repos will be cloned locally)
3. Get Augment Cosmos to interact with Gitlab via the `glab` cli
4. Deploy your first Cosmos MR experts
Below is the flow we’ll configure with a simple MR reviewer expert:
```mermaid theme={null}
sequenceDiagram
autonumber
participant A as Augment Code | Cosmos
participant AWS as AWS EC2
participant GL as GitLab Self-Hosted
GL->>A: Webhook: Merge Request created (MR payload)
A->>AWS: run experts locally via Daemon
AWS->>AWS: Start Expert (spawn/run expert agent)
AWS->>AWS: Expert analyzes MR (diff + context)
AWS->>GL: POST MR comment (GitLab CLI: create comment)
GL-->>AWS: 201 Created (comment posted)
```
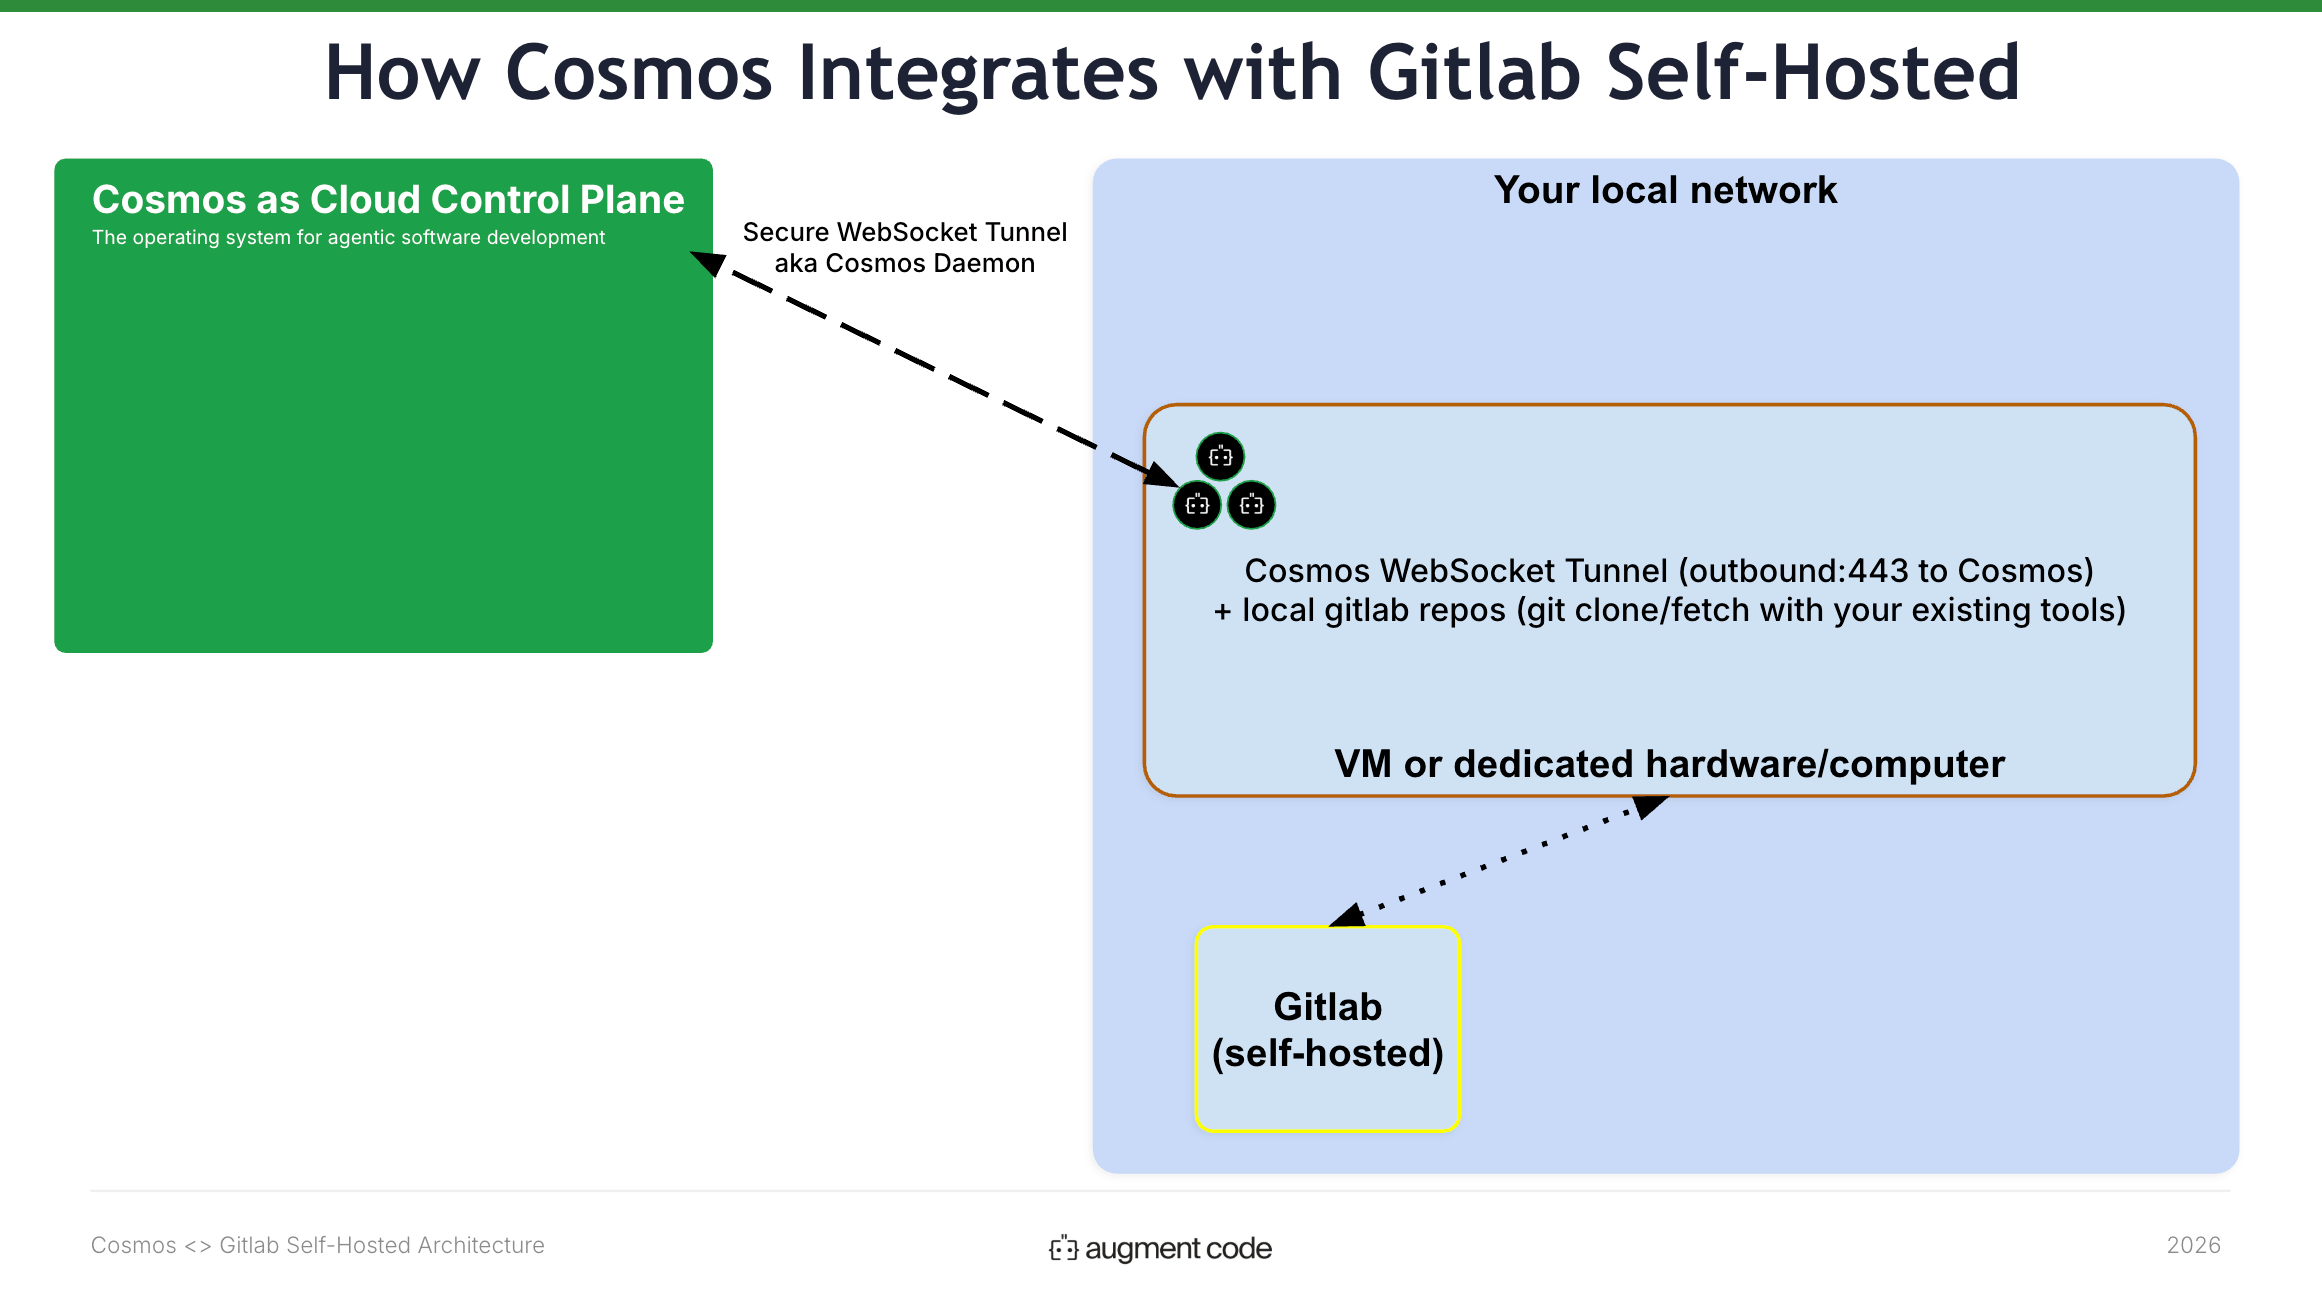
Below is a high level architecture diagram of the components at play:
 ## Prerequisites
To configure the one-time connectivity between Cosmos and Gitlab:
**Cosmos**
* must be an admin to create a Augment service account and webhooks
**Gitlab Self-Hosted**
* must have at least Maintainer or Owner role on a given project, or be Owner of a group that has access to given projects
* allow inbound connections from other VMs on your VPC (inbound calls will come from within your network)
**AWS**
* must have the ability to deploy EC2 instances in a VPC that has network connectivity to your Gitlab self-hosted. Must enable outbound network connectivity to \*.[augmentcode.com](http://augmentcode.com/) (see [https://docs.augmentcode.com/setup-augment/network-configuration](https://docs.augmentcode.com/setup-augment/network-configuration))
## Step 1 - Configure Gitlab to notify a Cosmos Webhook
### Webhook receiver in Cosmos
Let’s create a new webhook in Cosmos (so Cosmos can listen to Gitlab events):
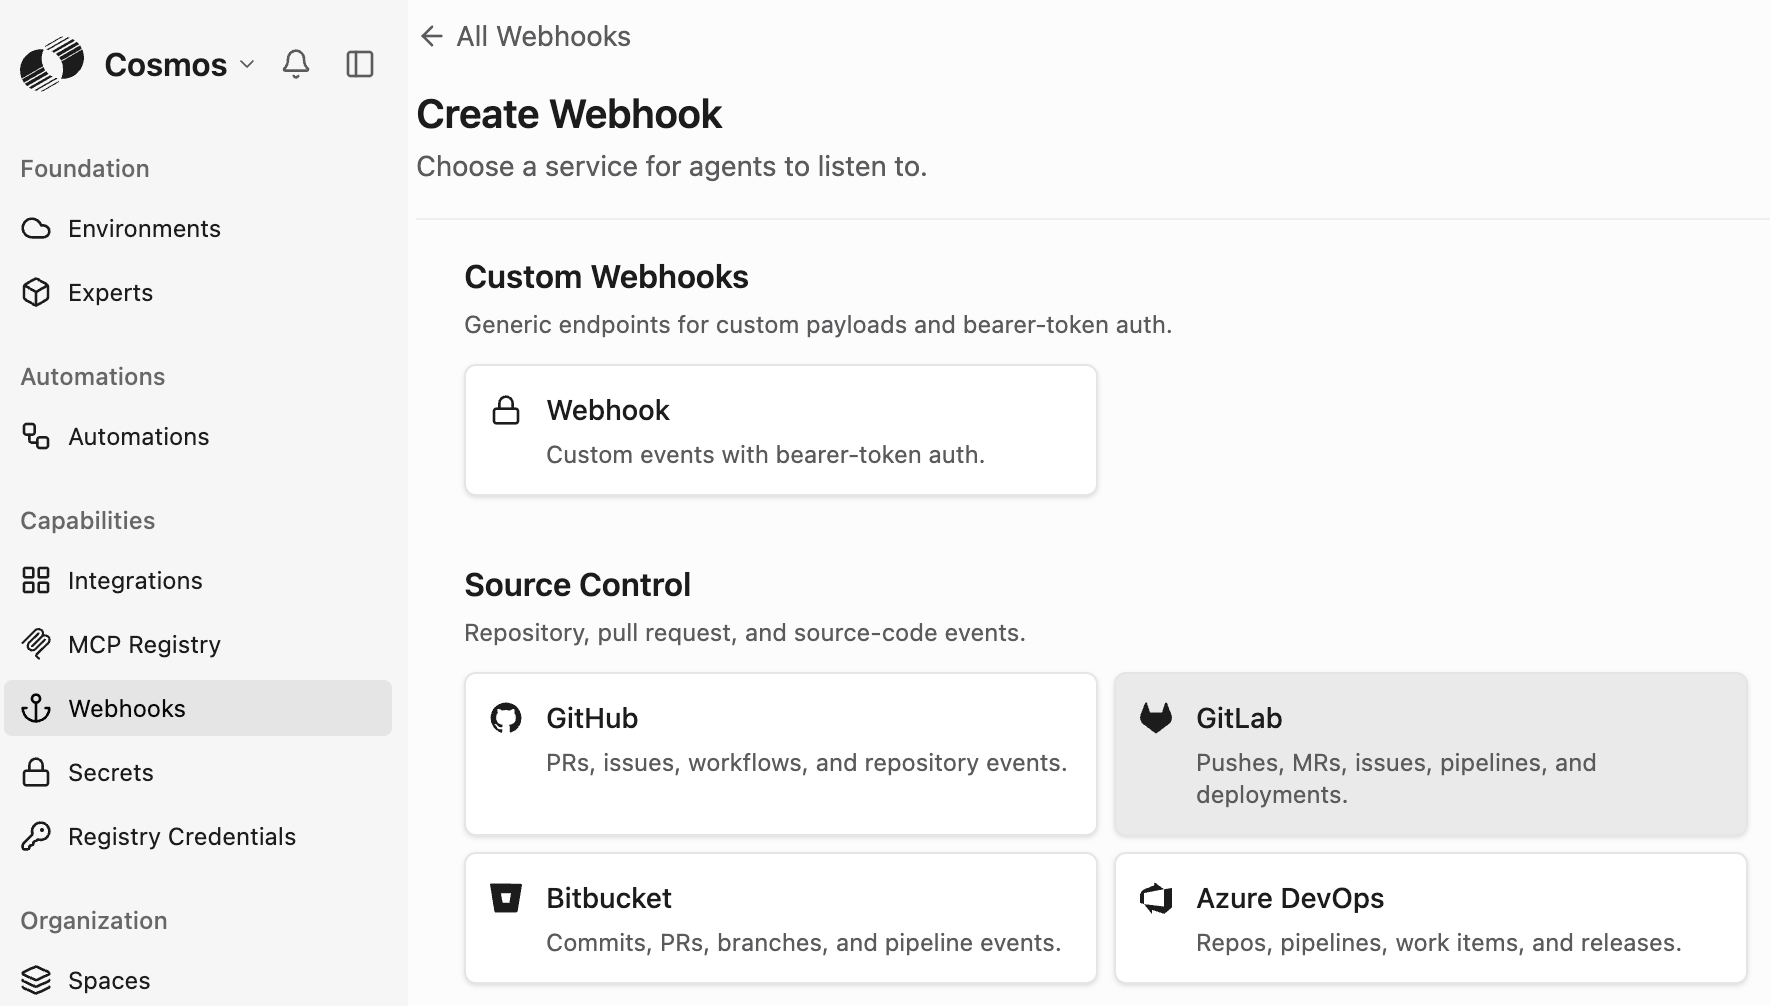
* As an admin go to Cosmos ([https://cosmos.augmentcode.com](https://cosmos.augmentcode.com/)) > Settings > Webhooks > Create a webhook > Select type: GitLab > Enter Description: **GitLab MR events**
## Prerequisites
To configure the one-time connectivity between Cosmos and Gitlab:
**Cosmos**
* must be an admin to create a Augment service account and webhooks
**Gitlab Self-Hosted**
* must have at least Maintainer or Owner role on a given project, or be Owner of a group that has access to given projects
* allow inbound connections from other VMs on your VPC (inbound calls will come from within your network)
**AWS**
* must have the ability to deploy EC2 instances in a VPC that has network connectivity to your Gitlab self-hosted. Must enable outbound network connectivity to \*.[augmentcode.com](http://augmentcode.com/) (see [https://docs.augmentcode.com/setup-augment/network-configuration](https://docs.augmentcode.com/setup-augment/network-configuration))
## Step 1 - Configure Gitlab to notify a Cosmos Webhook
### Webhook receiver in Cosmos
Let’s create a new webhook in Cosmos (so Cosmos can listen to Gitlab events):
* As an admin go to Cosmos ([https://cosmos.augmentcode.com](https://cosmos.augmentcode.com/)) > Settings > Webhooks > Create a webhook > Select type: GitLab > Enter Description: **GitLab MR events**
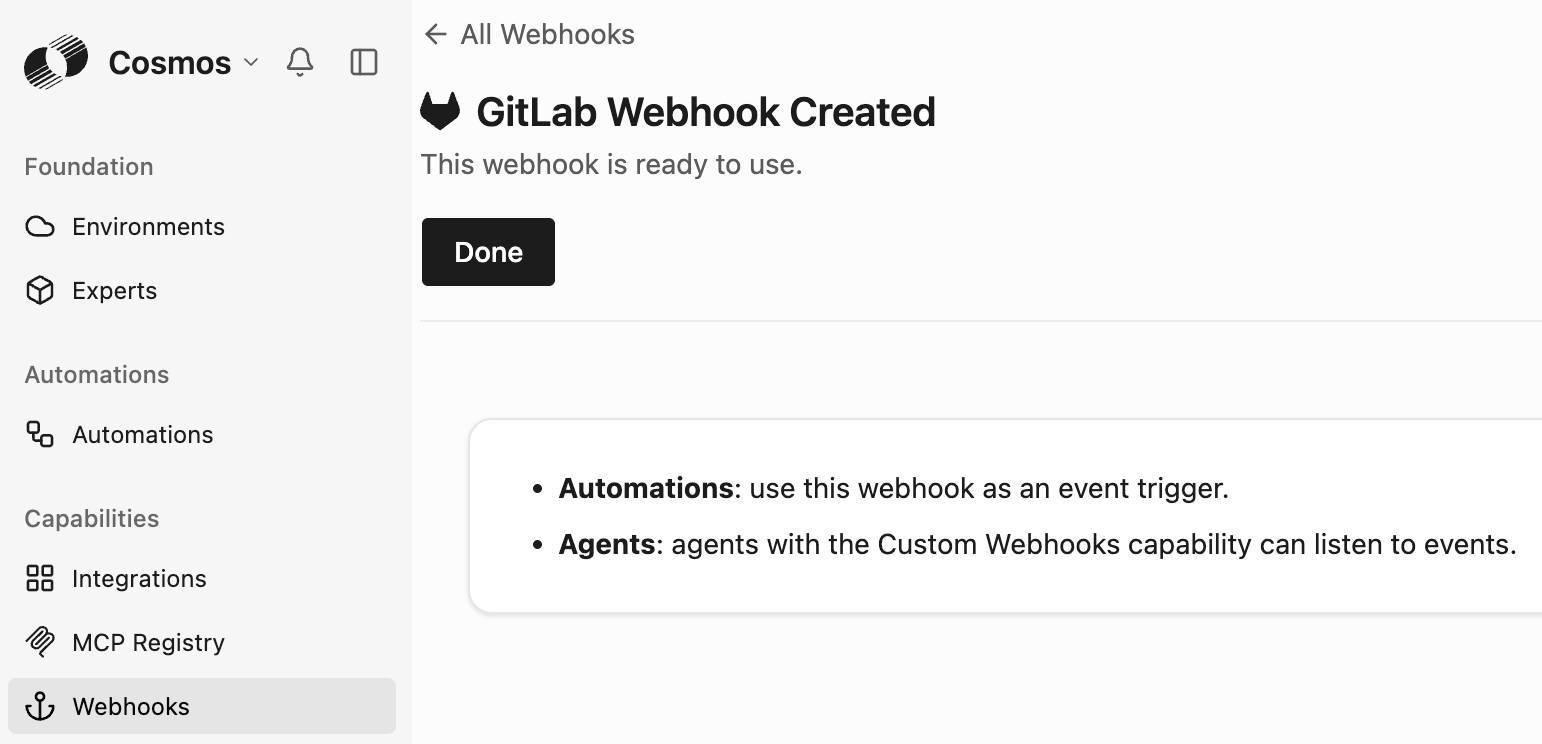
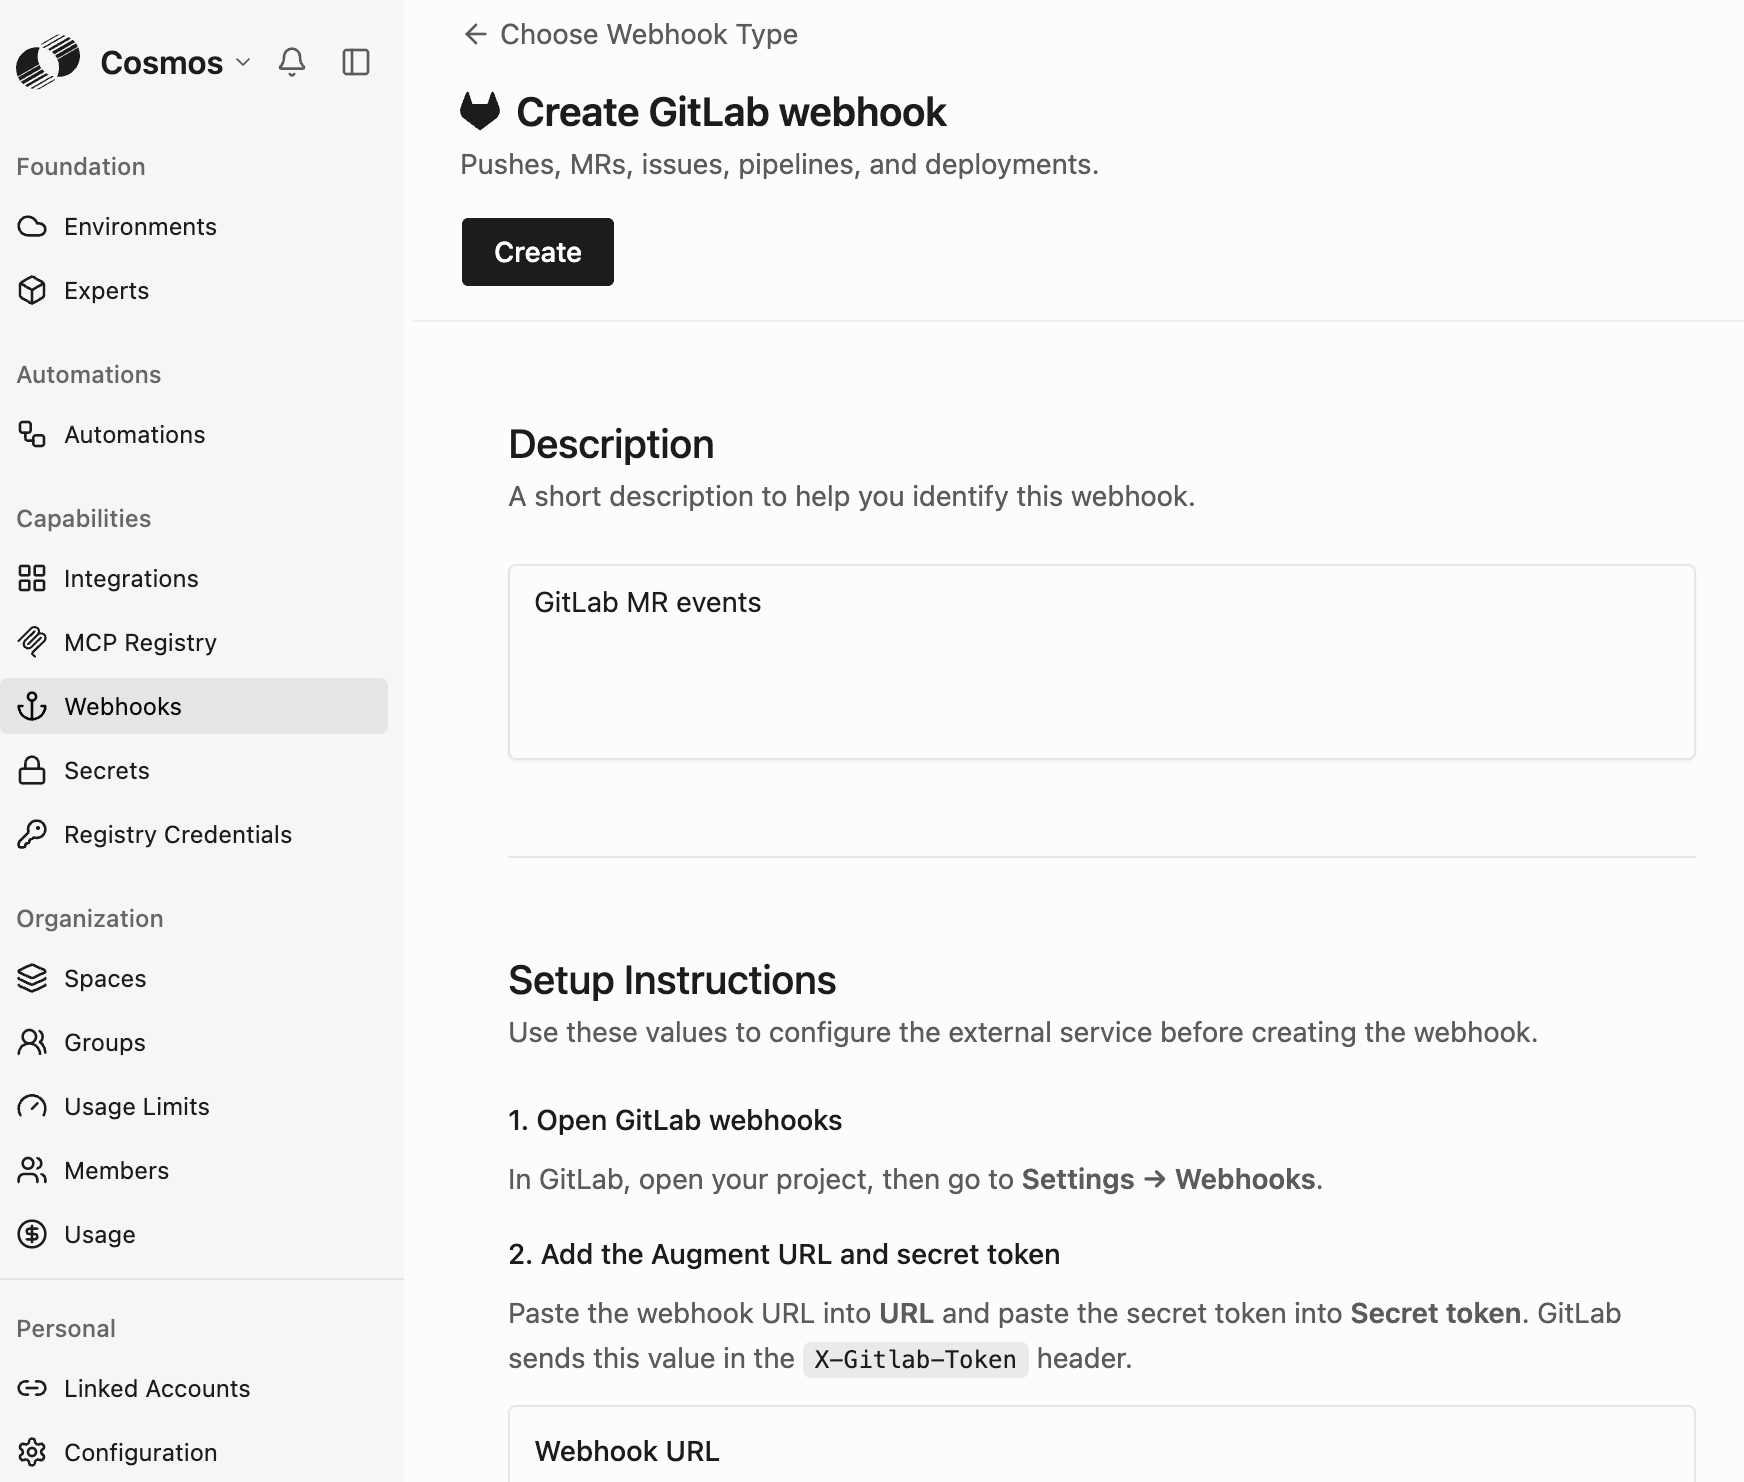 Make sure to copy the provided Webhook URL and the Secret token, then click on Create. You’ll get a confirmation that the webhook is ready to use.
 Run this curl request (with your own parameters) to do a quick test:
```shell theme={null}
curl -i -X POST "https://XXX.api.augmentcode.com/webhooks/XXX" \
-H "Content-Type: application/json" \
-H "X-Gitlab-Event: Push Hook" \
-H "X-Gitlab-Token: whsec_XXX" \
-d '{"event": "test", "data": "your payload here"}'
```
You should get this response:
```plain text theme={null}
HTTP/2 200
content-length: 30
content-type: application/json
date: Sun, 02 Aug 2026 23:23:23 GMT
via: 1.1 google
alt-svc: h3=":443"; ma=2592000
{"message":"Webhook accepted"}%
```
### Webhook sender in Gitlab
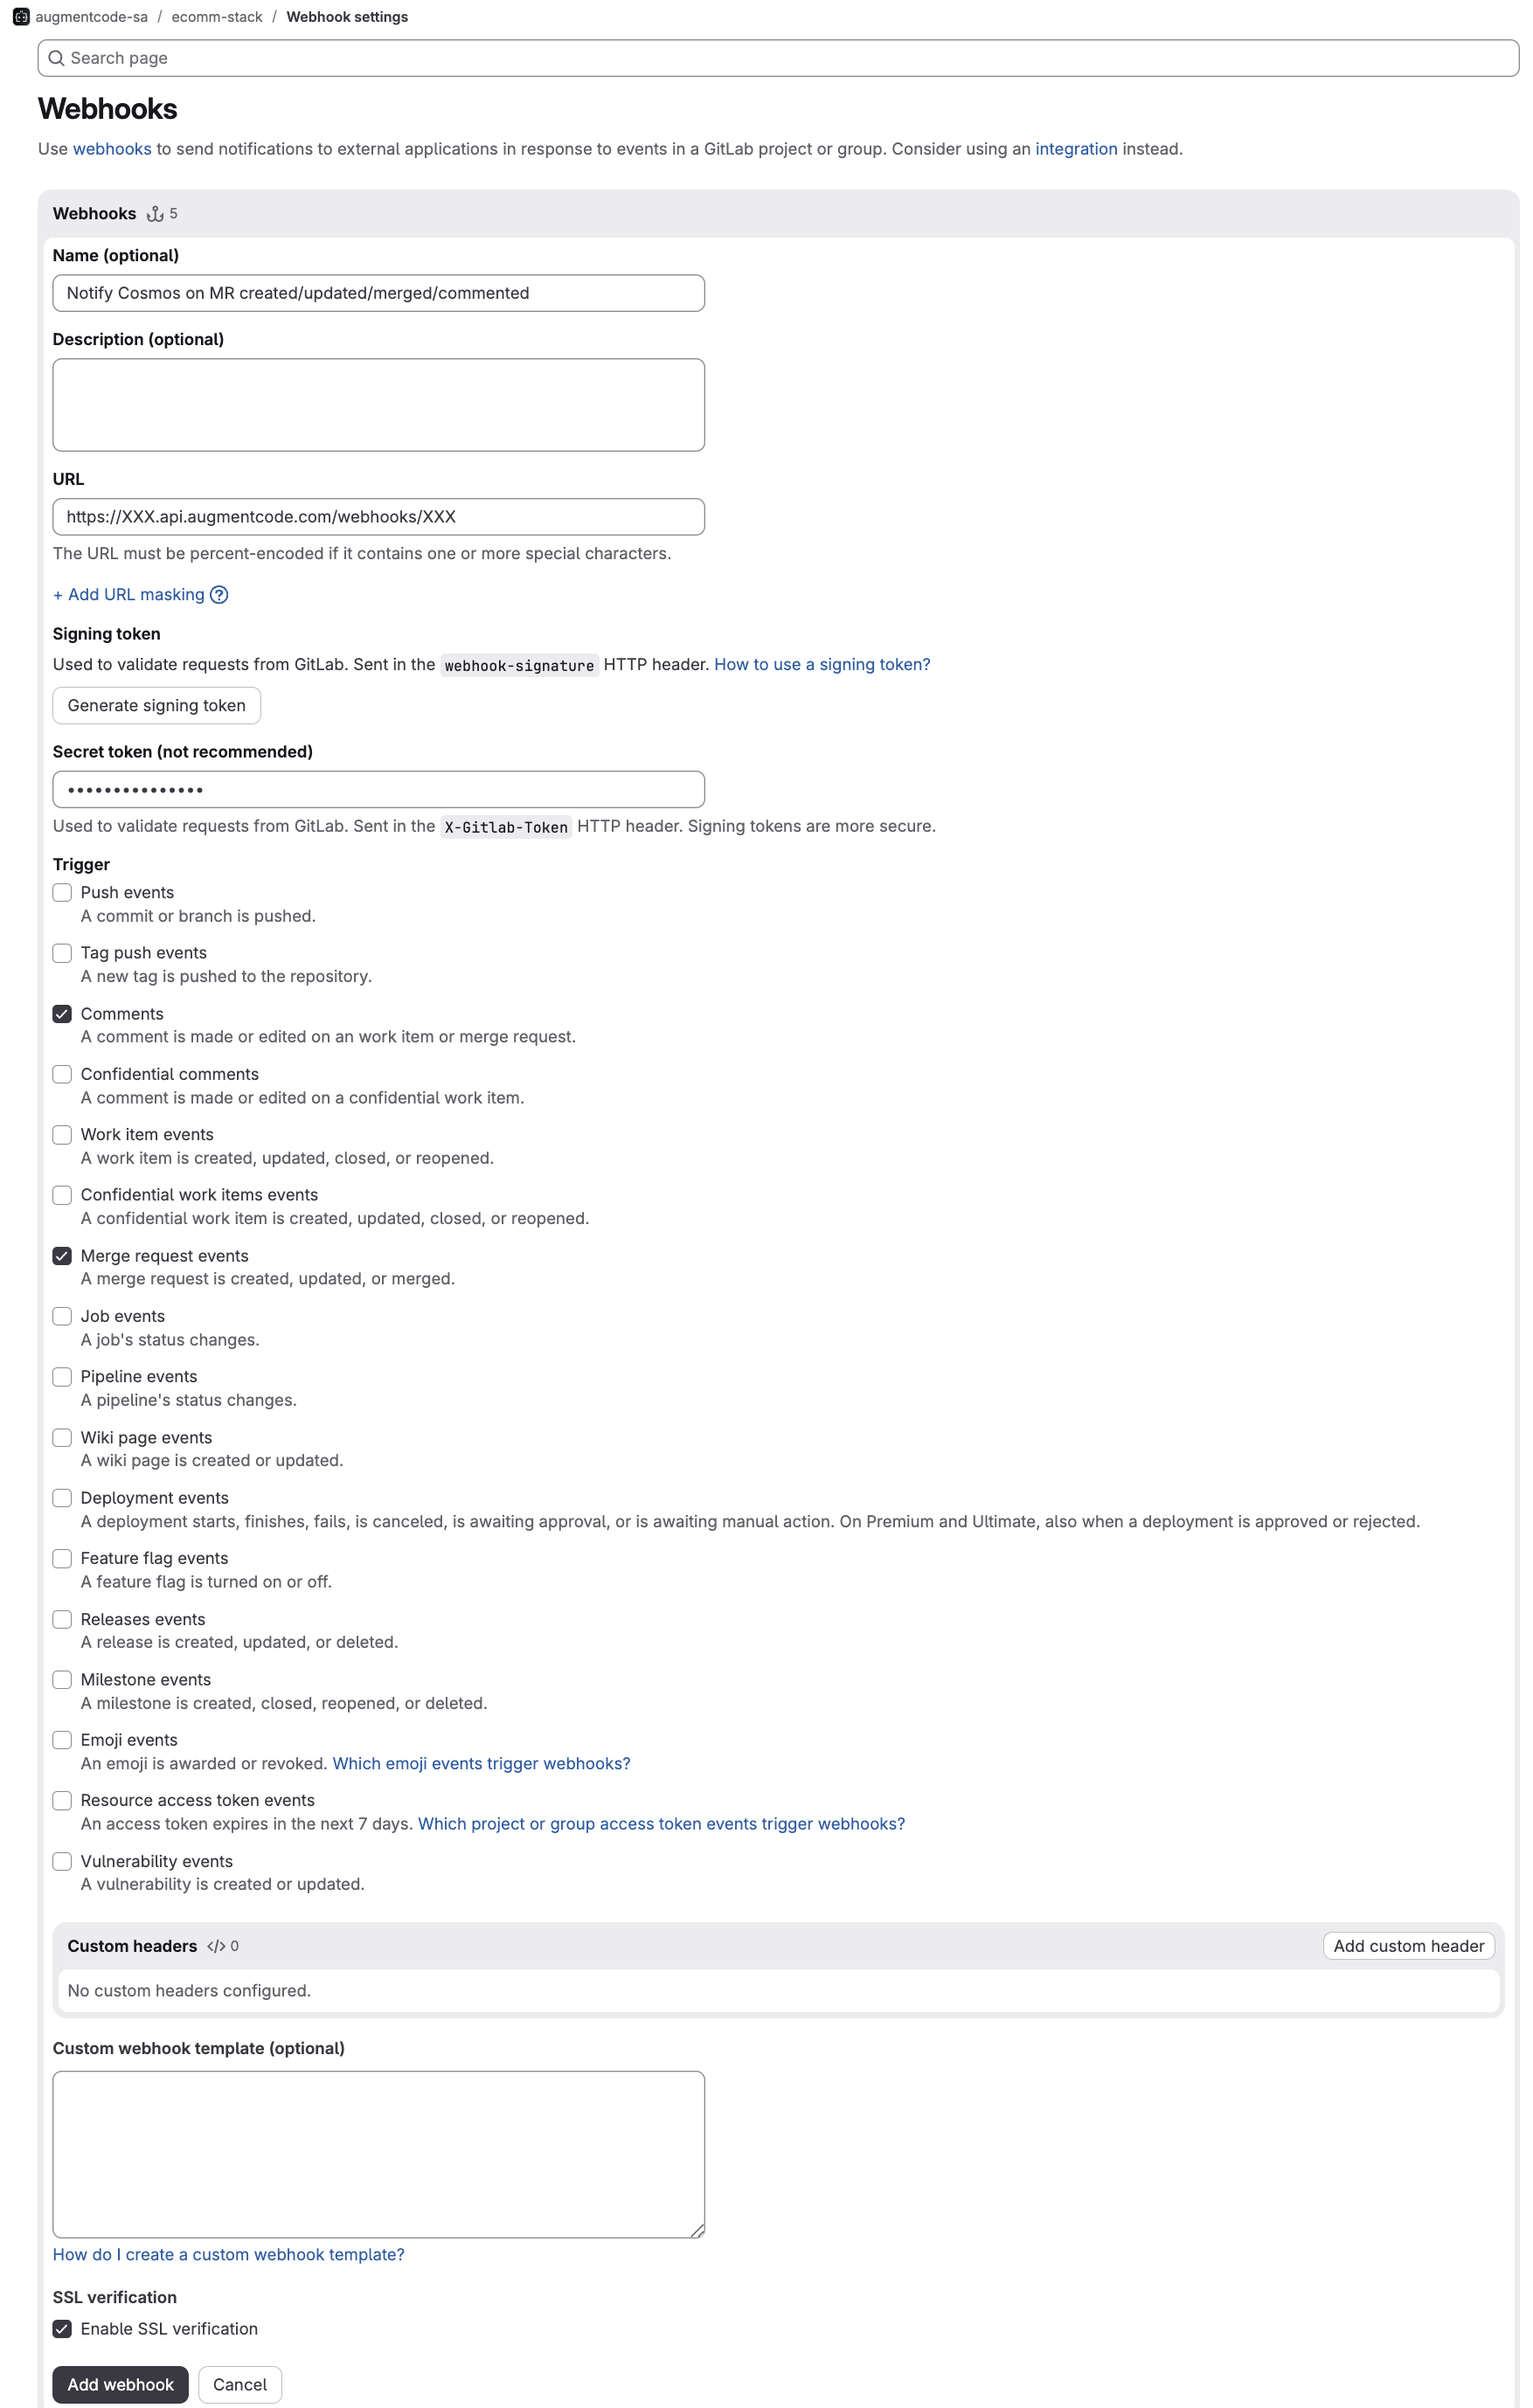
Create a new webhook config in Gitlab\*\* \*\*(so Gitlab can POST to a given url when certain Gitlab events occur): as a Maintainer or Owner, go to your Gitlab repo > Settings > Webhooks > Add new webhook > Add those details:
* Name: **Notify Cosmos on MR created/updated/merged/commented**
* URL: the webhook url provided by Cosmos
* Secret token: the secret provided by Cosmos
* Trigger: `Comments` and `Merge request events`
* Custom header: leave empty
* Enable SSL verification: **keep it selected**
* Click on Add webhook
Run this curl request (with your own parameters) to do a quick test:
```shell theme={null}
curl -i -X POST "https://XXX.api.augmentcode.com/webhooks/XXX" \
-H "Content-Type: application/json" \
-H "X-Gitlab-Event: Push Hook" \
-H "X-Gitlab-Token: whsec_XXX" \
-d '{"event": "test", "data": "your payload here"}'
```
You should get this response:
```plain text theme={null}
HTTP/2 200
content-length: 30
content-type: application/json
date: Sun, 02 Aug 2026 23:23:23 GMT
via: 1.1 google
alt-svc: h3=":443"; ma=2592000
{"message":"Webhook accepted"}%
```
### Webhook sender in Gitlab
Create a new webhook config in Gitlab\*\* \*\*(so Gitlab can POST to a given url when certain Gitlab events occur): as a Maintainer or Owner, go to your Gitlab repo > Settings > Webhooks > Add new webhook > Add those details:
* Name: **Notify Cosmos on MR created/updated/merged/commented**
* URL: the webhook url provided by Cosmos
* Secret token: the secret provided by Cosmos
* Trigger: `Comments` and `Merge request events`
* Custom header: leave empty
* Enable SSL verification: **keep it selected**
* Click on Add webhook
 Now run a test: in Gitlab go back to your list of Gitlab webhooks (Settings > Webhooks) > click on the Test dropdown > Merge request events
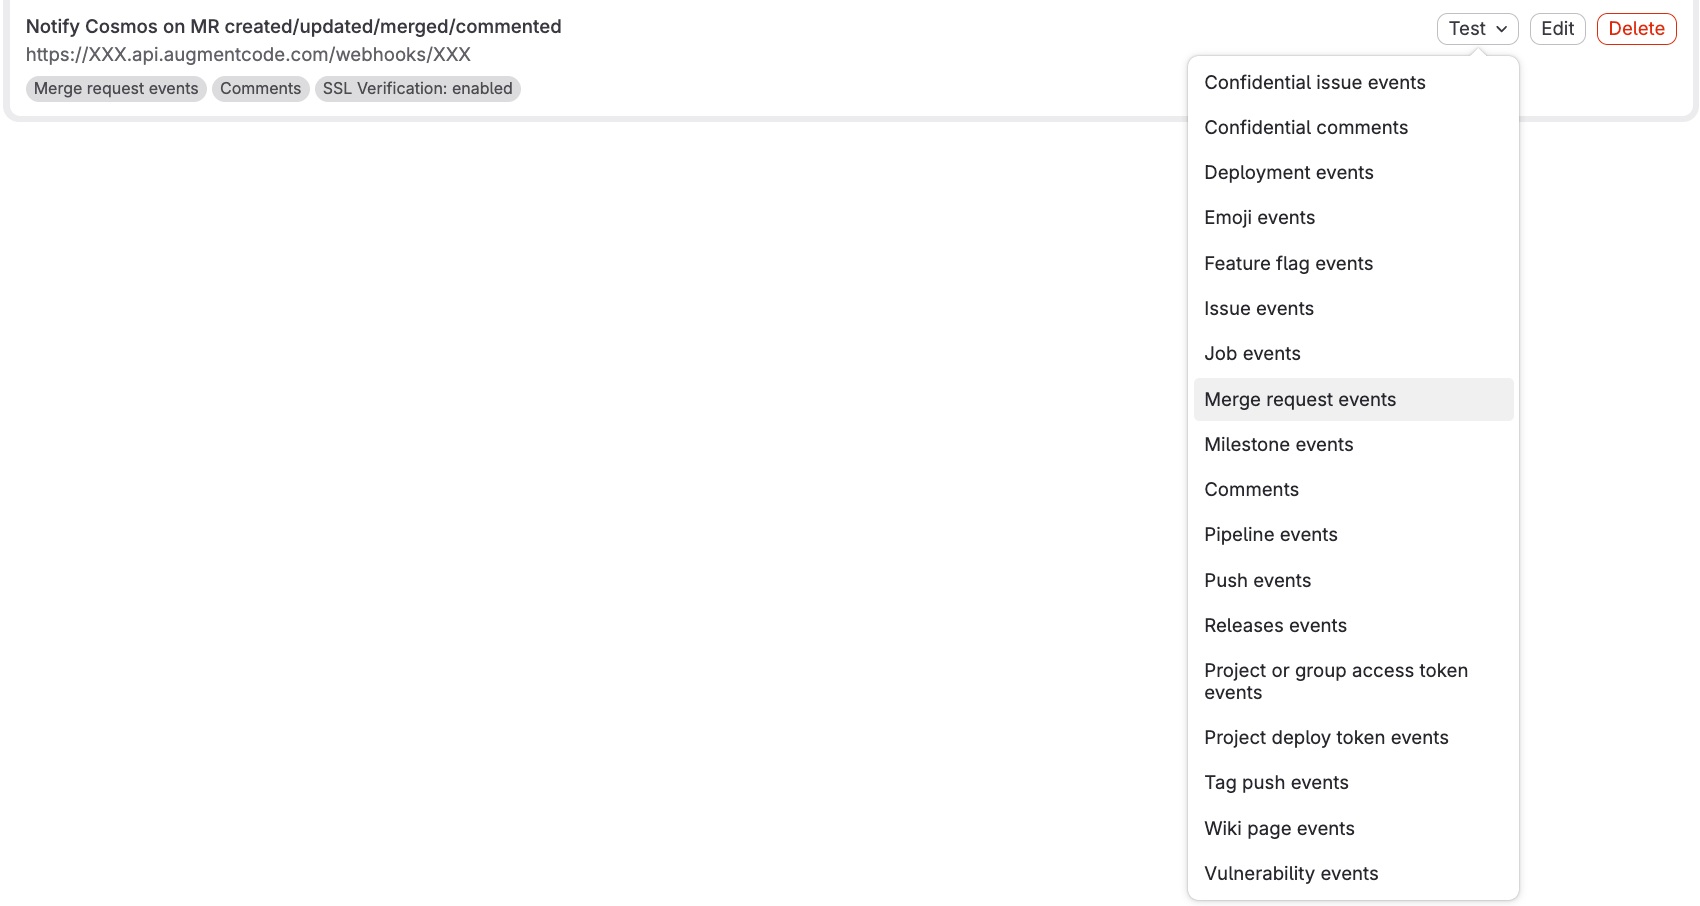 You should see this banner at the top:
 Now go back to Cosmos and check that Cosmos received the event:
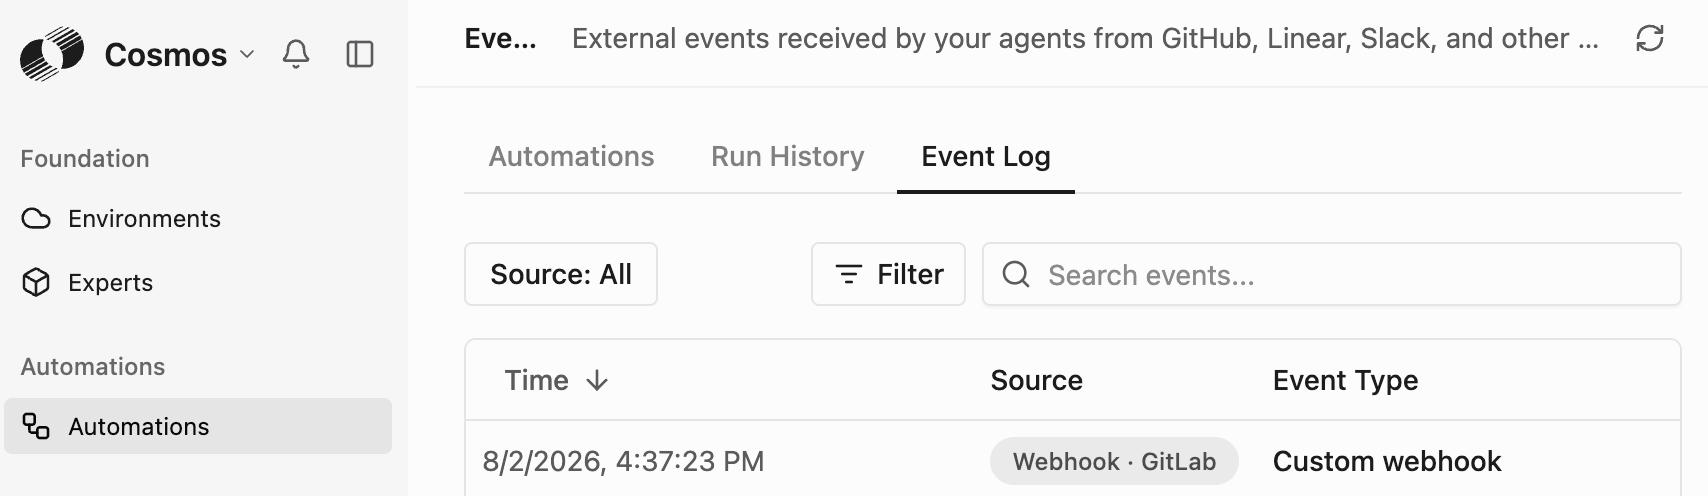
Cosmos ([https://cosmos.augmentcode.com](https://cosmos.augmentcode.com/)) > Settings > Automations > Events Log. You should see your event with source “Webhook · GitLab”:
Now go back to Cosmos and check that Cosmos received the event:
Cosmos ([https://cosmos.augmentcode.com](https://cosmos.augmentcode.com/)) > Settings > Automations > Events Log. You should see your event with source “Webhook · GitLab”:
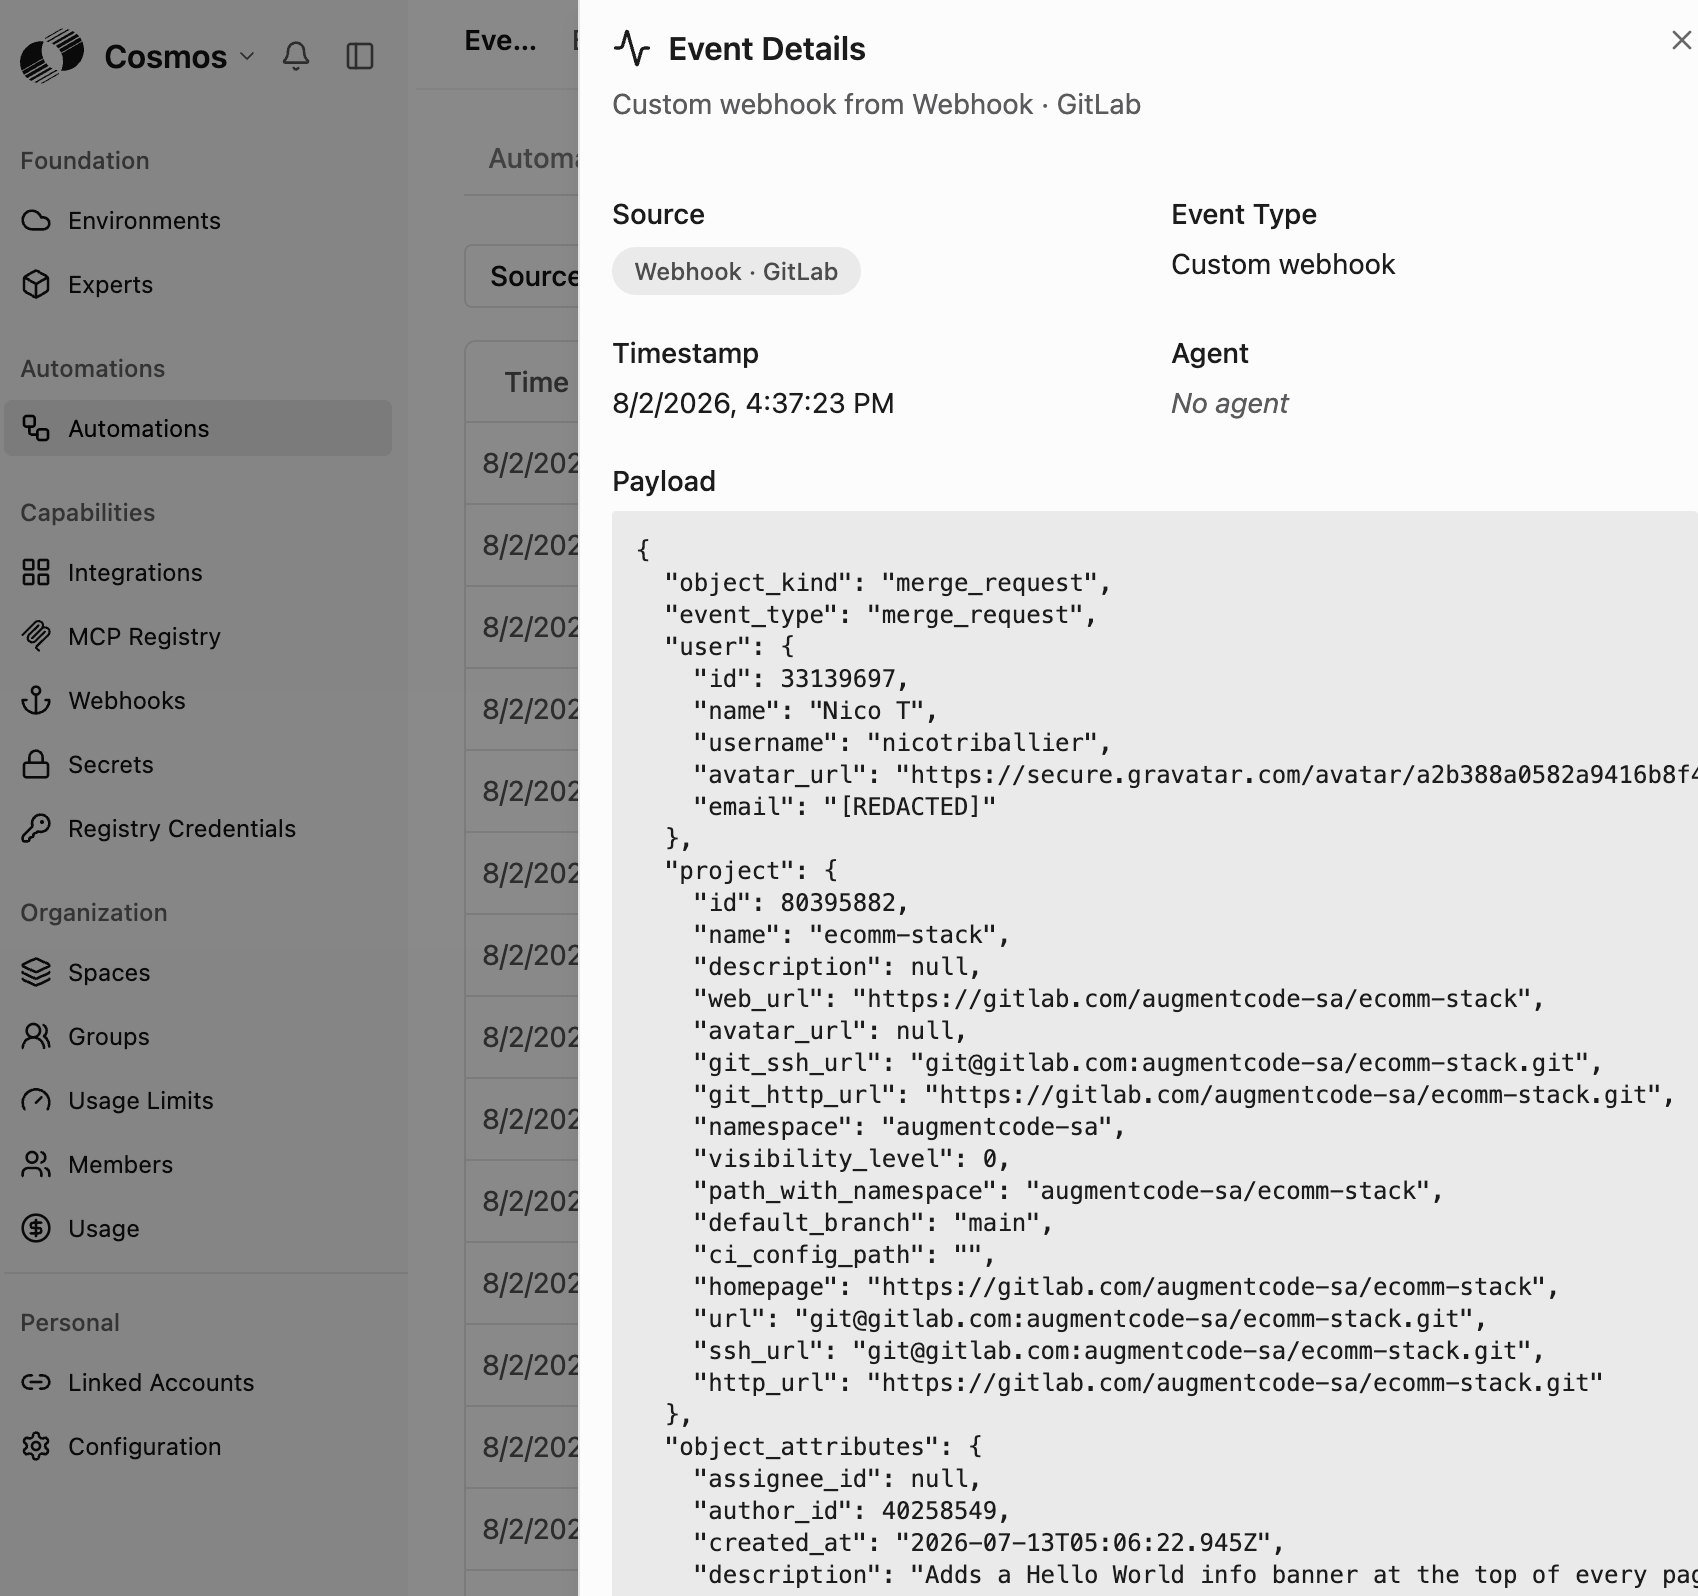
 Click on the event to inspect the test payload:
 At this point Gitlab will automatically notify Cosmos whenever a MR is created/updated/commented on ✅
## Step 2 - Create a Gitlab Service Account
For headless automation and to start agentic workflows based on Gitlab events, you’ll create a dedicated Gitlab service account and its access token:
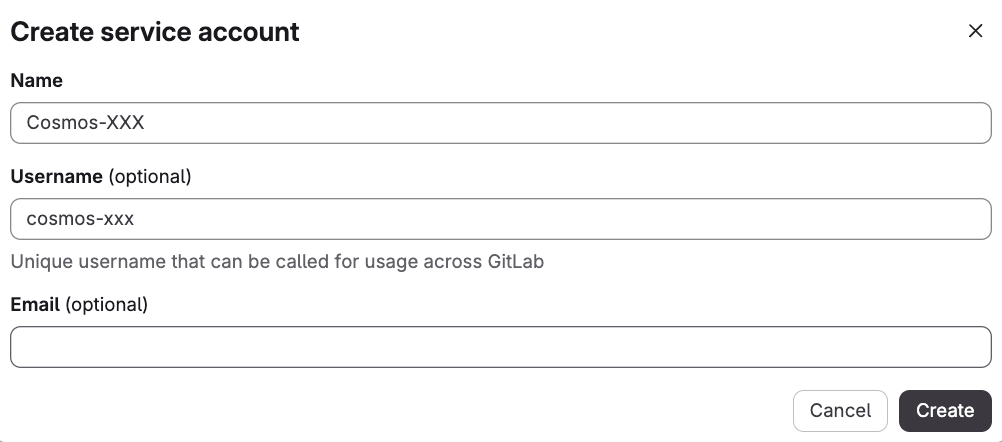
Gitlab repo > Settings > Service accounts > Add service account > Add a name (ex: **Cosmos-XXX**) and username (ex: **cosmos-xxx**):
At this point Gitlab will automatically notify Cosmos whenever a MR is created/updated/commented on ✅
## Step 2 - Create a Gitlab Service Account
For headless automation and to start agentic workflows based on Gitlab events, you’ll create a dedicated Gitlab service account and its access token:
Gitlab repo > Settings > Service accounts > Add service account > Add a name (ex: **Cosmos-XXX**) and username (ex: **cosmos-xxx**):
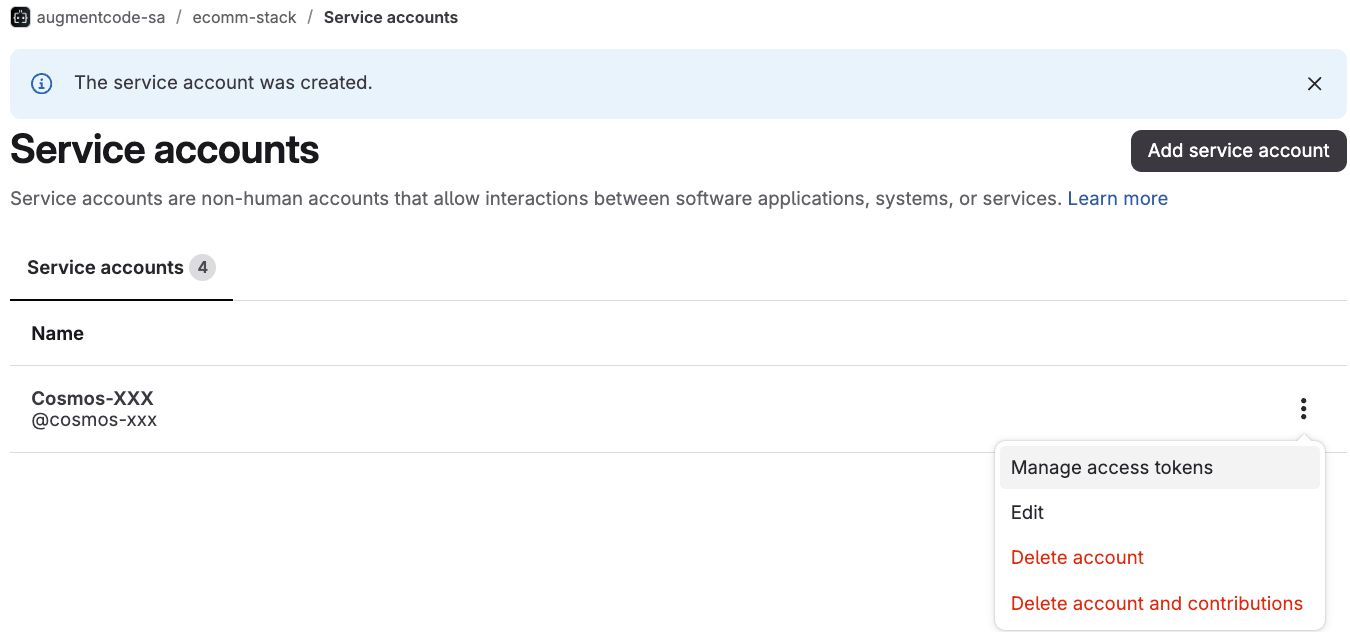
 Then next to that service account > 3 dots > Manage access tokens
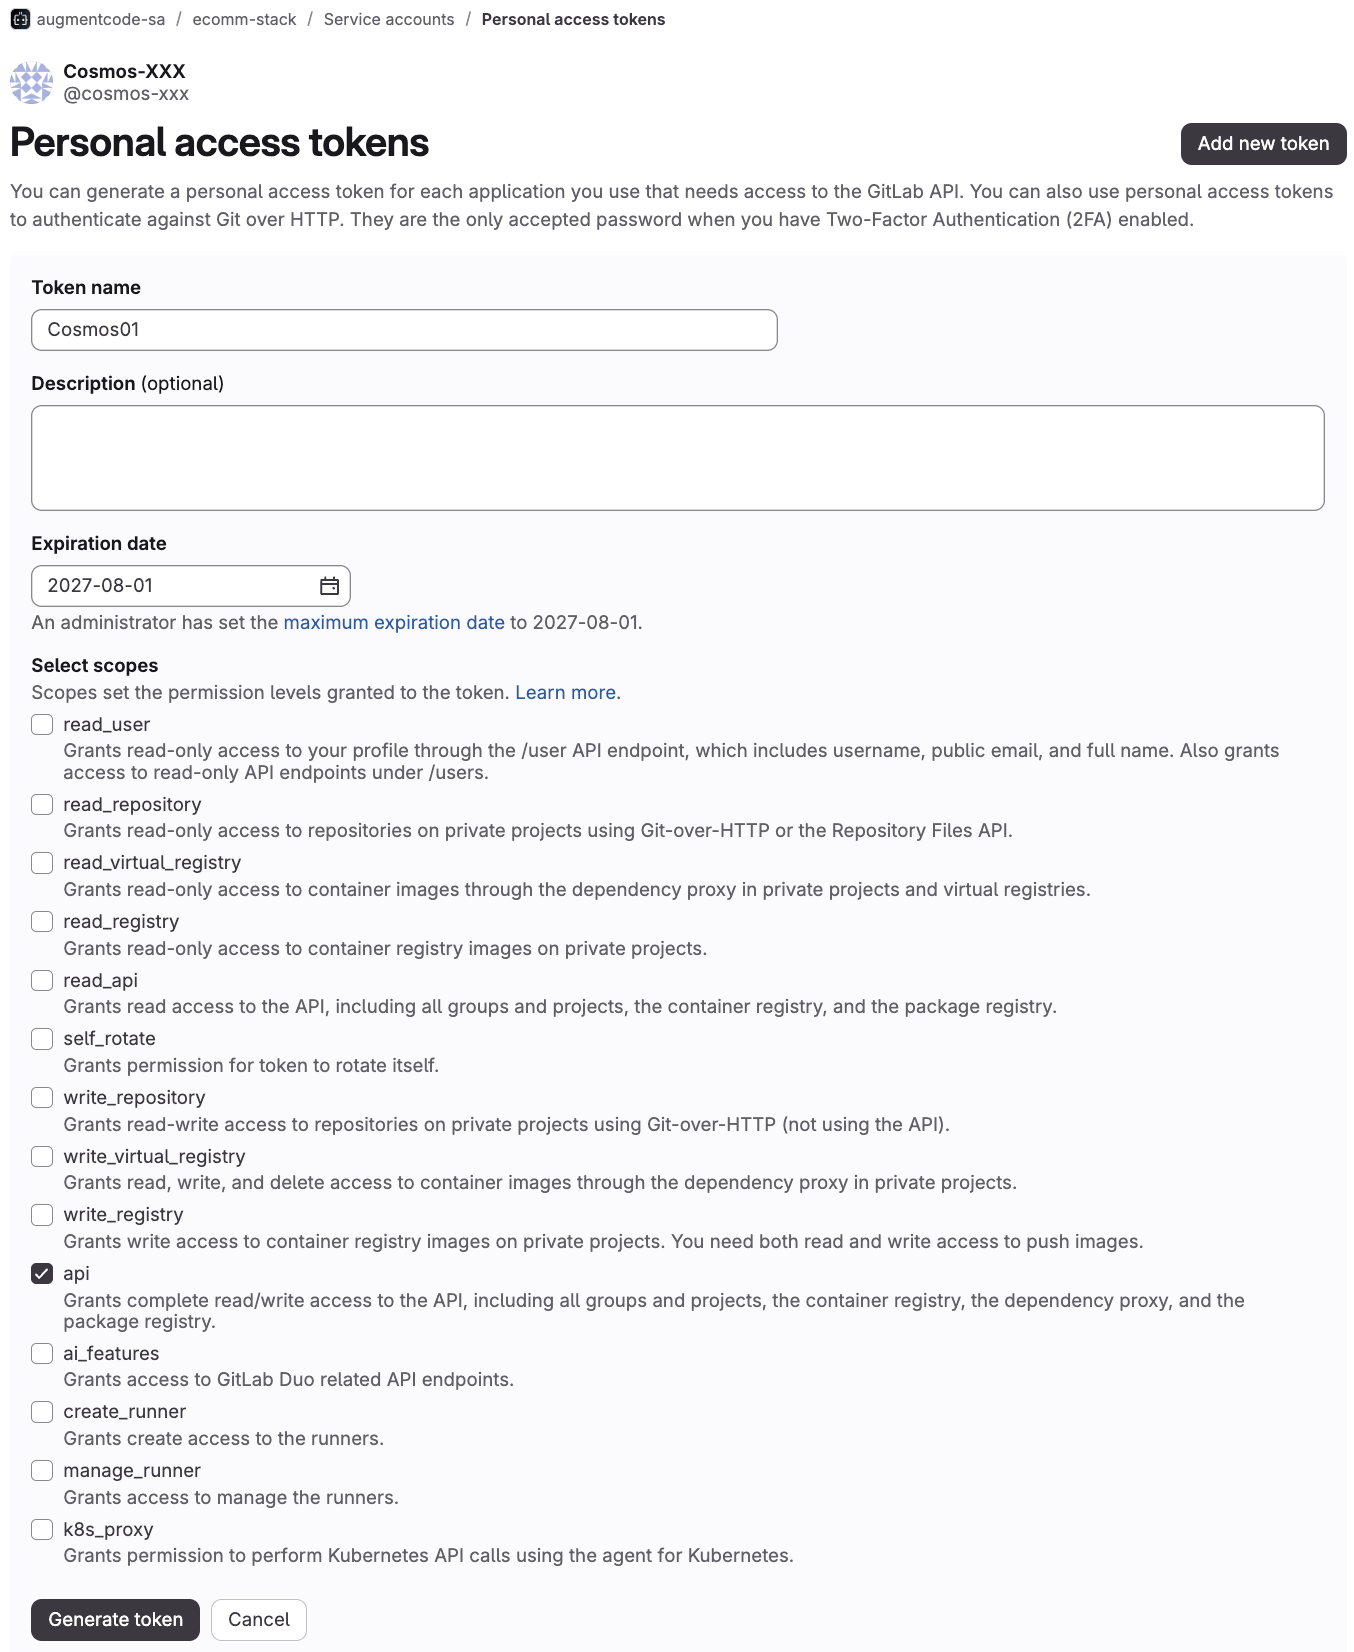
 Click on Add new token:
* Enter a token name (ex: **Cosmos01**)
* Set a max expiration date as far out as possible
* Select scope `api`
* Click on Generate token
Click on Add new token:
* Enter a token name (ex: **Cosmos01**)
* Set a max expiration date as far out as possible
* Select scope `api`
* Click on Generate token
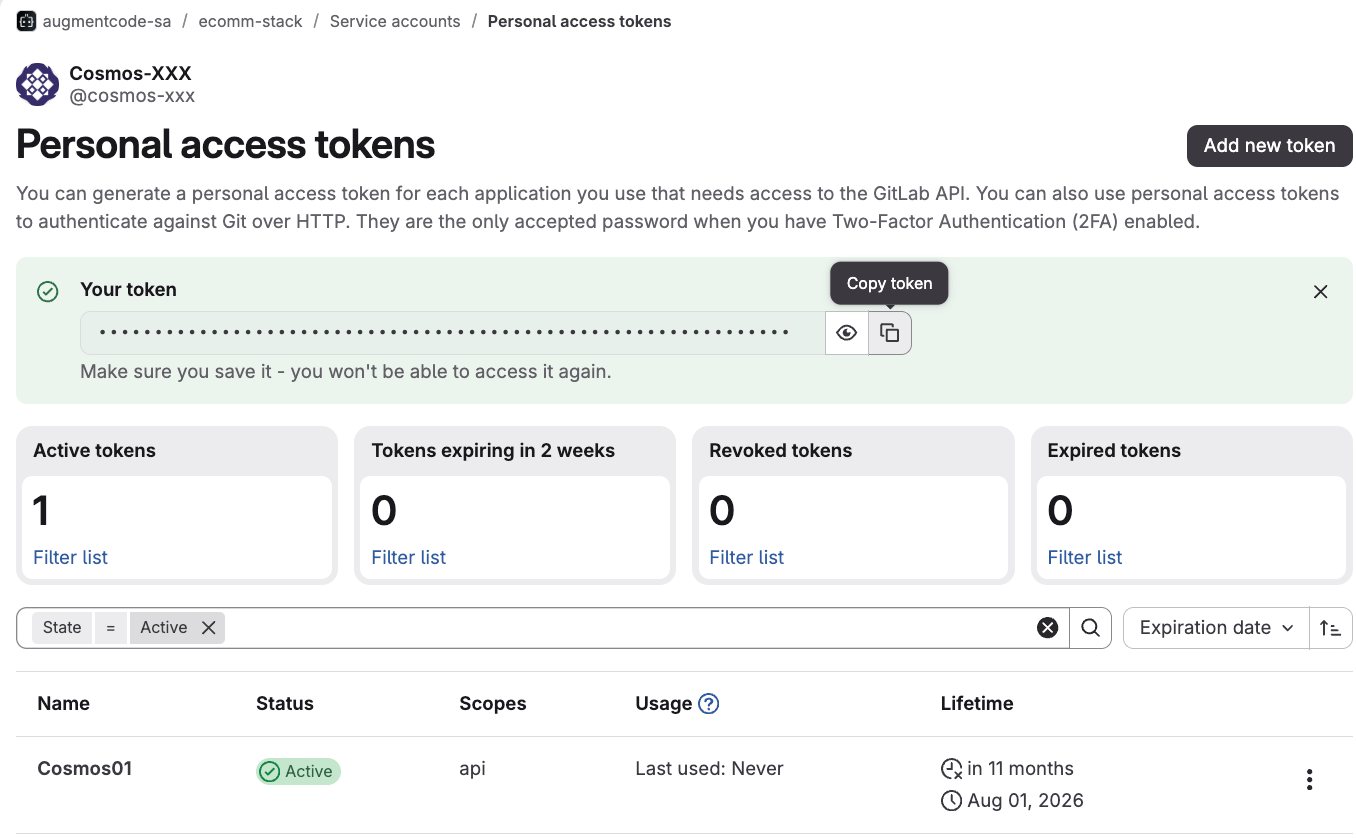
 Click on the copy icon to copy the GITLAB\_TOKEN in your clipboard
 Now get back to Gitlab and add your Gitlab service account with role=`Maintainer` onto the repos where the service account should be able to read/post (add it per repo or add it to the group that manages all the repos):
Go to your Gitlab repo(s) > Manage > Members > Invite members > add your Gitlab service account and click on Invite:
Now get back to Gitlab and add your Gitlab service account with role=`Maintainer` onto the repos where the service account should be able to read/post (add it per repo or add it to the group that manages all the repos):
Go to your Gitlab repo(s) > Manage > Members > Invite members > add your Gitlab service account and click on Invite:
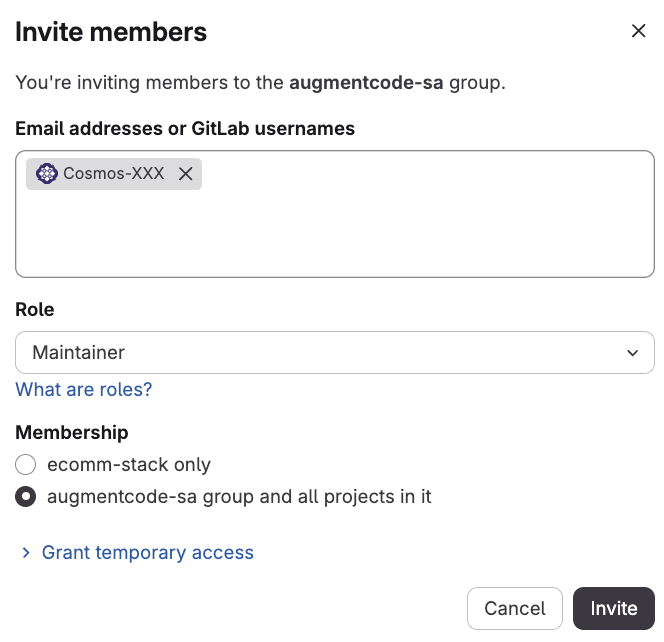 Now your Gitlab service account has permissions to collaborate across your repos.
## Step 3 - Create a Augment service account
Before we start the websocket tunnel from your AWS EC2 instance to Cosmos, you’ll need to create a dedicated Augment service account, which will be used to authenticate and start the tunnel.
As an admin go to [https://app.augmentcode.com/](https://app.augmentcode.com/) > Service Accounts > + Add Service Account > Add:
Now your Gitlab service account has permissions to collaborate across your repos.
## Step 3 - Create a Augment service account
Before we start the websocket tunnel from your AWS EC2 instance to Cosmos, you’ll need to create a dedicated Augment service account, which will be used to authenticate and start the tunnel.
As an admin go to [https://app.augmentcode.com/](https://app.augmentcode.com/) > Service Accounts > + Add Service Account > Add:
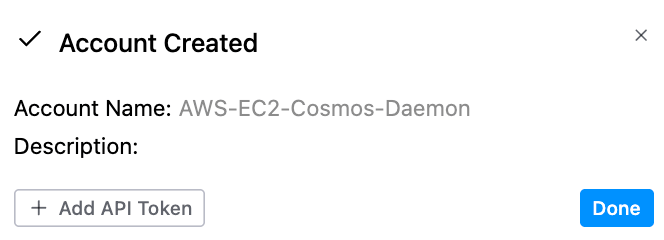
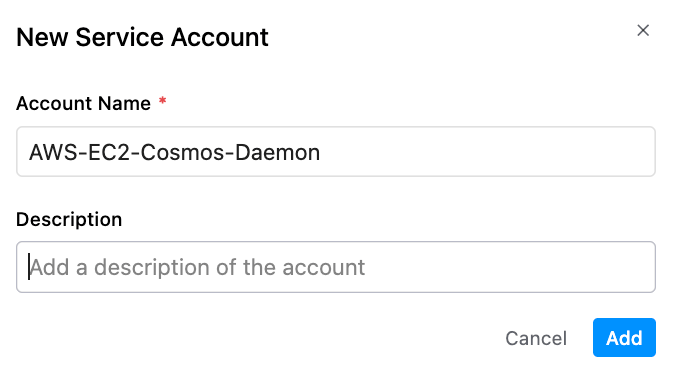 Then click on + Add API Token:
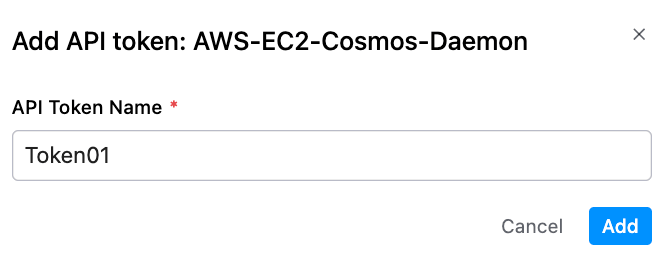
 Enter an API Token Name (ex: Token01):
 Click on Download JSON:
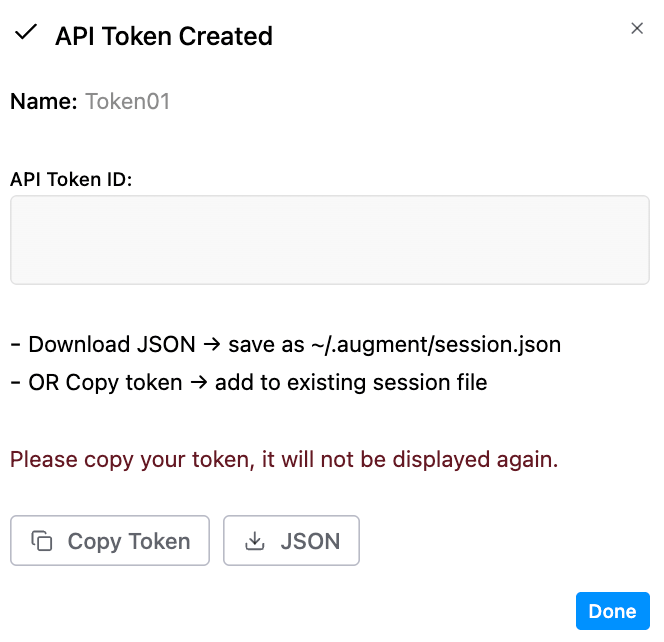 You'll obtain a session.json, it will be used to authenticate the Cosmos daemon later on.
## Step 4 - Create a Cosmos daemon pool
Since you’ll be leveraging a AWS EC2 VM to host your daemon, it’s important to think about uptime and resilience: your VM could loose network connectivity or have an outage. The best practice is to create a daemon pool and attach your daemons to that daemon pool. Then you can later have N daemons (1 per VM) all tied to the same daemon pool, and Cosmos will use that pool which will automatically route to the next available daemon. In this guide you’ll create 1 daemon pool and 1 daemon running in 1 VM, but you can extend that approach to spin up 2 more VMs (and their respective daemons) for max resilience.
Go to Cosmos ([https://cosmos.augmentcode.com](https://cosmos.augmentcode.com/)) > Settings > Environments > Create an environment > Daemon Pool:
You'll obtain a session.json, it will be used to authenticate the Cosmos daemon later on.
## Step 4 - Create a Cosmos daemon pool
Since you’ll be leveraging a AWS EC2 VM to host your daemon, it’s important to think about uptime and resilience: your VM could loose network connectivity or have an outage. The best practice is to create a daemon pool and attach your daemons to that daemon pool. Then you can later have N daemons (1 per VM) all tied to the same daemon pool, and Cosmos will use that pool which will automatically route to the next available daemon. In this guide you’ll create 1 daemon pool and 1 daemon running in 1 VM, but you can extend that approach to spin up 2 more VMs (and their respective daemons) for max resilience.
Go to Cosmos ([https://cosmos.augmentcode.com](https://cosmos.augmentcode.com/)) > Settings > Environments > Create an environment > Daemon Pool:
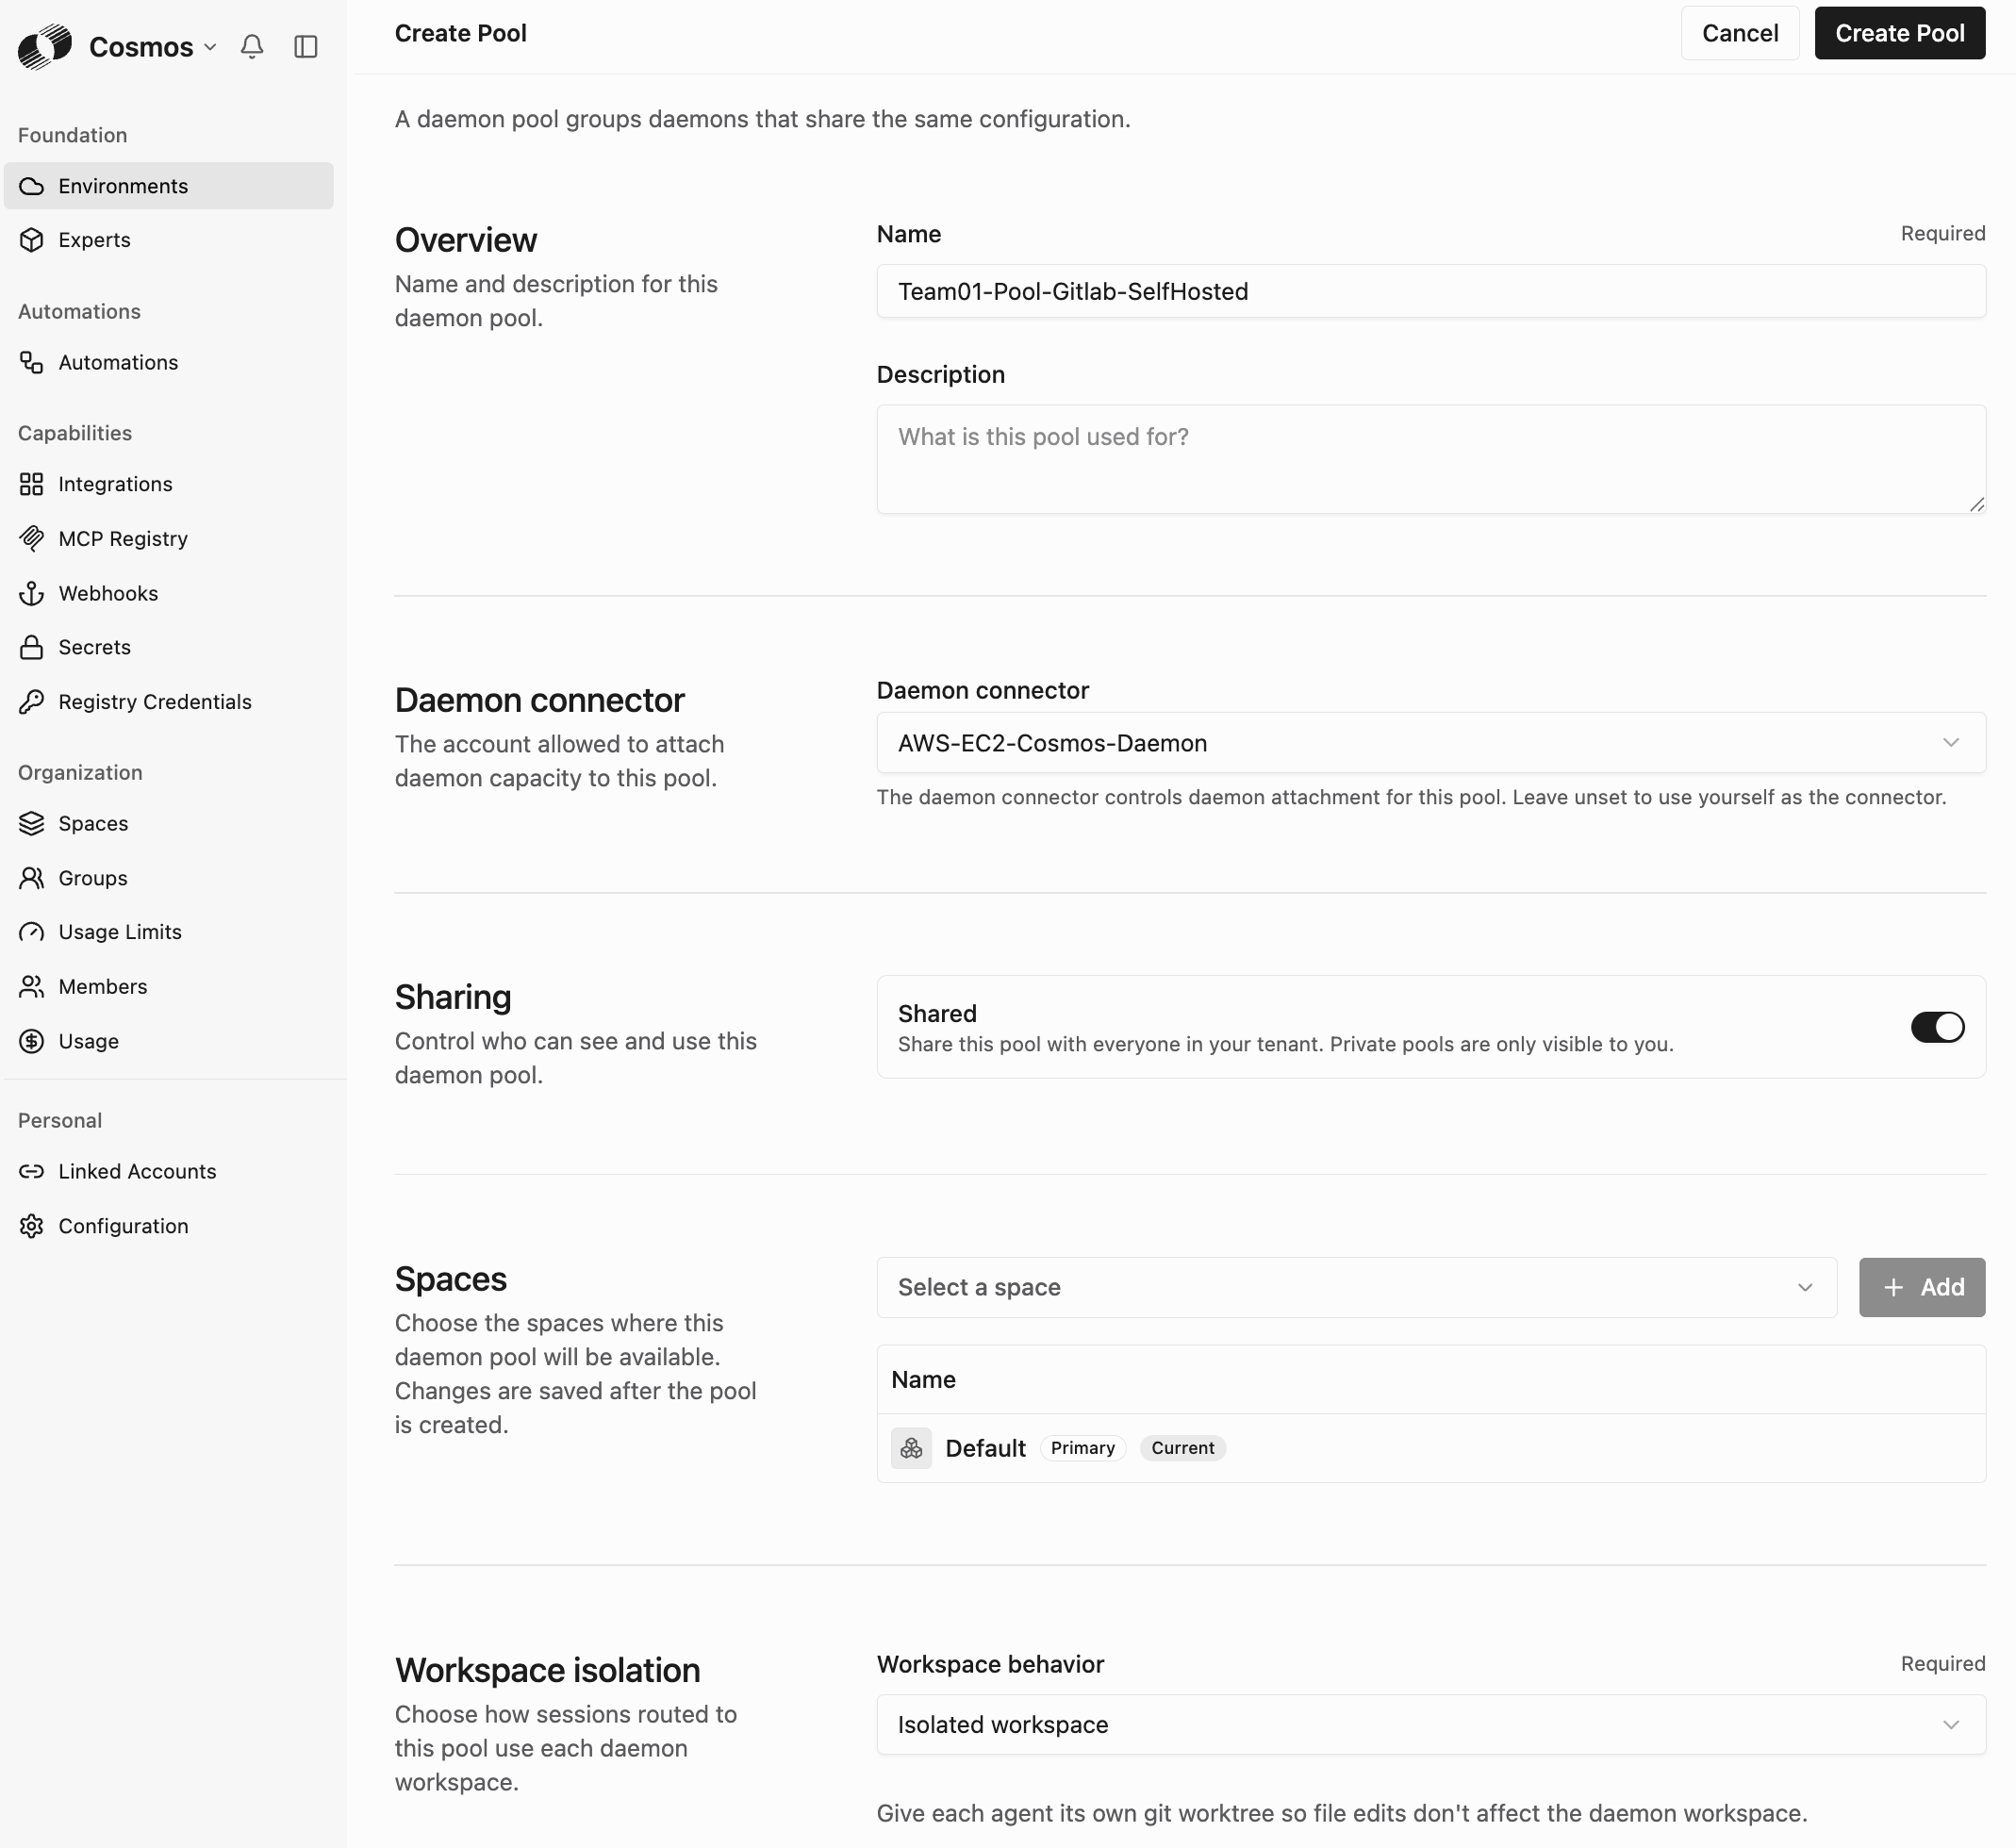
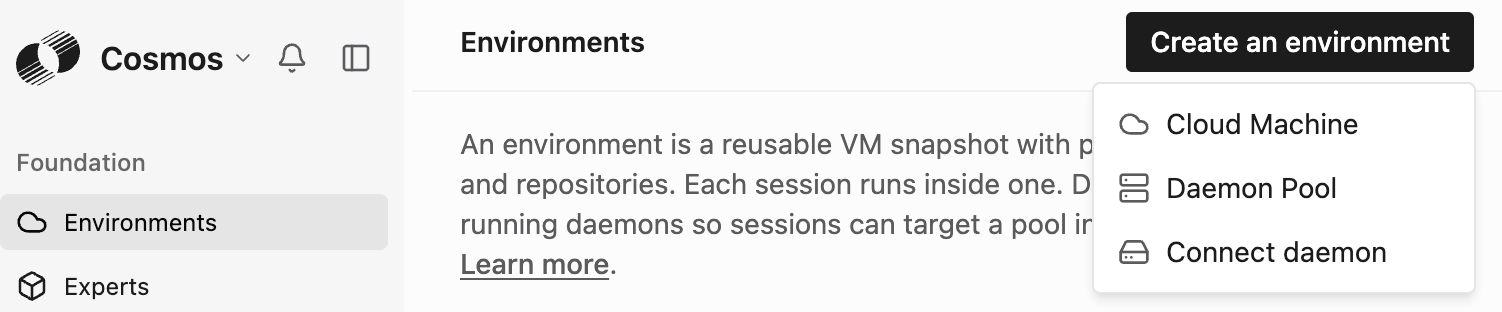 Configure the pool with:
* Name: **Team01-Pool-Gitlab-SelfHosted**
* Daemon connector: select the dedicated service account you created in the section earlier
* Shared: **toggle on**
* Workspace behavior: `Isolated workspace`
Then click on Create Pool:
Configure the pool with:
* Name: **Team01-Pool-Gitlab-SelfHosted**
* Daemon connector: select the dedicated service account you created in the section earlier
* Shared: **toggle on**
* Workspace behavior: `Isolated workspace`
Then click on Create Pool:
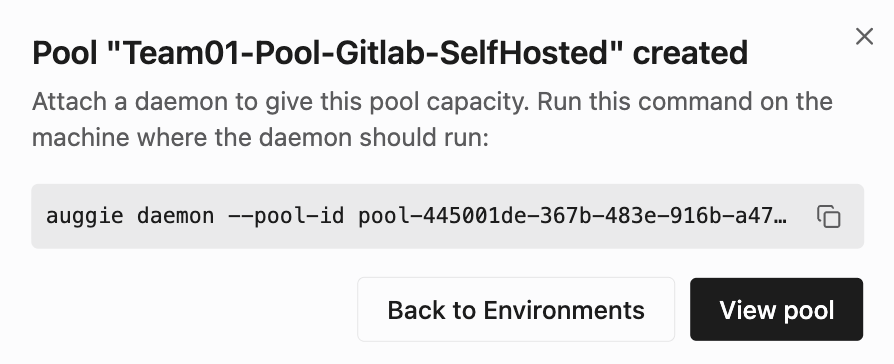
 You’ll get the confirmation that the pool has been created, note the pool-id:
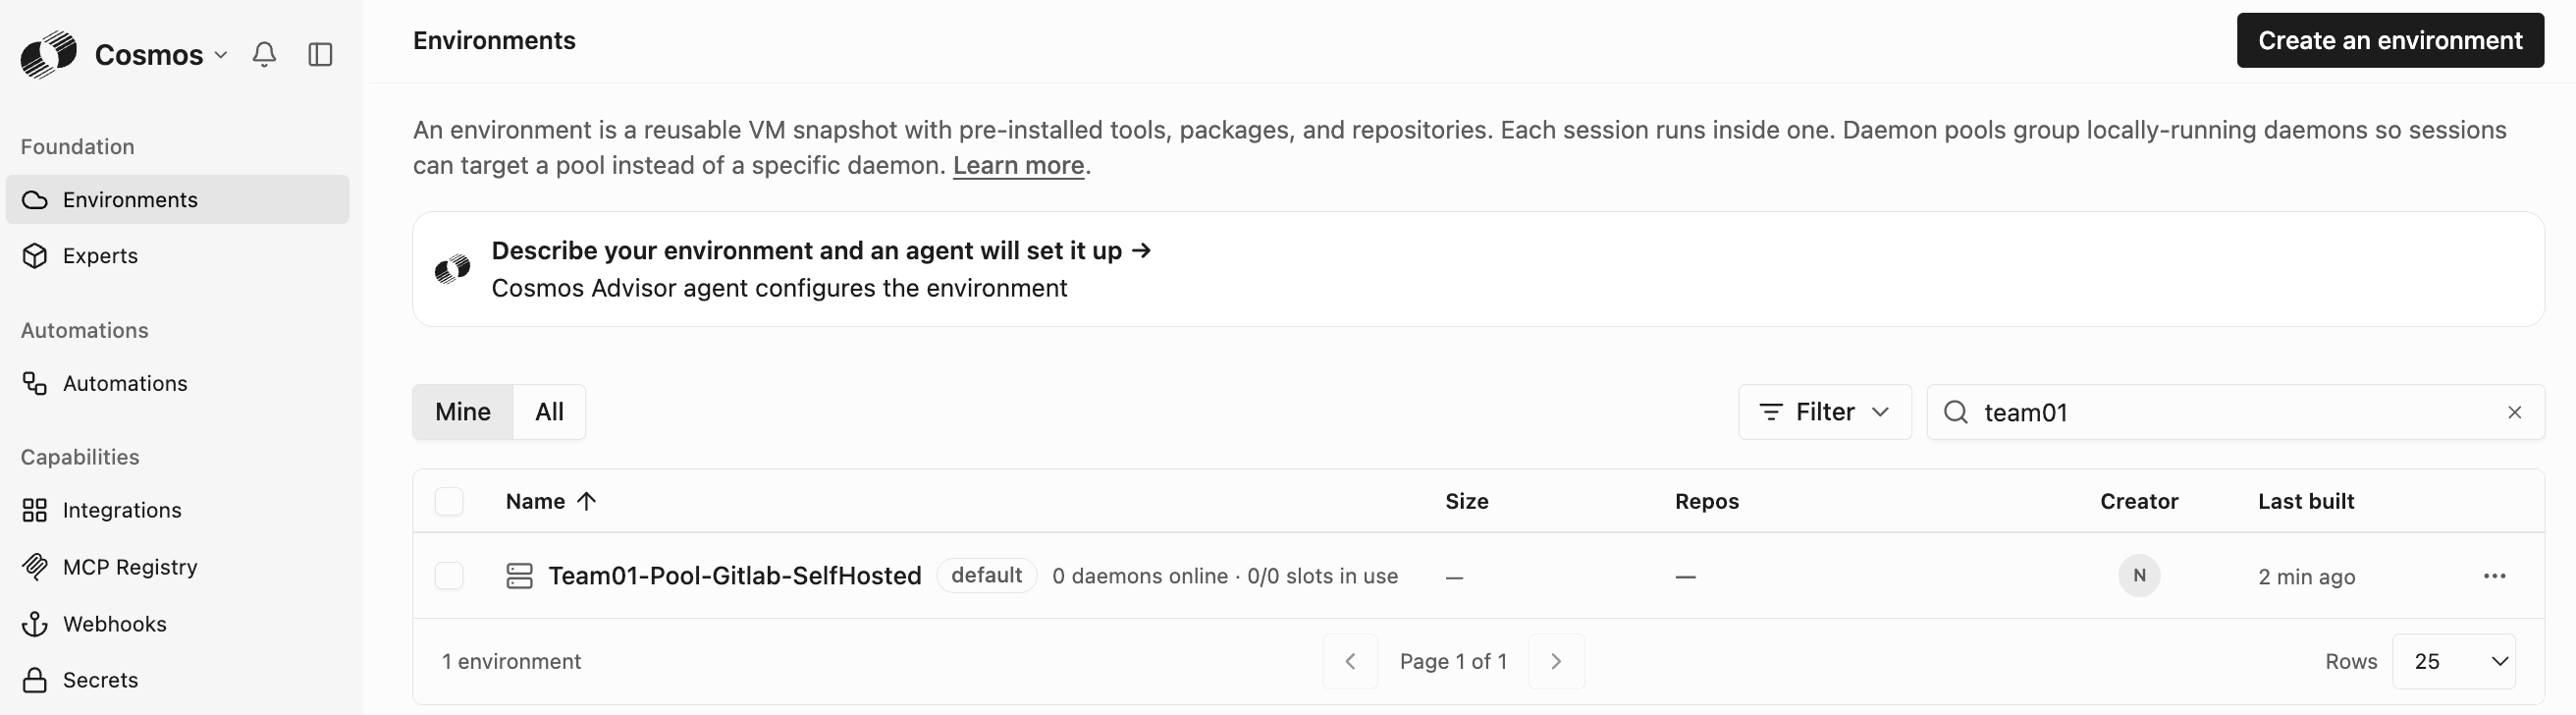
 Go back to your list of environments, you should see your pool (with no daemon online yet):
 ## Step 5 - Configure your VM with local Gitlab repos, glab cli and Cosmos daemon
In this section you’ll configure a AWS EC2 VM with the following:
* locally cloned Gitlab repos
* `glab` cli so Cosmos local agents can communicate to Gitlab
* a Cosmos pool + daemon (to establish an outbound websocket tunnel from AWS to Cosmos)
### Create the VM, with git and NVM/node
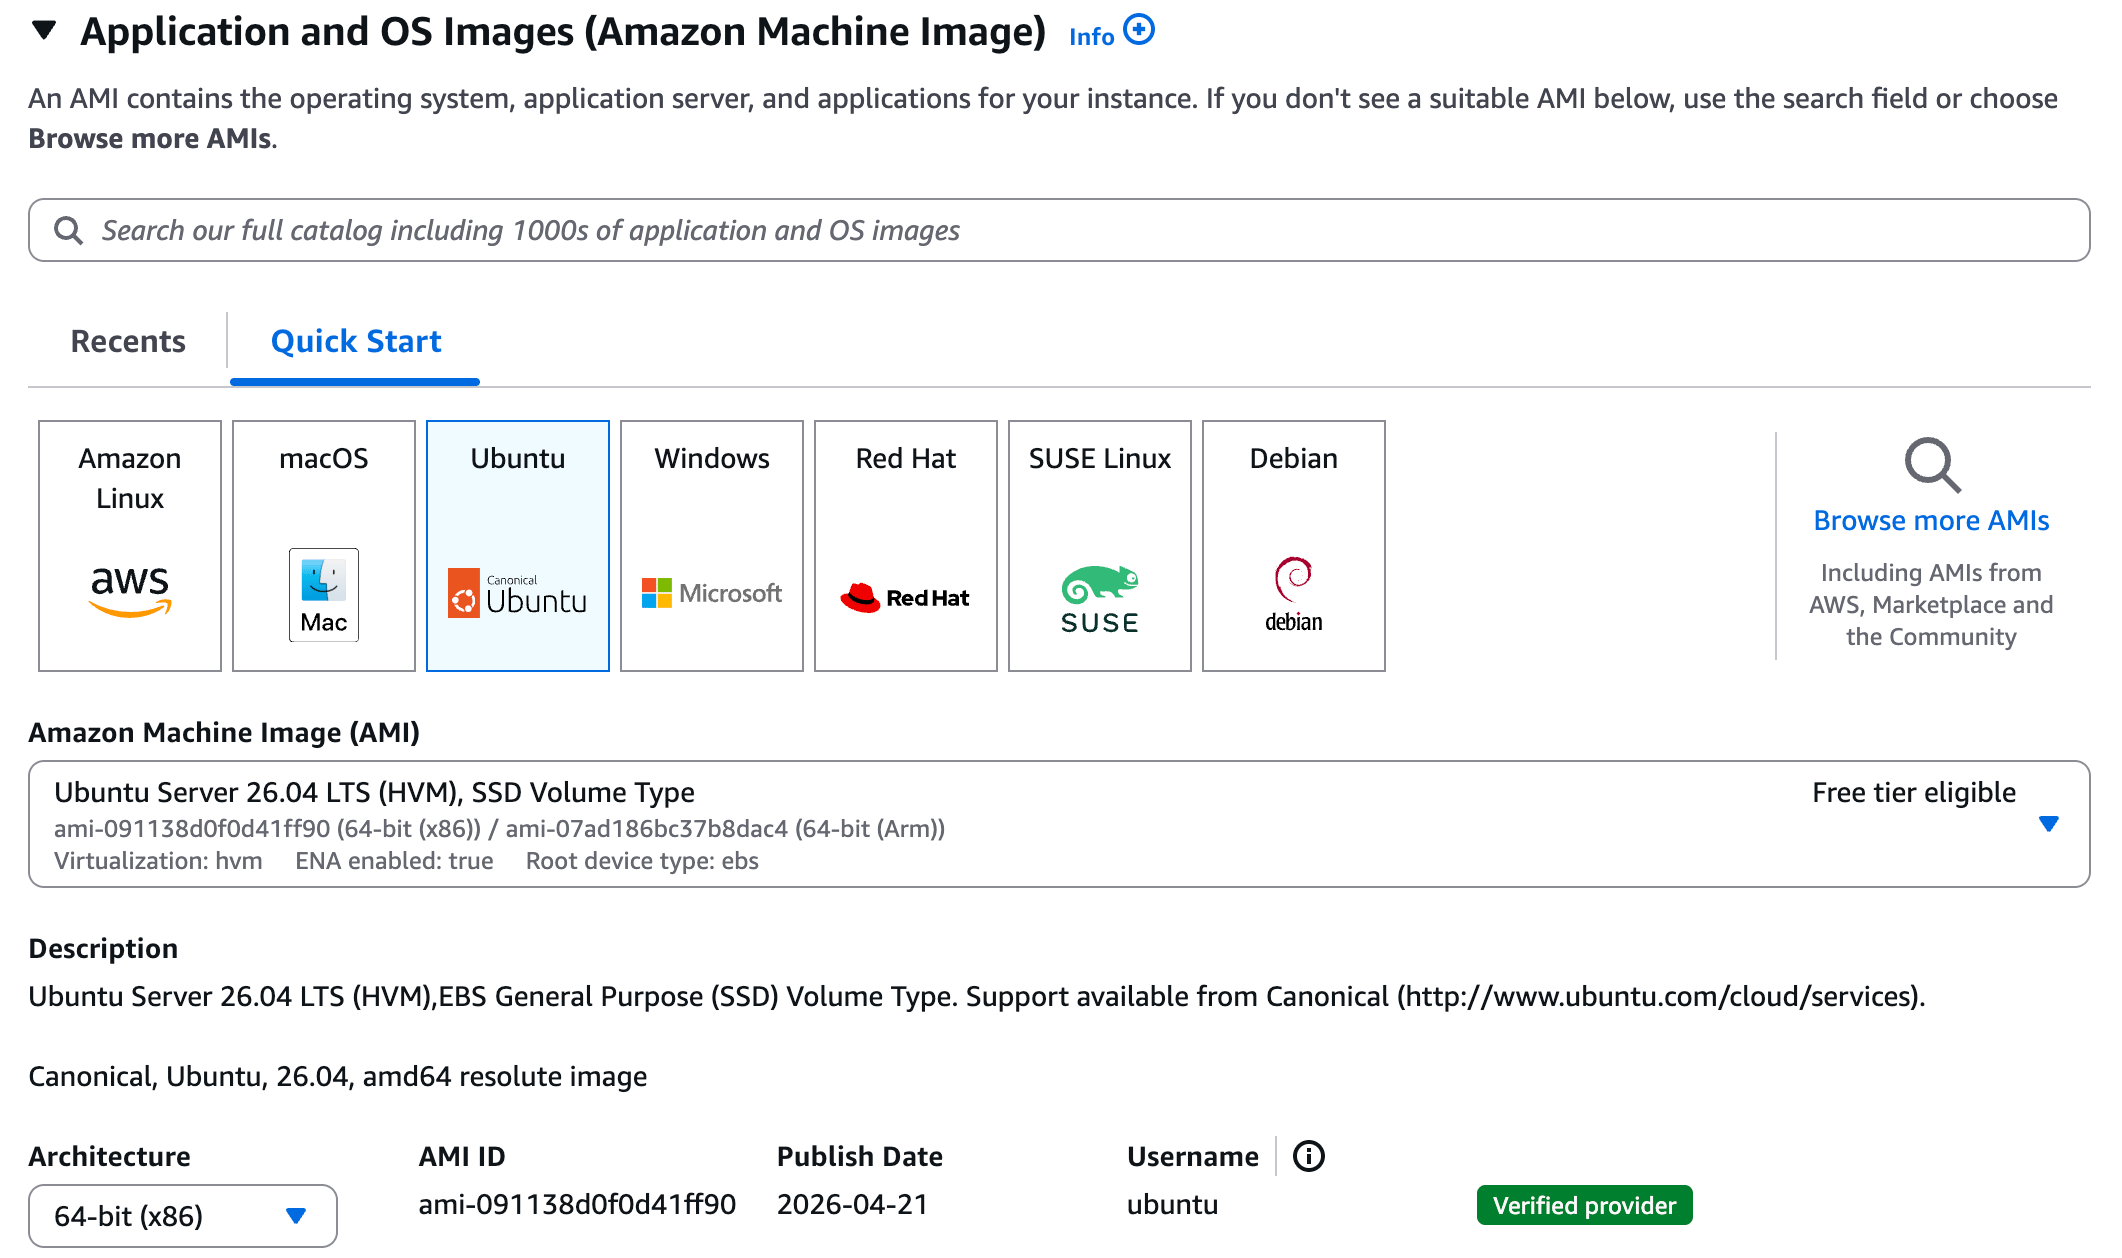
Create a new AWS EC2 Linux instance (ex: Ubuntu x86\_64 - ami-091138d0f0d41ff90) in a AWS VPC that will be able to reach your Gitlab Self-Hosted instance.
Minimum config recommended: **4 vCPU, 16 GB RAM, 100 GB SSD**
## Step 5 - Configure your VM with local Gitlab repos, glab cli and Cosmos daemon
In this section you’ll configure a AWS EC2 VM with the following:
* locally cloned Gitlab repos
* `glab` cli so Cosmos local agents can communicate to Gitlab
* a Cosmos pool + daemon (to establish an outbound websocket tunnel from AWS to Cosmos)
### Create the VM, with git and NVM/node
Create a new AWS EC2 Linux instance (ex: Ubuntu x86\_64 - ami-091138d0f0d41ff90) in a AWS VPC that will be able to reach your Gitlab Self-Hosted instance.
Minimum config recommended: **4 vCPU, 16 GB RAM, 100 GB SSD**
 Then SSH onto the AWS EC2 instance.
Install git
```bash theme={null}
sudo apt update && sudo apt install git -y
```
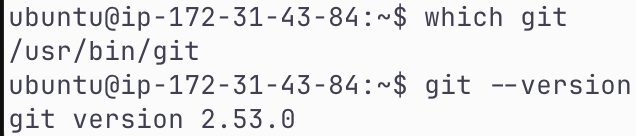
Verify the installation
```bash theme={null}
which git
git --version
```
Then SSH onto the AWS EC2 instance.
Install git
```bash theme={null}
sudo apt update && sudo apt install git -y
```
Verify the installation
```bash theme={null}
which git
git --version
```
 Install NVM
```bash theme={null}
curl -o- https://raw.githubusercontent.com/nvm-sh/nvm/v0.40.1/install.sh | bash
```
Refresh the terminal profile
```bash theme={null}
source ~/.bashrc
```
Install the latest Long-Term Support (LTS) version of Node & NPM
```bash theme={null}
nvm install --lts
```
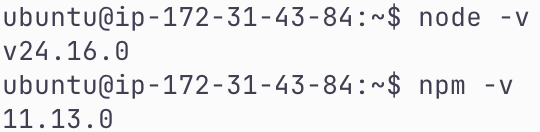
Verify the node install
```bash theme={null}
node -v
npm -v
```
Install NVM
```bash theme={null}
curl -o- https://raw.githubusercontent.com/nvm-sh/nvm/v0.40.1/install.sh | bash
```
Refresh the terminal profile
```bash theme={null}
source ~/.bashrc
```
Install the latest Long-Term Support (LTS) version of Node & NPM
```bash theme={null}
nvm install --lts
```
Verify the node install
```bash theme={null}
node -v
npm -v
```
 ### Git clone your Gitlab repos locally
Create a local \~/workspace/ folder
In that workspace folder create folders for your Gitlab organizations
In the corresponding organization folders, git clone your repos (you need at a minimum an empty git repo with at least one commit for the git worktree configuration to be valid and for the agent to start)
You should have a “2 layers” folder structure like this:
* \~/workspace/augmentcode-sa1/REPO\_A/.git
* \~/workspace/augmentcode-sa1/REPO\_B/.git
* \~/workspace/augmentcode-sa2/REPO\_C/.git
* \~/workspace/augmentcode-sa2/REPO\_D/.git
Note: at this moment you have to own making sure that the git repos are locally cloned and are kept up to date regularly. In a future release, daemons will be able to handle that on your behalf - stay tuned
### Install and authenticate the glab CLI
Install the `glab` cli: make sure you’re in your root folder, install the `glab` cli using this command:
```shell theme={null}
LATEST_TAG=$(curl -s "https://gitlab.com/api/v4/projects/gitlab-org%2Fcli/releases" | grep -o '"tag_name":"[^"]*' | head -n 1 | cut -d'"' -f4) && LATEST_VER="${LATEST_TAG#v}" && wget "https://gitlab.com/gitlab-org/cli/-/releases/${LATEST_TAG}/downloads/glab_${LATEST_VER}_linux_amd64.deb" -O /tmp/glab_latest.deb && sudo dpkg -i /tmp/glab_latest.deb && rm /tmp/glab_latest.deb
```
Then authenticate the `glab` cli, run:
```shell theme={null}
echo "" | glab auth login --hostname gitlab.yourdomain.com --stdin
```
You should see:
```plain text theme={null}
✓ Logged in as cosmos-xxx
✓ Stored your credentials in the configuration file.
```
### Start the daemon
cd into \~/workspace/
run
```shell theme={null}
nano session.json
```
Paste in there the content of session.json you retrieved earlier when creating the Augment service account. Then CTRL-O + RETURN to save the file and CTRL-X + RETURN to exit
Install Auggie
```bash theme={null}
npm install -g @augmentcode/auggie
```
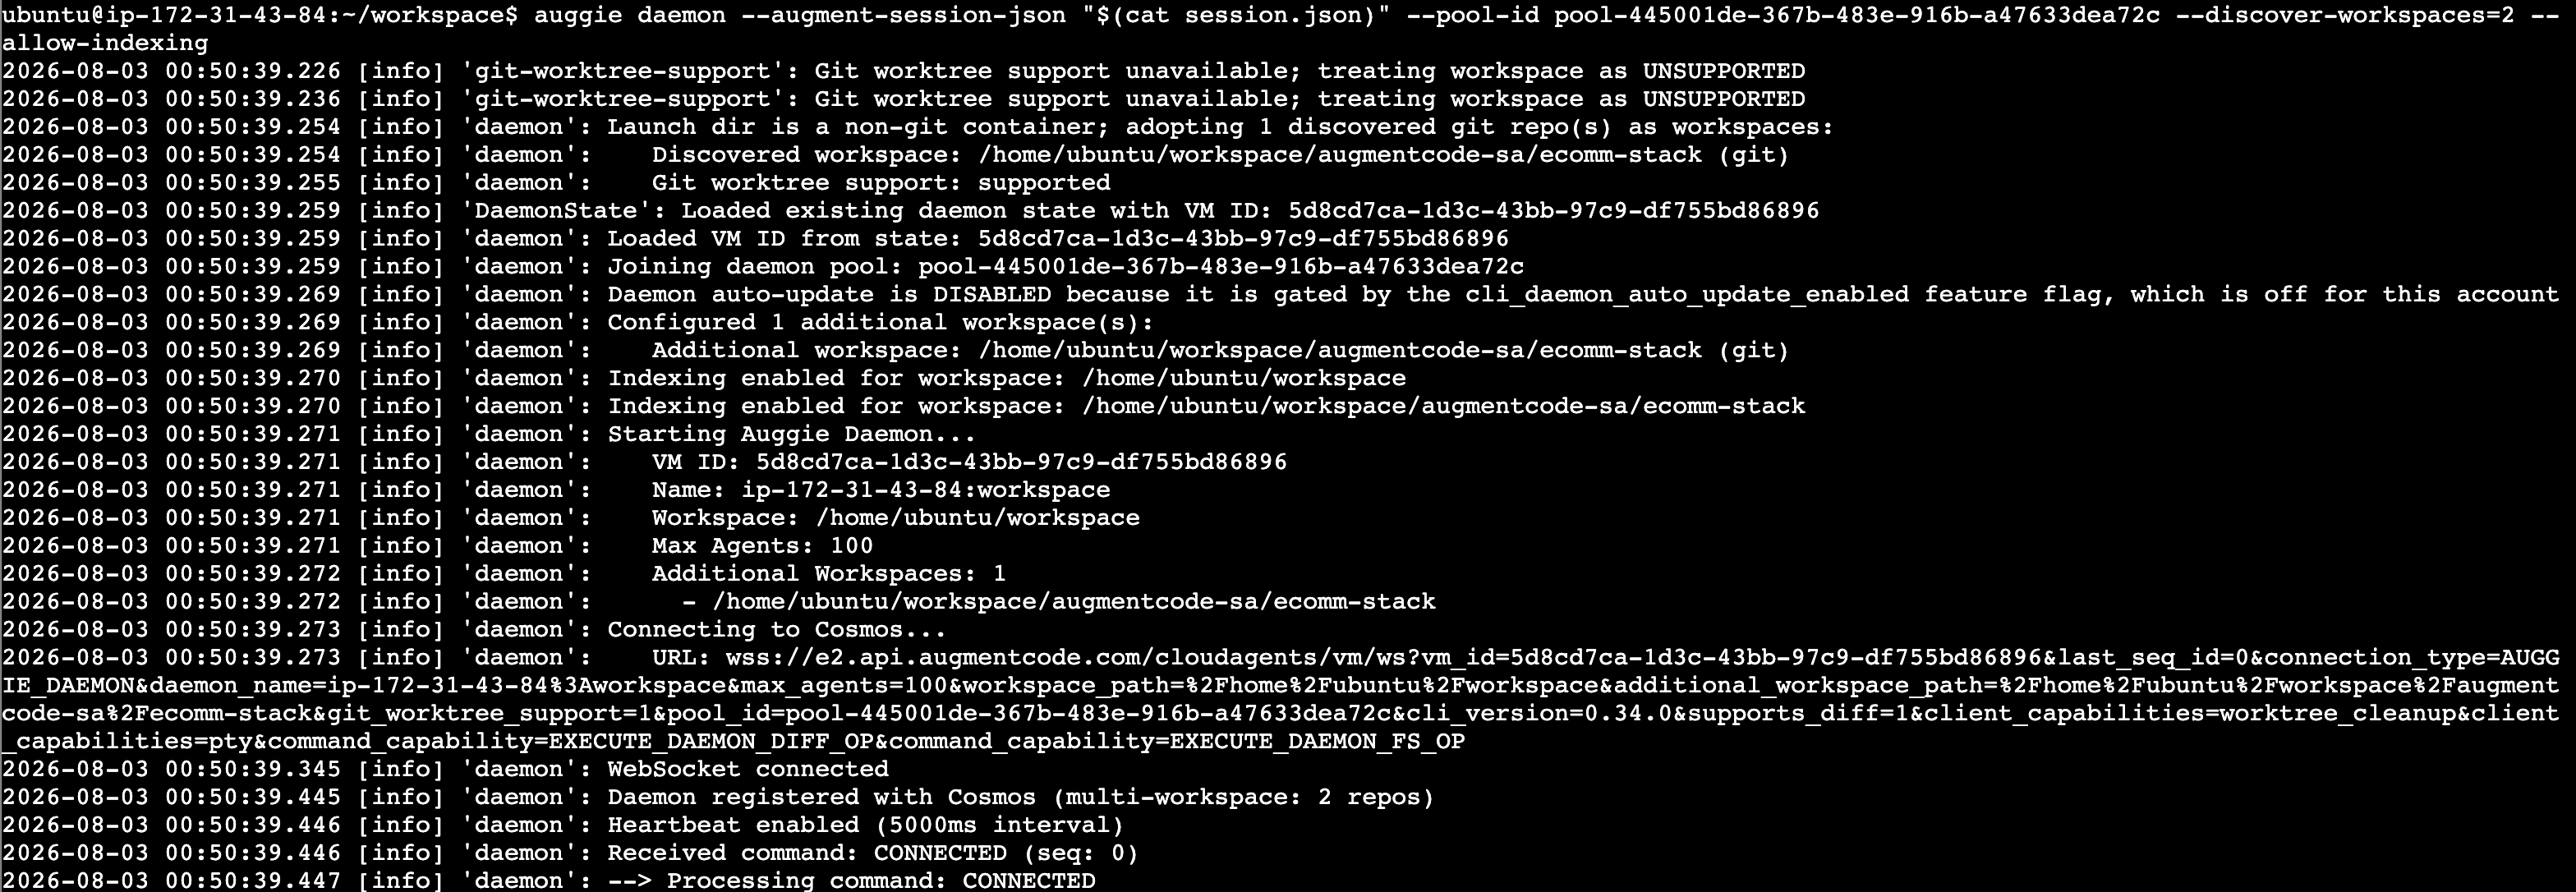
Start the Cosmos daemon using the Augment service account and attach the daemon to the pool, run:
```shell theme={null}
auggie daemon --augment-session-json "$(cat /path/to/session.json)" --pool-id --discover-workspaces=2 --allow-indexing
```
That will start the daemon, note in your daemon logs:
* “Launch dir is a non-git container; adopting N discovered git repo(s) as workspaces \[…]” ⇒ check that all your local git repos have been discovered
* “Git worktree support: supported”
* “Joining daemon pool: \”
* “Indexing enabled for workspace: \[…]”
* “Starting Auggie Daemon \[…]”
* “Connecting to Cosmos...”
### Git clone your Gitlab repos locally
Create a local \~/workspace/ folder
In that workspace folder create folders for your Gitlab organizations
In the corresponding organization folders, git clone your repos (you need at a minimum an empty git repo with at least one commit for the git worktree configuration to be valid and for the agent to start)
You should have a “2 layers” folder structure like this:
* \~/workspace/augmentcode-sa1/REPO\_A/.git
* \~/workspace/augmentcode-sa1/REPO\_B/.git
* \~/workspace/augmentcode-sa2/REPO\_C/.git
* \~/workspace/augmentcode-sa2/REPO\_D/.git
Note: at this moment you have to own making sure that the git repos are locally cloned and are kept up to date regularly. In a future release, daemons will be able to handle that on your behalf - stay tuned
### Install and authenticate the glab CLI
Install the `glab` cli: make sure you’re in your root folder, install the `glab` cli using this command:
```shell theme={null}
LATEST_TAG=$(curl -s "https://gitlab.com/api/v4/projects/gitlab-org%2Fcli/releases" | grep -o '"tag_name":"[^"]*' | head -n 1 | cut -d'"' -f4) && LATEST_VER="${LATEST_TAG#v}" && wget "https://gitlab.com/gitlab-org/cli/-/releases/${LATEST_TAG}/downloads/glab_${LATEST_VER}_linux_amd64.deb" -O /tmp/glab_latest.deb && sudo dpkg -i /tmp/glab_latest.deb && rm /tmp/glab_latest.deb
```
Then authenticate the `glab` cli, run:
```shell theme={null}
echo "" | glab auth login --hostname gitlab.yourdomain.com --stdin
```
You should see:
```plain text theme={null}
✓ Logged in as cosmos-xxx
✓ Stored your credentials in the configuration file.
```
### Start the daemon
cd into \~/workspace/
run
```shell theme={null}
nano session.json
```
Paste in there the content of session.json you retrieved earlier when creating the Augment service account. Then CTRL-O + RETURN to save the file and CTRL-X + RETURN to exit
Install Auggie
```bash theme={null}
npm install -g @augmentcode/auggie
```
Start the Cosmos daemon using the Augment service account and attach the daemon to the pool, run:
```shell theme={null}
auggie daemon --augment-session-json "$(cat /path/to/session.json)" --pool-id --discover-workspaces=2 --allow-indexing
```
That will start the daemon, note in your daemon logs:
* “Launch dir is a non-git container; adopting N discovered git repo(s) as workspaces \[…]” ⇒ check that all your local git repos have been discovered
* “Git worktree support: supported”
* “Joining daemon pool: \”
* “Indexing enabled for workspace: \[…]”
* “Starting Auggie Daemon \[…]”
* “Connecting to Cosmos...”
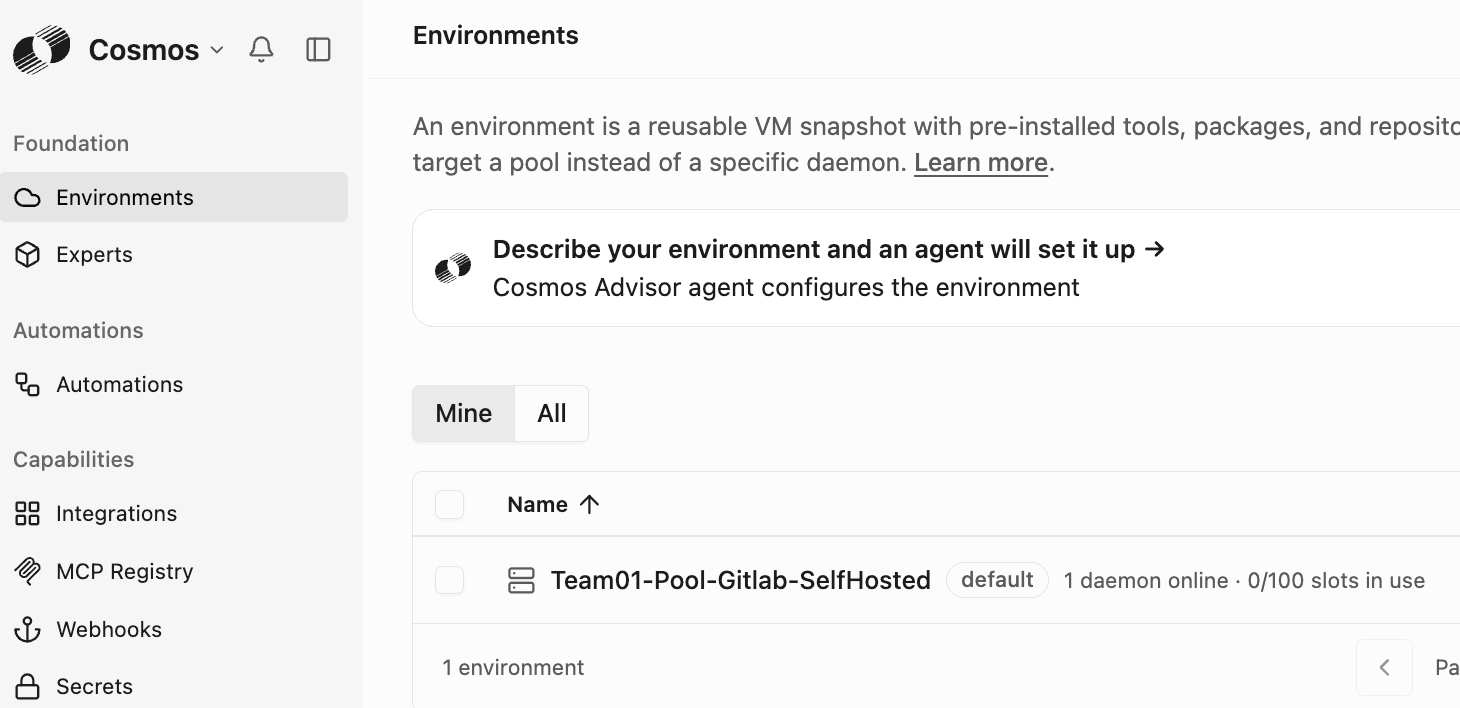
 You can now see the daemon running from Cosmos: Cosmos ([https://cosmos.augmentcode.com](https://cosmos.augmentcode.com/)) > Settings > Environments:
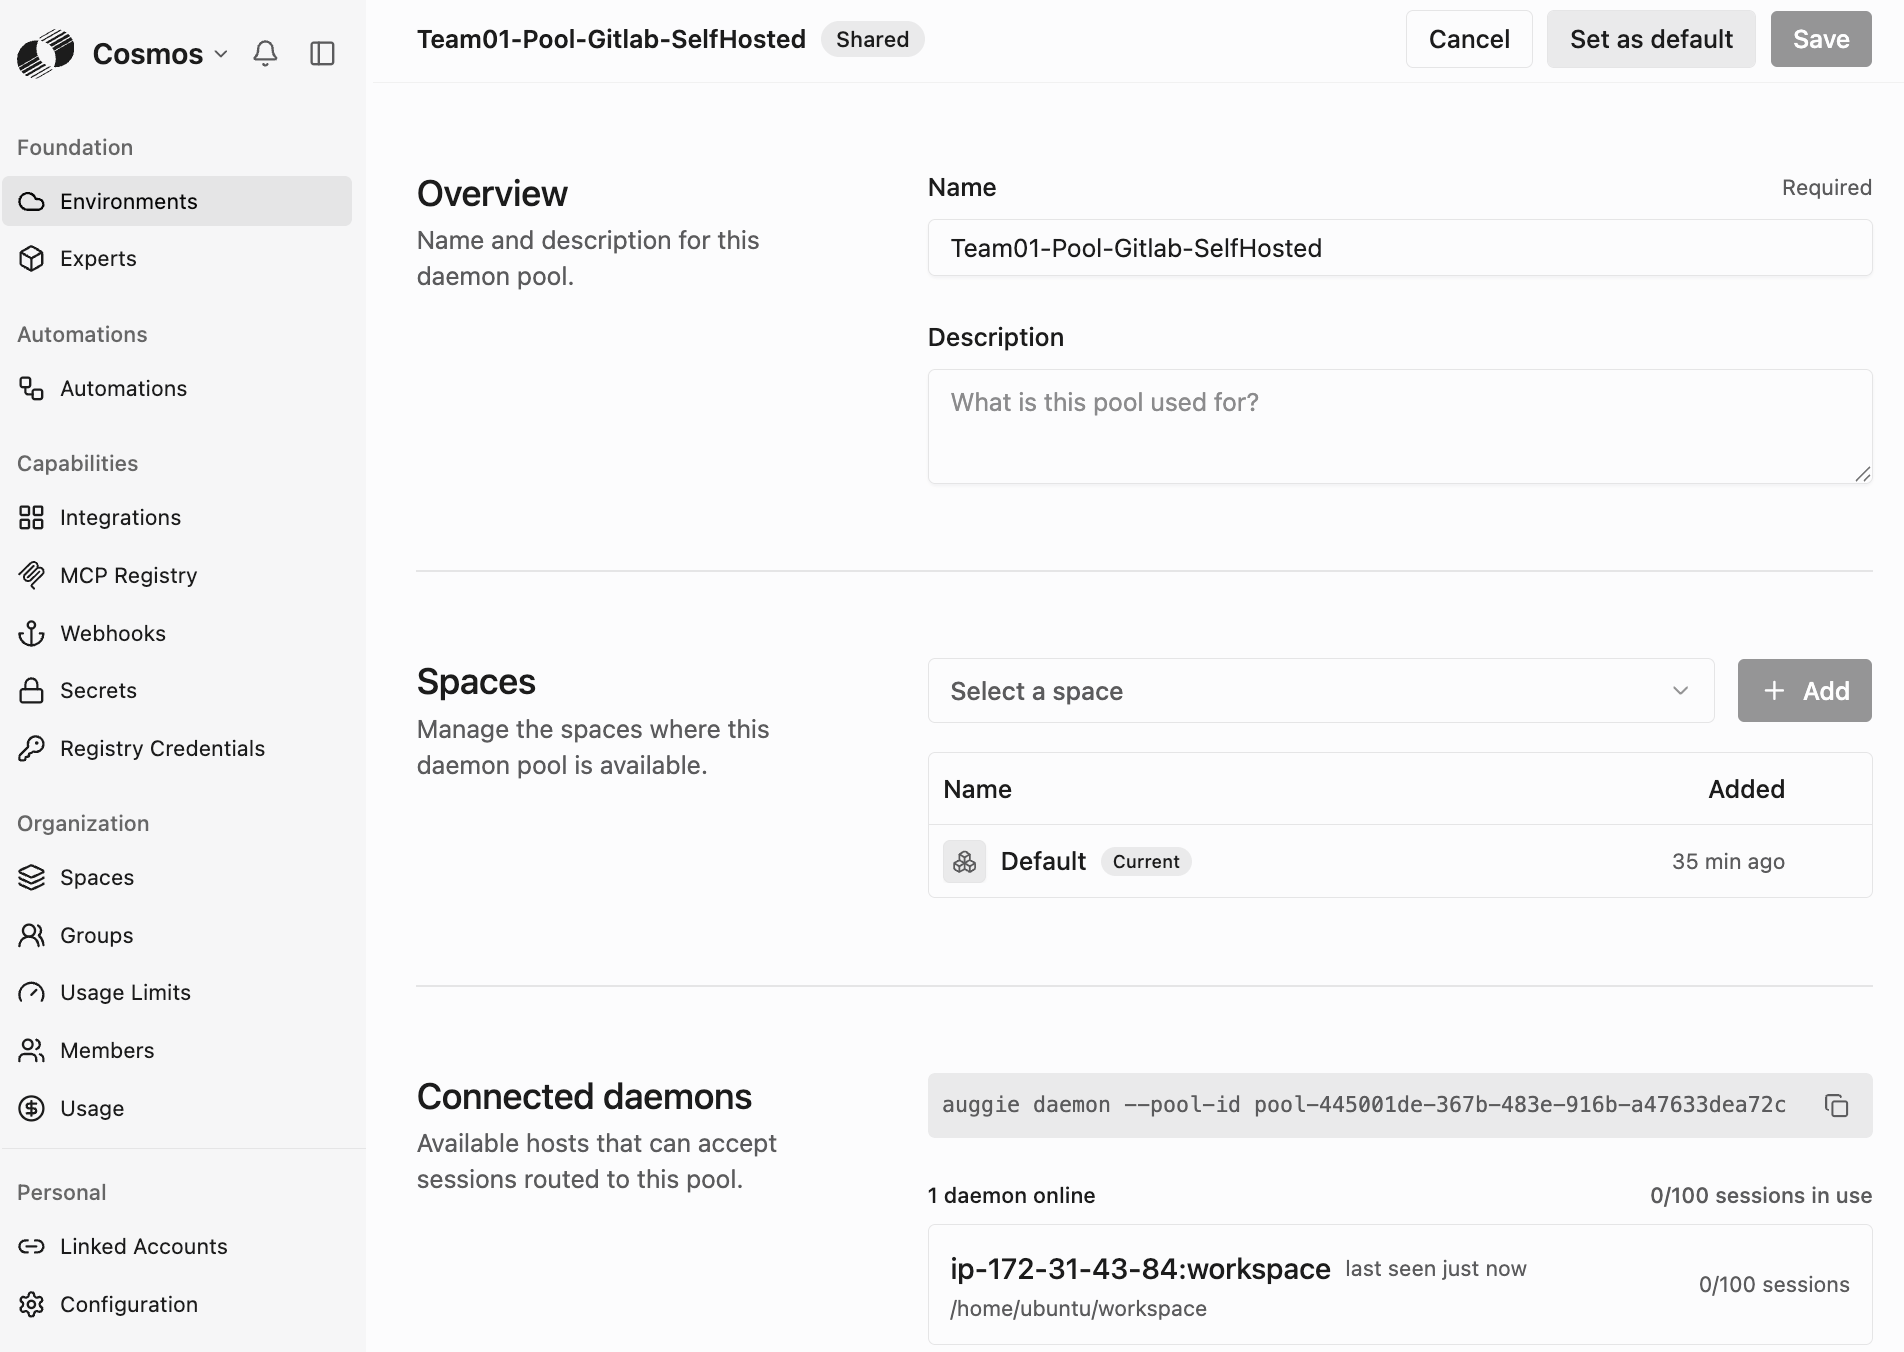
 If you click on the pool, then top right you can set this pool as default environment to run your agents:
 ## Step 6 - Connectivity test
Now you’ll create a session in Cosmos (cloud) and verify it can connect to the VM, make sense of the local repos and from that VM reach out to Gitlab via the `glab` CLI.
Go to Cosmos > New Session ([https://cosmos.augmentcode.com/home](https://cosmos.augmentcode.com/home))
Under the prompt, click on the dropdown list with the cloud icon > select Daemon > select your daemon pool:
## Step 6 - Connectivity test
Now you’ll create a session in Cosmos (cloud) and verify it can connect to the VM, make sense of the local repos and from that VM reach out to Gitlab via the `glab` CLI.
Go to Cosmos > New Session ([https://cosmos.augmentcode.com/home](https://cosmos.augmentcode.com/home))
Under the prompt, click on the dropdown list with the cloud icon > select Daemon > select your daemon pool:
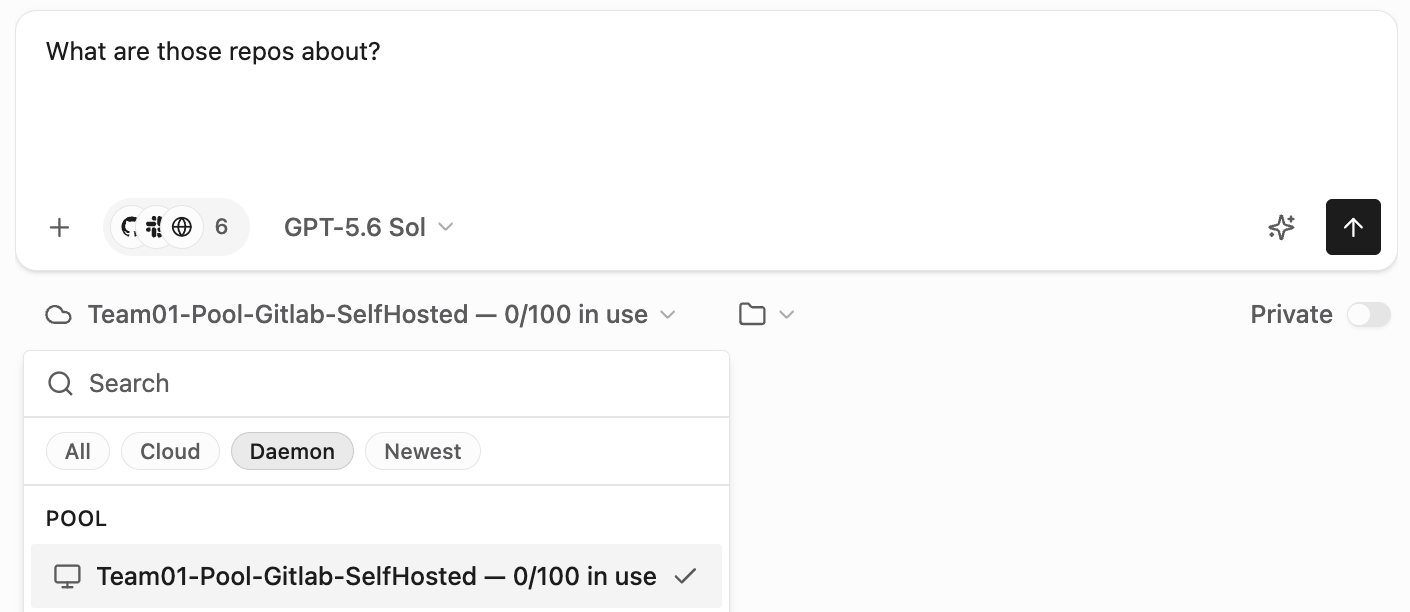 Prompt the session with **What are those repos about?**, you should see a response powered by the Augment Context Engine that already made sense of your repos:
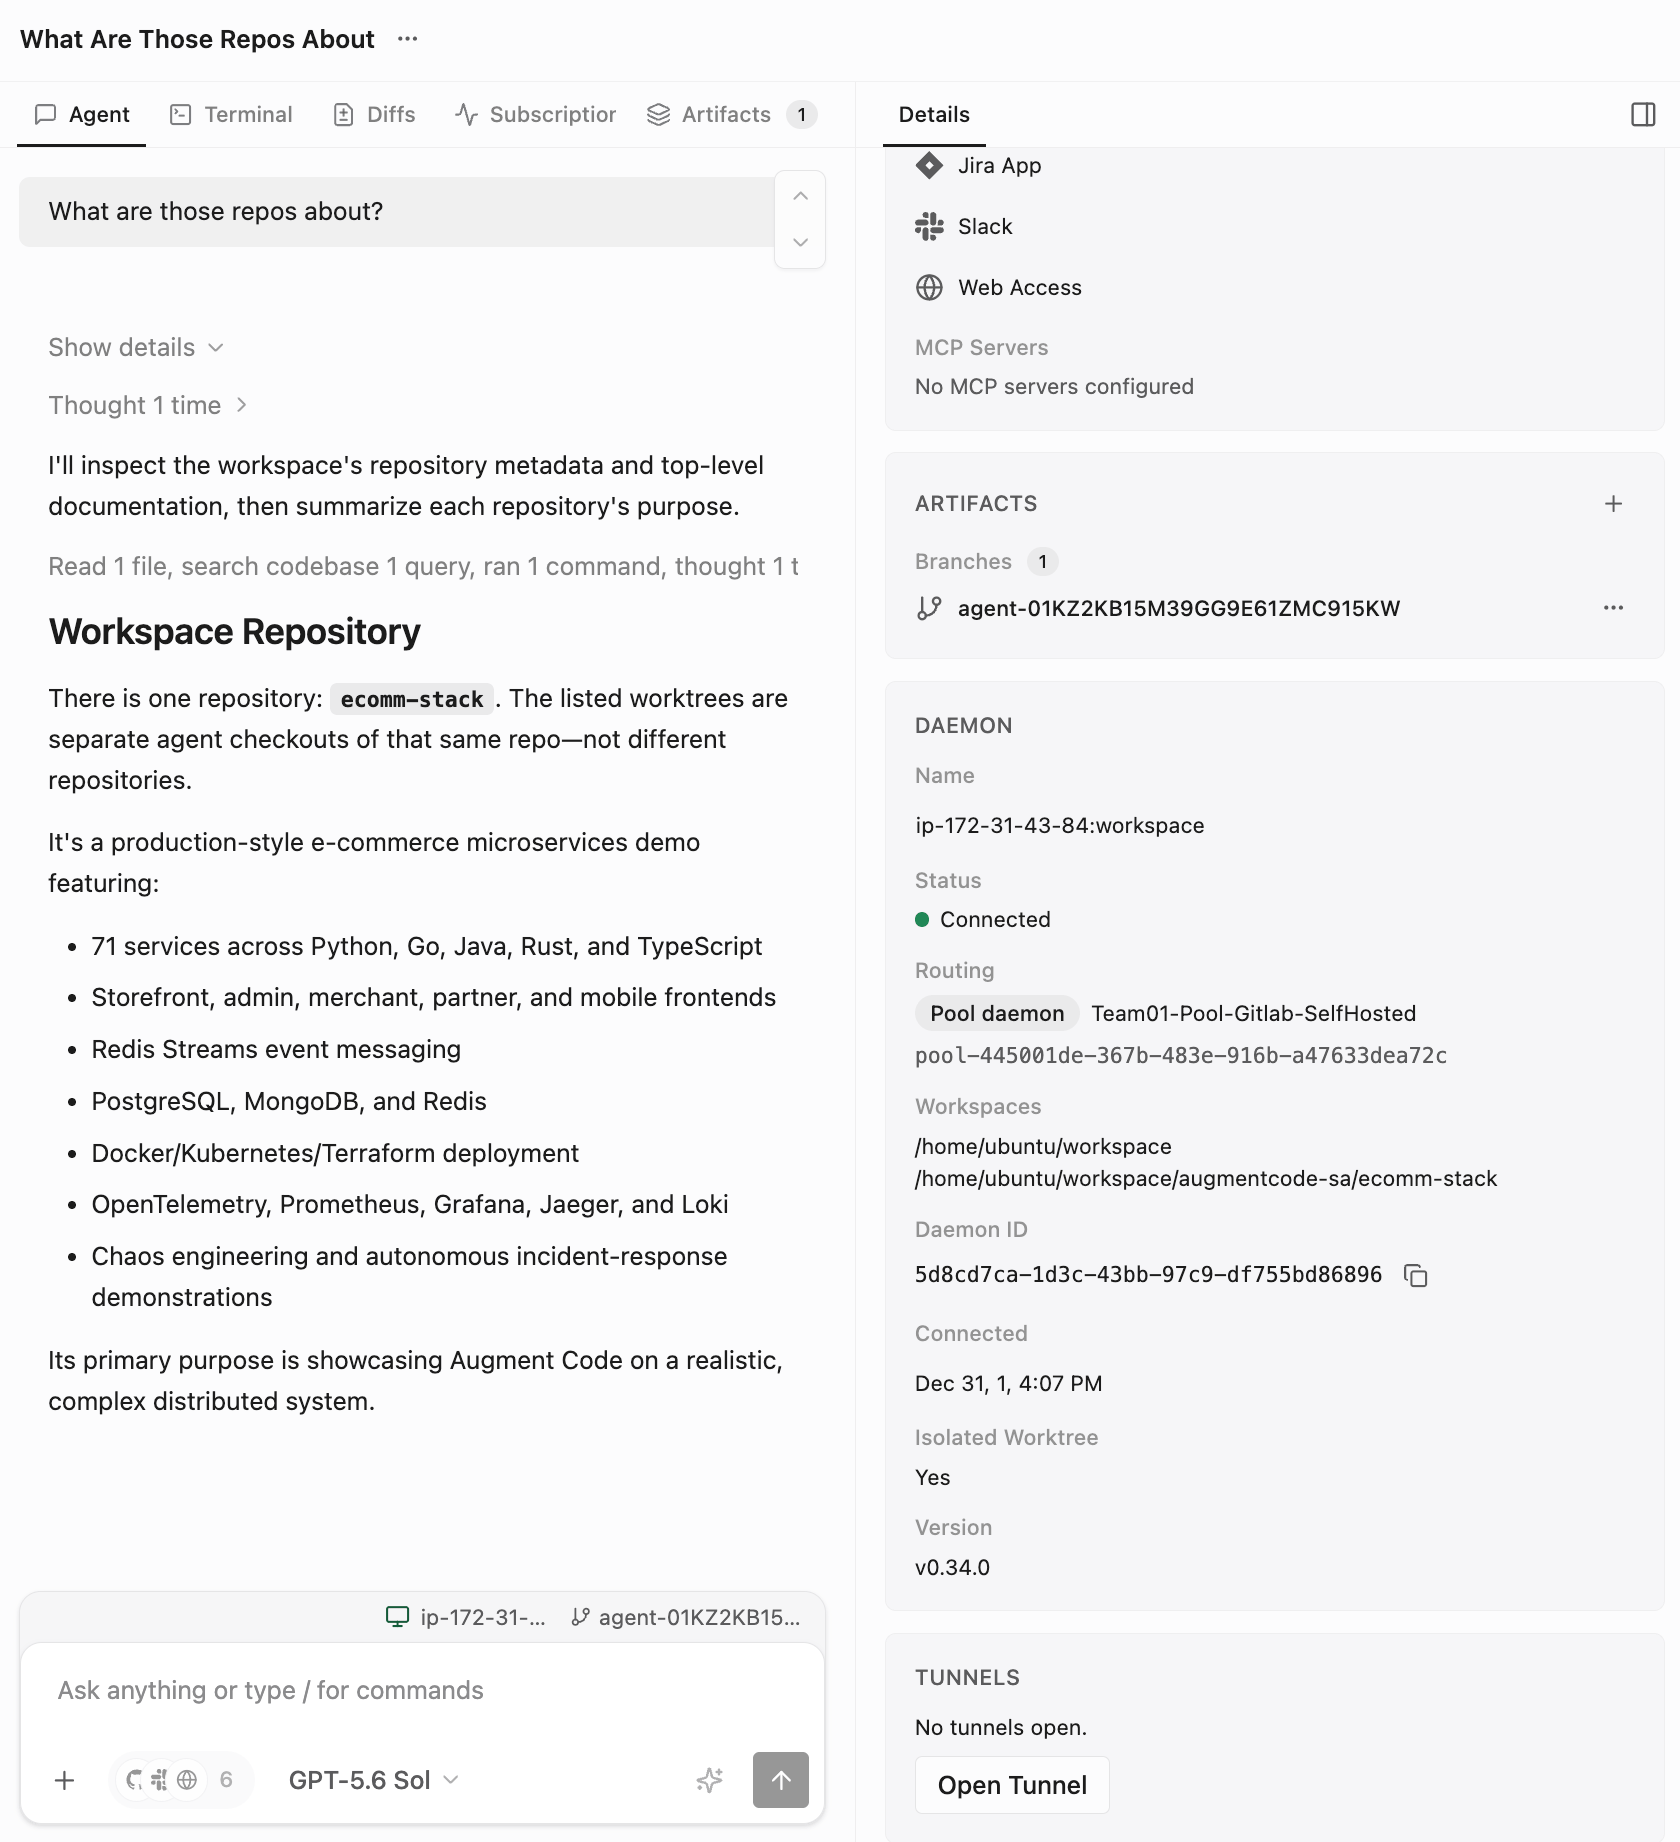 The connectivity between Cosmos (cloud) and your local VM has been verified ✅
Now prompt the session with: **Use the glab cli to look up \**
The connectivity between Cosmos (cloud) and your local VM has been verified ✅
Now prompt the session with: **Use the glab cli to look up \**
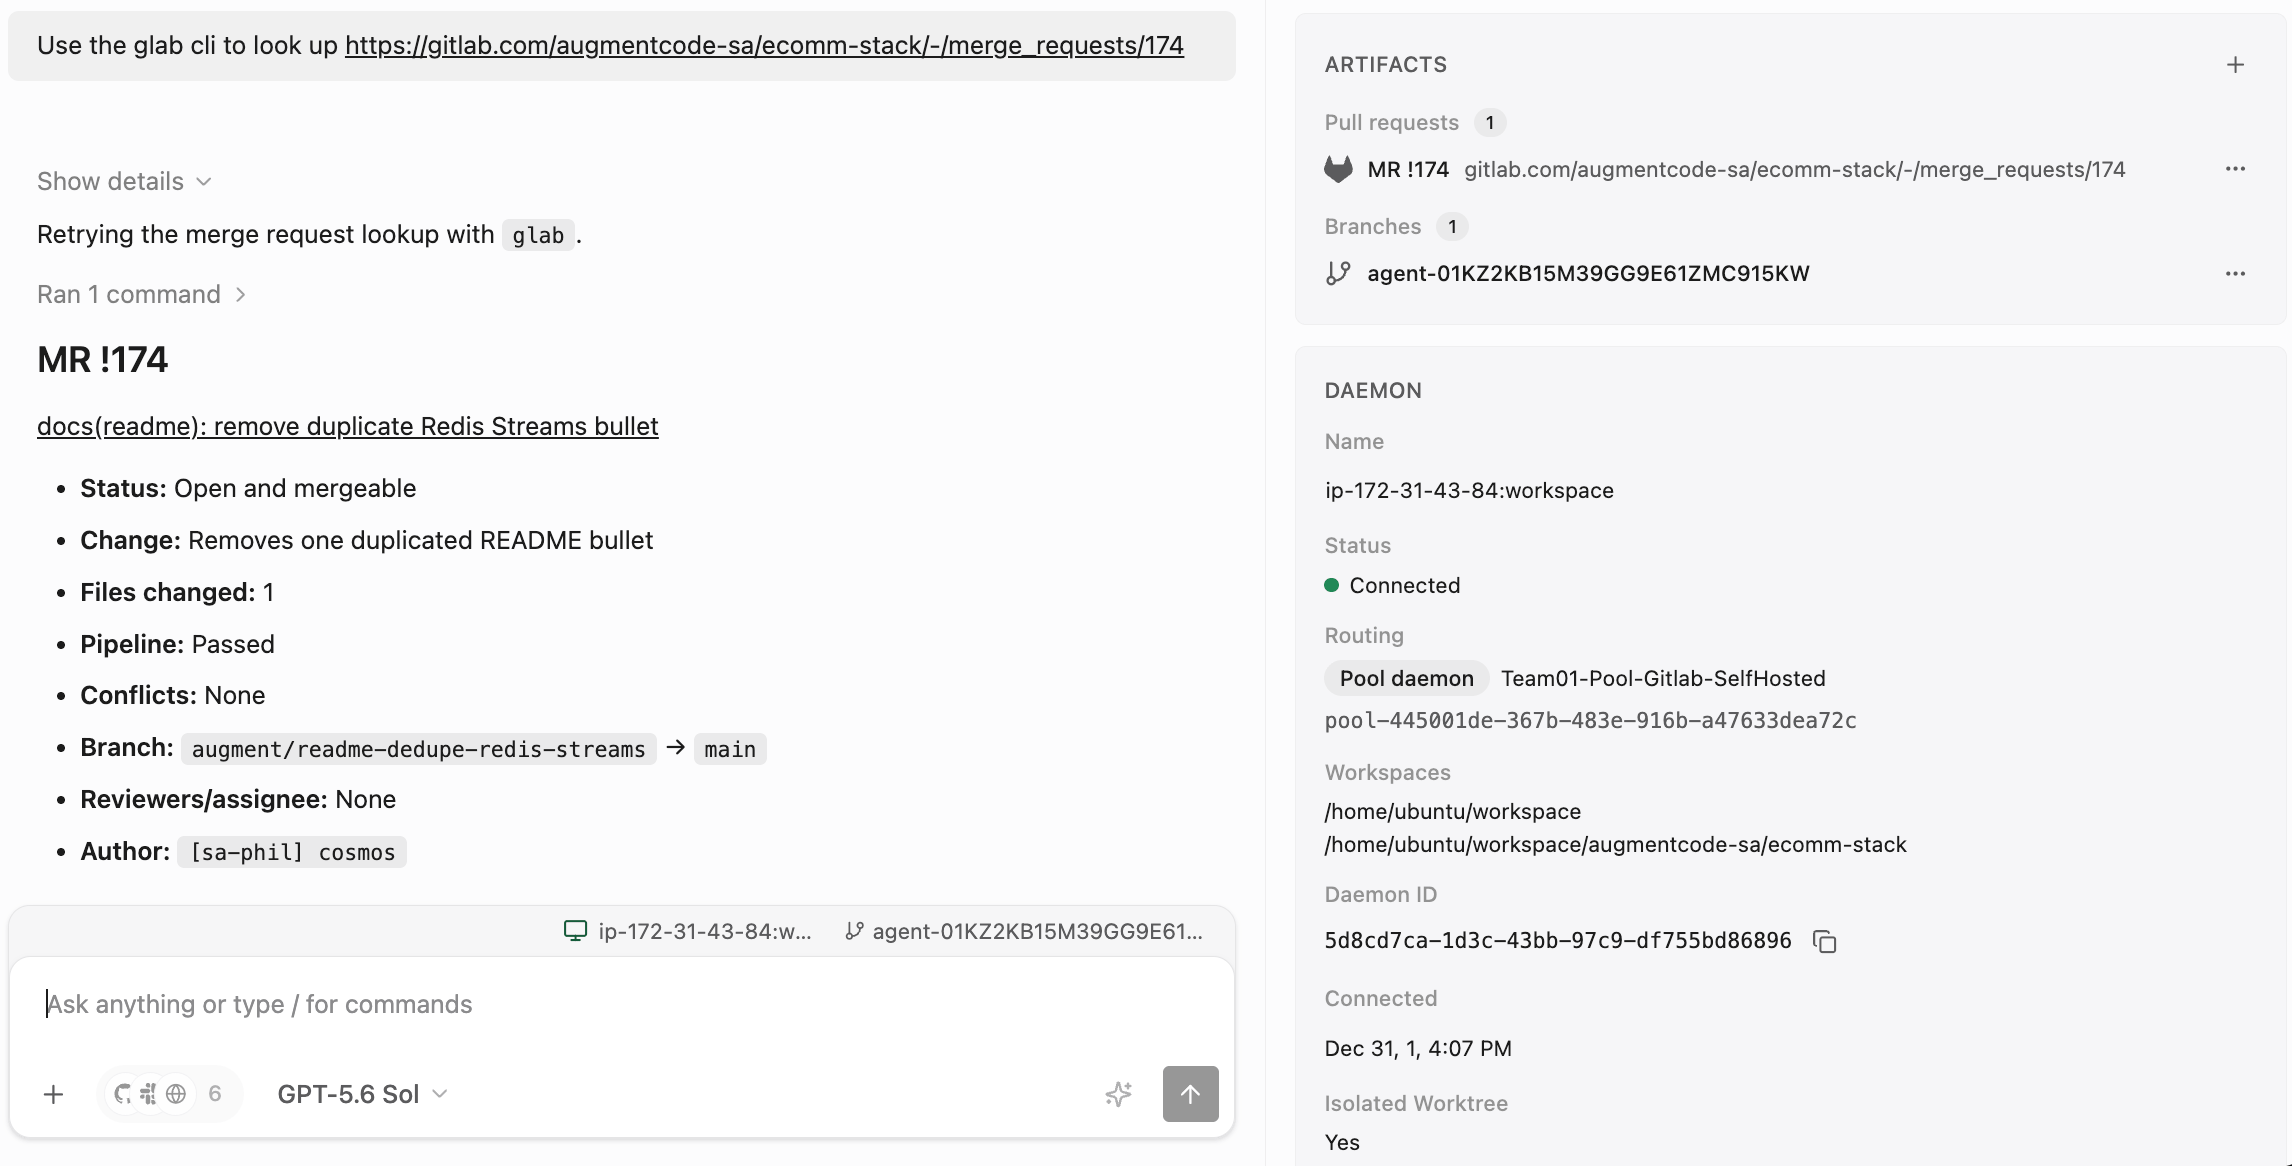 Observe that the Cosmos session was able to use the `glab` cli to lookup the MR.
## Step 7 - Create your Cosmos Experts
Now that connectivity is established, you can focus on deploying your Cosmos experts.
You can follow the steps in [https://docs.augmentcode.com/cosmos/gitlab-cloud#step-3-create-a-mr-deep-reviewer-expert](https://docs.augmentcode.com/cosmos/gitlab-cloud#step-3-create-a-mr-deep-reviewer-expert) to create a MR author, MR Deep Code Reviewer etc. The only key difference is you’ll have to explicitly instruct Cosmos Advisor to do the following when deploying those experts:
* use the
Observe that the Cosmos session was able to use the `glab` cli to lookup the MR.
## Step 7 - Create your Cosmos Experts
Now that connectivity is established, you can focus on deploying your Cosmos experts.
You can follow the steps in [https://docs.augmentcode.com/cosmos/gitlab-cloud#step-3-create-a-mr-deep-reviewer-expert](https://docs.augmentcode.com/cosmos/gitlab-cloud#step-3-create-a-mr-deep-reviewer-expert) to create a MR author, MR Deep Code Reviewer etc. The only key difference is you’ll have to explicitly instruct Cosmos Advisor to do the following when deploying those experts:
* use the glab cli (instead of the native Gitlab Cloud integration)
* use your daemon pool (instead of the cloud environment)
* use the Gitlab webhook (instead of the native Gitlab Cloud integration)
Congratulations, you’ve integrated Cosmos with Gitlab Self-Hosted and deployed your first MR experts! 🎉