> ## Documentation Index
> Fetch the complete documentation index at: https://docs.augmentcode.com/llms.txt
> Use this file to discover all available pages before exploring further.
# Integrate GitLab Self-Hosted
## Introduction
In this page we’ll learn how to configure those items:
1. Get Gitlab to push events (ex: “new MR created”) to Augment Cosmos via webhooks
2. Configure Cosmos Daemons to integrate with a AWS EC2 instance/VM (where the Gitlab local repo will be cloned)
3. Get Augment Cosmos to interact with Gitlab via the `glab` cli\
For 2+3, below is the flow we’ll configure with a simple MR reviewer expert:
```mermaid theme={null}
sequenceDiagram
autonumber
participant A as Augment Cosmos
participant AWS as AWS EC2
participant GL as GitLab Self-Hosted
GL->>A: Webhook: Merge Request created (MR payload)
A->>AWS: run experts locally via Daemon
AWS->>AWS: Start Expert (spawn/run expert agent)
AWS->>AWS: Expert analyzes MR (diff + context)
AWS->>GL: POST MR comment (GitLab CLI: create comment)
GL-->>AWS: 201 Created (comment posted)
```
## Prerequisites
* Gitlab Self-Hosted
* Permissions: maintainer or owner role for a given project at least, or owner of a group who has access to given projects
* Allowing inbound connections from other VMs on your VPC (all calls stay on your network)
* AWS
* Permissions: ability to deploy ec2 instances in a VPC that has network connectivity to your Gitlab self-hosted. Outbound network connectivity to \*.[augmentcode.com](https://augmentcode.com/) (see [https://docs.augmentcode.com/setup-augment/network-configuration](https://docs.augmentcode.com/setup-augment/network-configuration))
## Step 1 - Configure Gitlab to notify a Cosmos Webhook
Let’s create a new webhook in Cosmos (so Cosmos can listen to Gitlab events):
* Go to Cosmos ([https://app.augmentcode.com/app](https://app.augmentcode.com/app)) > Settings > Capabilities > Webhooks > Create Webhook
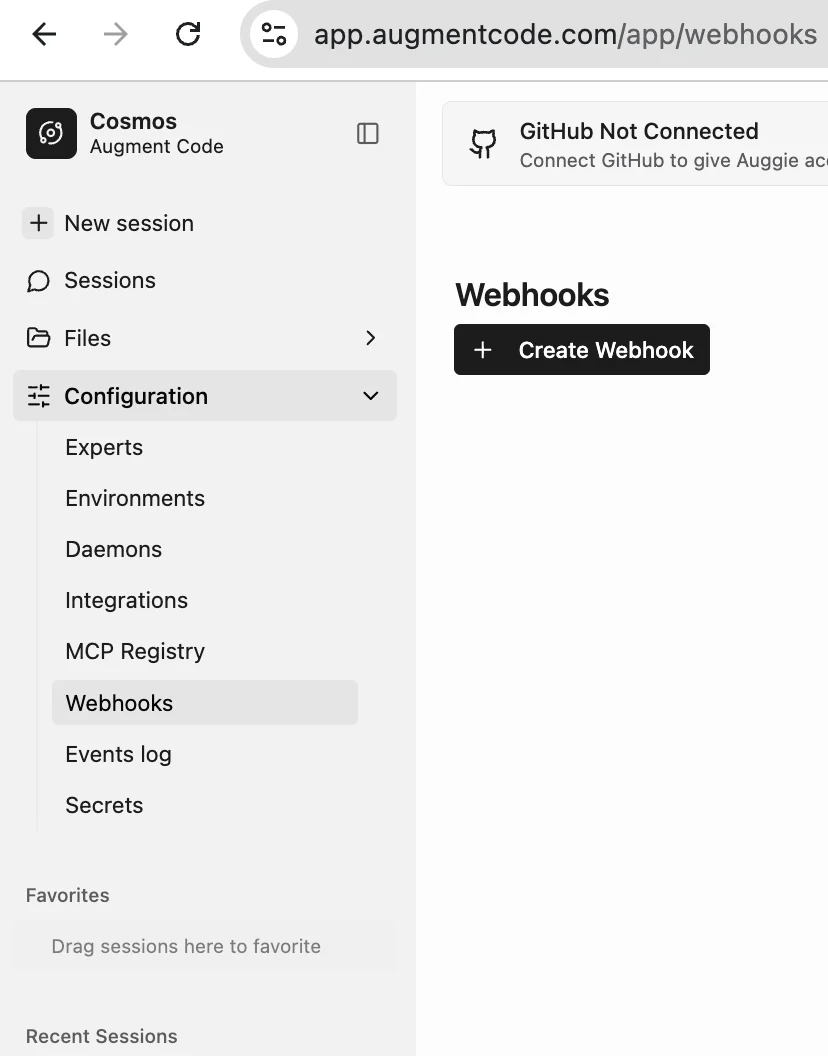 * That gives us a url to POST with a given Bearer token to pass as HTTP header. Curl request would look like:
```shell theme={null}
curl -X POST https://XXX.api.augmentcode.com/webhooks/XXX \
-H "Authorization: Bearer XXX" \
-H "Content-Type: application/json" \
-d '{"event": "test", "data": "your payload here"}'
```
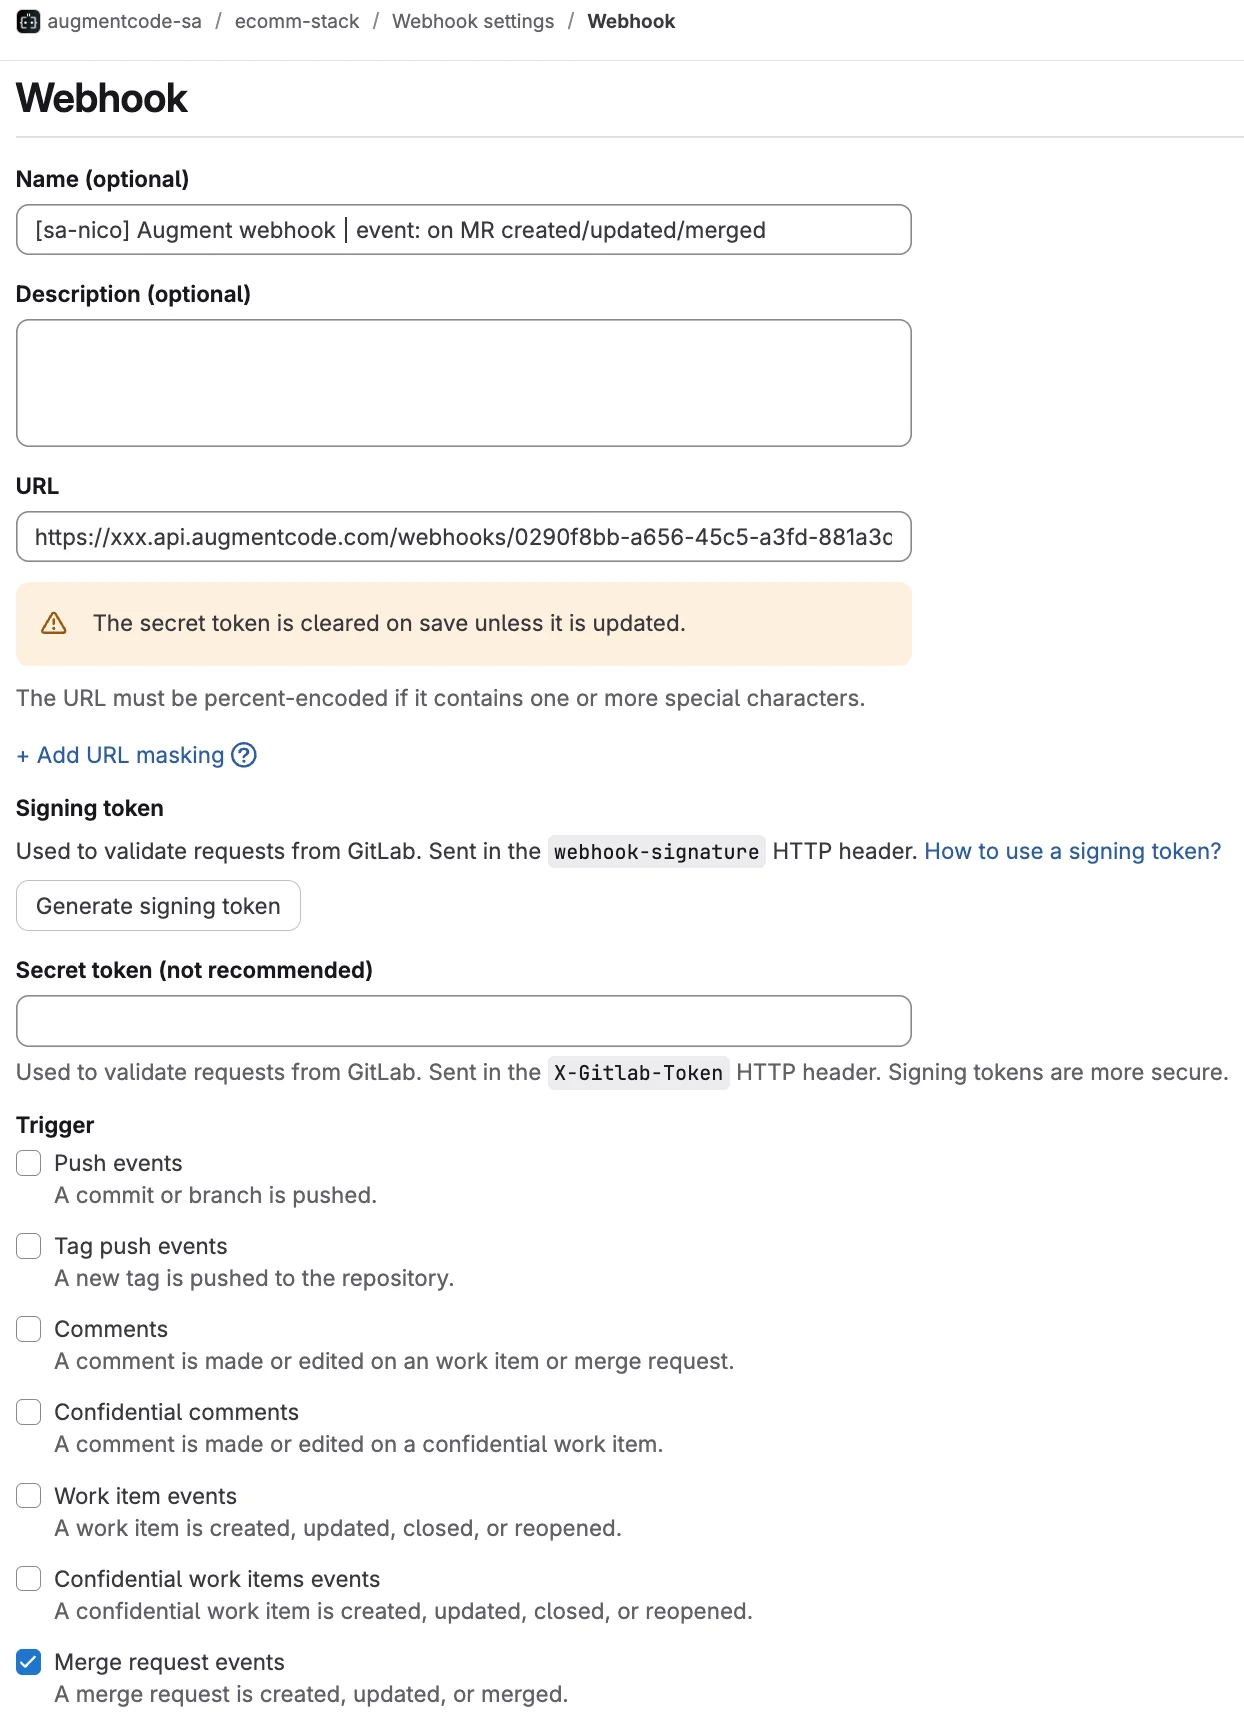
**Create a new webhook config in Gitlab** (so Gitlab can POST to a given url when certain Gitlab events occur)
* Go to your Gitlab repo > Settings > Webhooks > Add new webhook
* Add
* Name
* URL: the Cosmos webhook url
* DO NOT FILL SECRET TOKEN (that for a separate X-Gitlab-Token header that Cosmos would ignore)
* Trigger: Merge request events
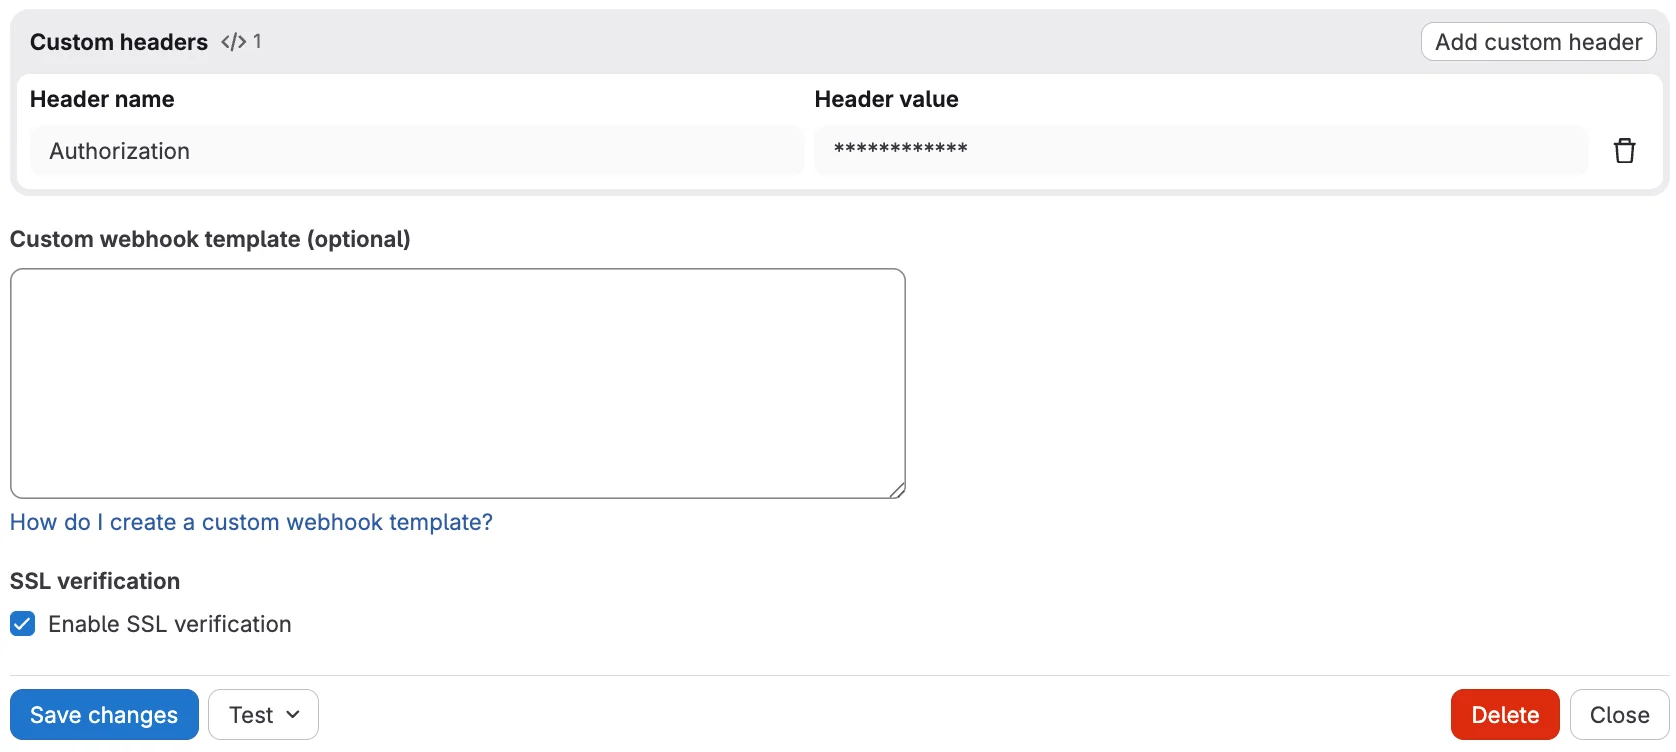
* Custom header > Add custom header
* Header name: Authorization
* Header value: Bearer THE\_SECRET\_PROVIDED\_BY\_COSMOS
* Keep Enable SSL verification selected
* Save changes
* That gives us a url to POST with a given Bearer token to pass as HTTP header. Curl request would look like:
```shell theme={null}
curl -X POST https://XXX.api.augmentcode.com/webhooks/XXX \
-H "Authorization: Bearer XXX" \
-H "Content-Type: application/json" \
-d '{"event": "test", "data": "your payload here"}'
```
**Create a new webhook config in Gitlab** (so Gitlab can POST to a given url when certain Gitlab events occur)
* Go to your Gitlab repo > Settings > Webhooks > Add new webhook
* Add
* Name
* URL: the Cosmos webhook url
* DO NOT FILL SECRET TOKEN (that for a separate X-Gitlab-Token header that Cosmos would ignore)
* Trigger: Merge request events
* Custom header > Add custom header
* Header name: Authorization
* Header value: Bearer THE\_SECRET\_PROVIDED\_BY\_COSMOS
* Keep Enable SSL verification selected
* Save changes
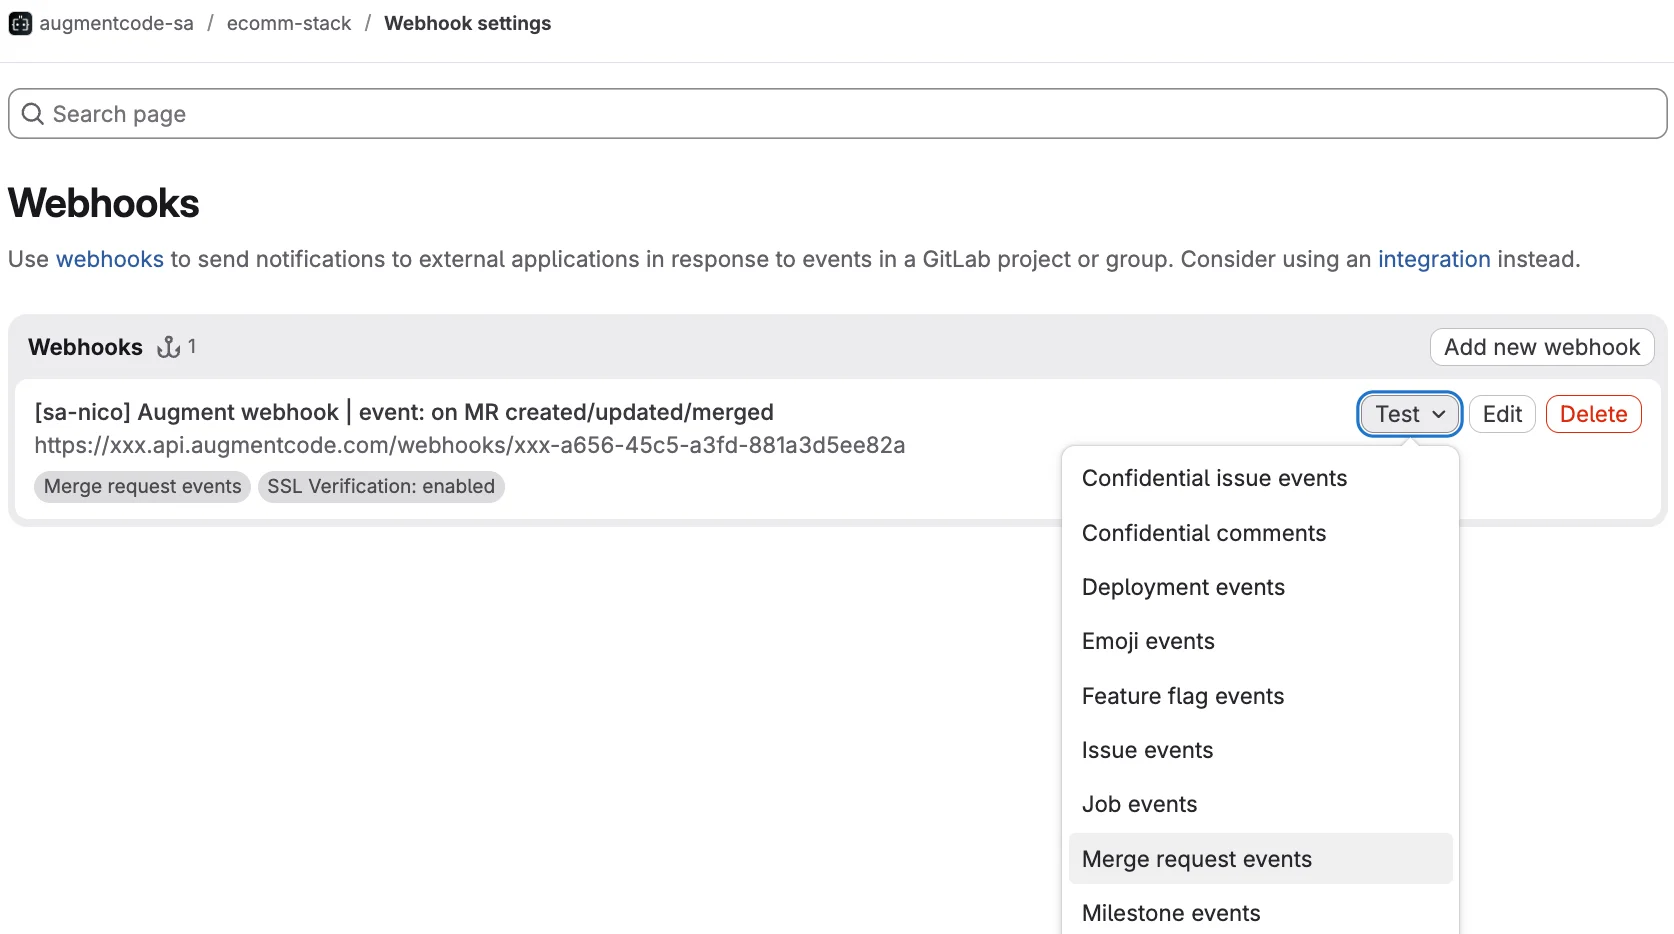
 * Now run a test: in Gitlab go back to your list of Gitlab Webhooks (Settings > Webhooks) > click on the Test dropdown > Merge request events
 Now go back to Cosmos and check that Cosmos received the event:
* [https://app.augmentcode.com/app](https://app.augmentcode.com/app) > Settings > Automations > Event Log. You should see your event with source “Custom”
Now go back to Cosmos and check that Cosmos received the event:
* [https://app.augmentcode.com/app](https://app.augmentcode.com/app) > Settings > Automations > Event Log. You should see your event with source “Custom”
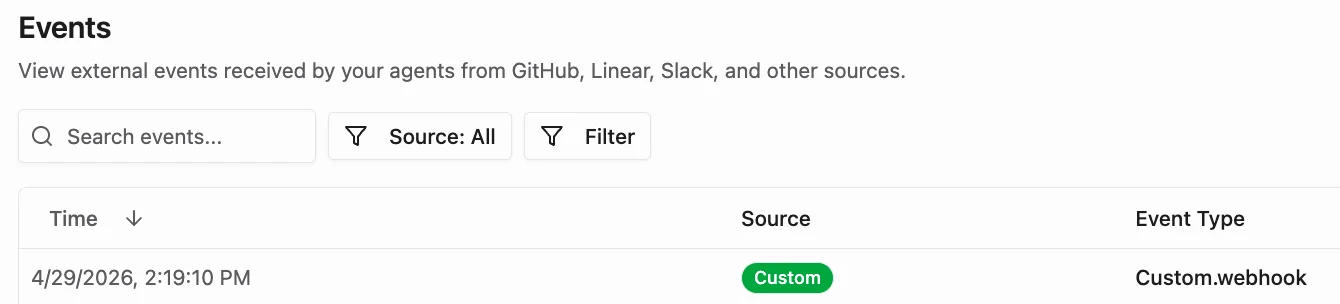 * Click on the event:
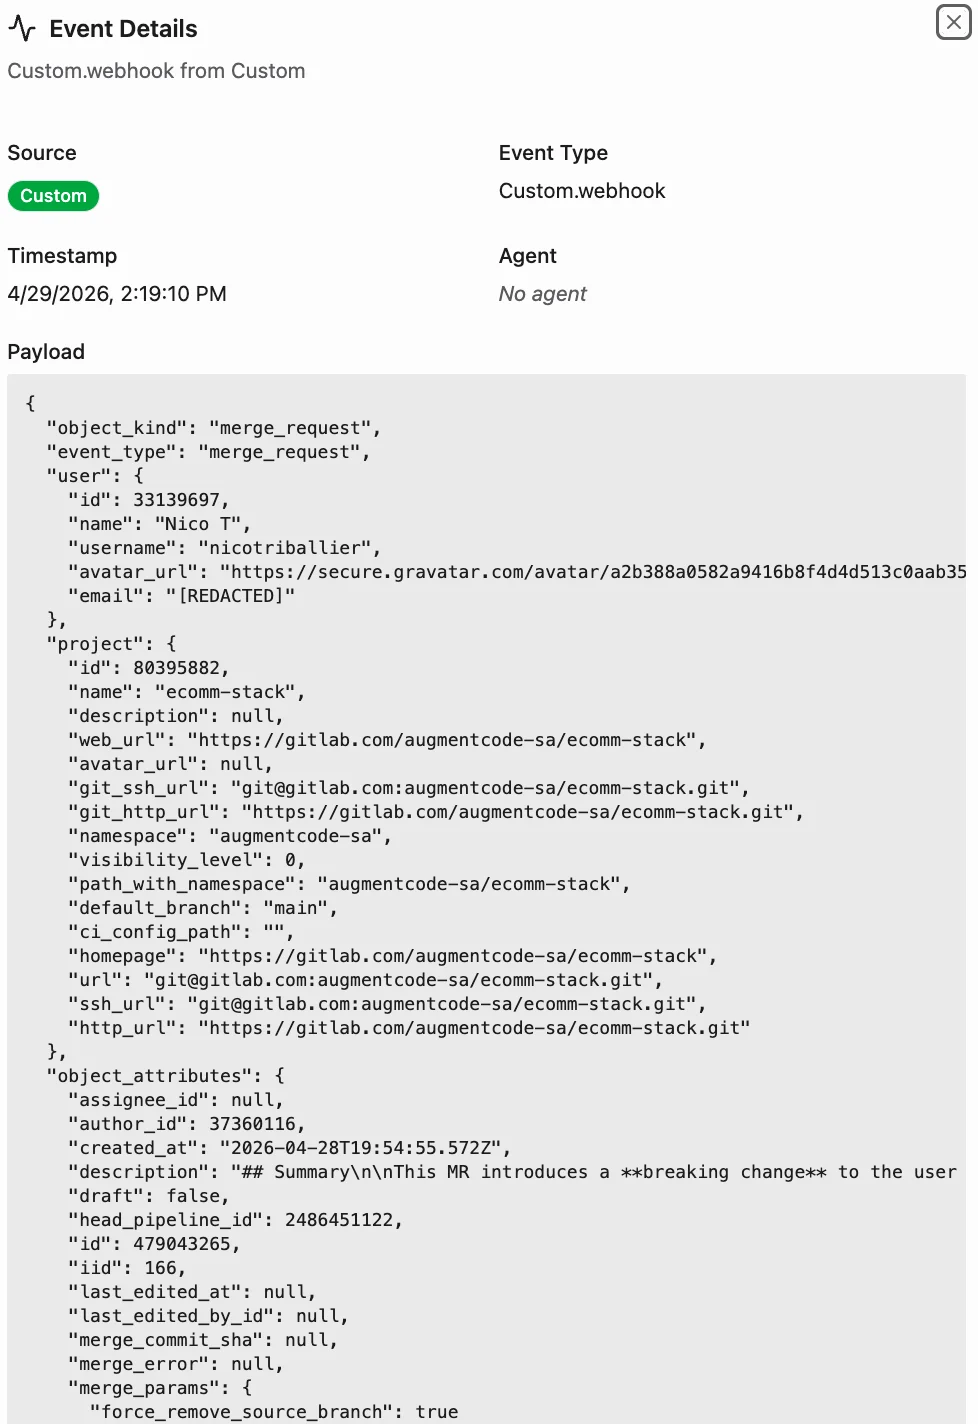 At this point Gitlab can invoke Cosmos ✅.
## Step 2 - Create a Gitlab Service Account
For headless automation and to start agentic workflows based on gitlab events, we’ll create a dedicated Gitlab service account and its access token:
* Gitlab repo > Settings > Service accounts > Add service account > add a name
At this point Gitlab can invoke Cosmos ✅.
## Step 2 - Create a Gitlab Service Account
For headless automation and to start agentic workflows based on gitlab events, we’ll create a dedicated Gitlab service account and its access token:
* Gitlab repo > Settings > Service accounts > Add service account > add a name
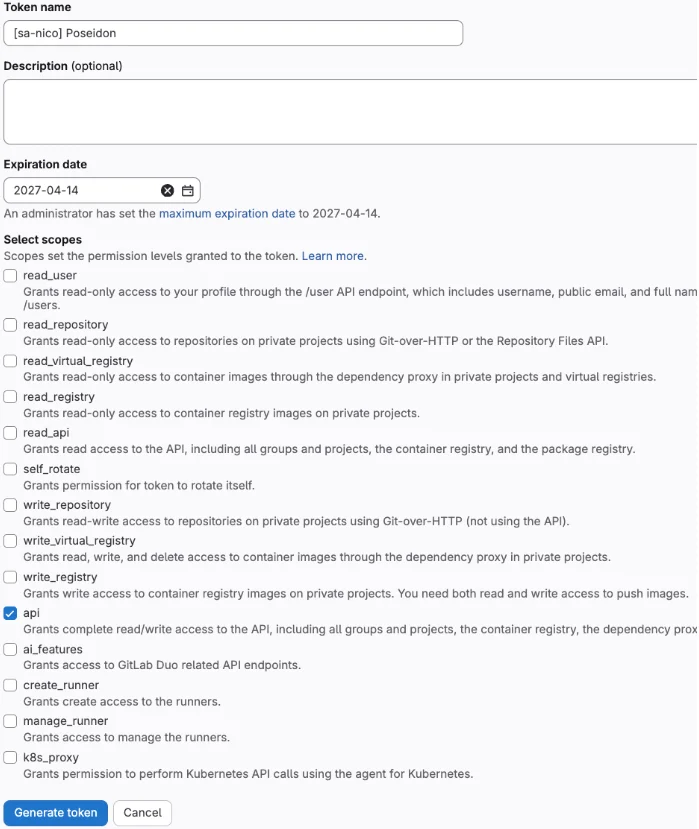
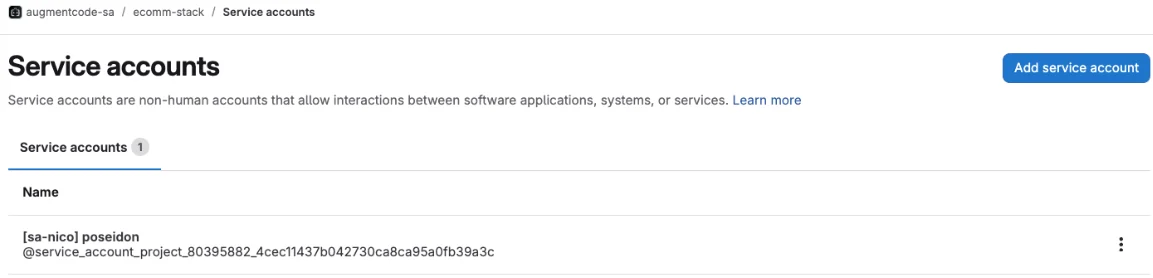 * Then next to that service account > 3 dots > manage access tokens
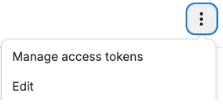 * Add new token
* Add token name
* Set a max expiration date (keep it mind that this access token would have to be rotated on the gitlab side, and its new value would have to also be updated in the Augment’s secret manager - that’s a common sec best practice)
* Select scope “api”
* Click on Generate token
* Add new token
* Add token name
* Set a max expiration date (keep it mind that this access token would have to be rotated on the gitlab side, and its new value would have to also be updated in the Augment’s secret manager - that’s a common sec best practice)
* Select scope “api”
* Click on Generate token
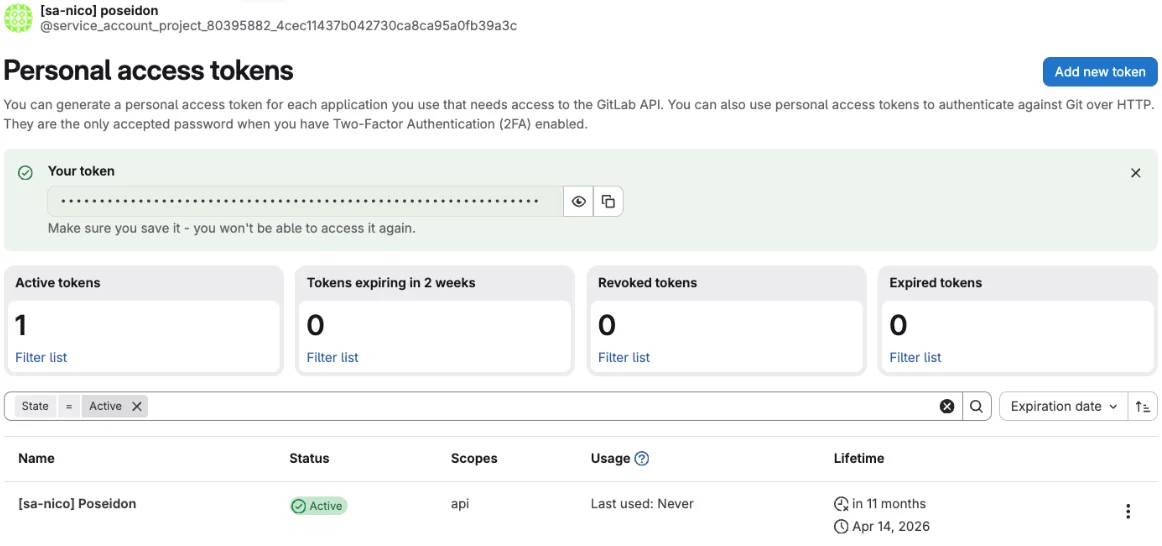
 * Click on the copy icon to copy the GITLAB\_TOKEN in your clipboard
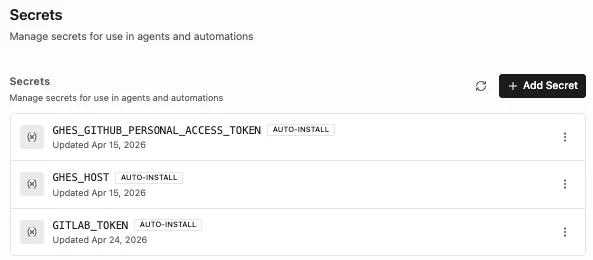
 Now go to Augment Agent Cloud’s secret manager: [https://app.augmentcode.com](https://app.augmentcode.com/) > Settings > Capabilities > Secrets > Add Secret > Environment Variable
* Name: GITLAB\_TOKEN
* Value: the value you copied from Gitlab
* Keep Visibility - Shared toggled off
* Keep “Automatically install in VMs” selected
* Click on Create Secret
Now go to Augment Agent Cloud’s secret manager: [https://app.augmentcode.com](https://app.augmentcode.com/) > Settings > Capabilities > Secrets > Add Secret > Environment Variable
* Name: GITLAB\_TOKEN
* Value: the value you copied from Gitlab
* Keep Visibility - Shared toggled off
* Keep “Automatically install in VMs” selected
* Click on Create Secret
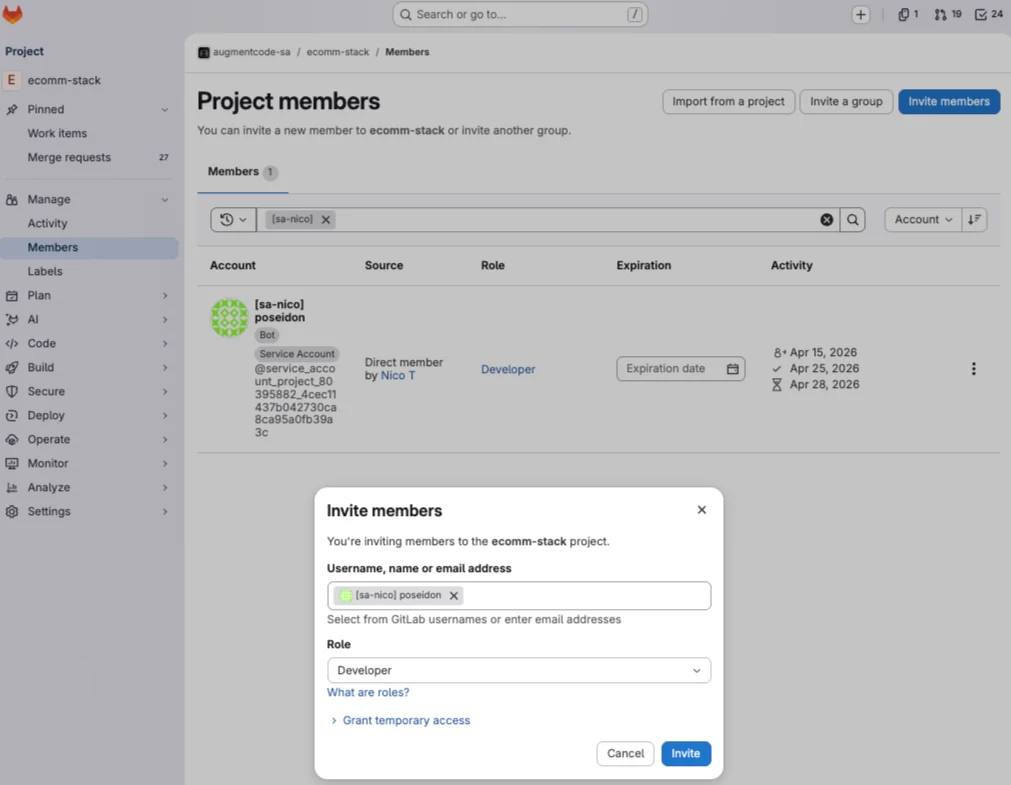
 Now get back to Gitlab and add your Gitlab service account with role=developer onto the repos where the service account should be able to read/post:
* Go to your Gitlab repo(s) > Manage > Members > Invite members > add your Gitlab service account and click on Invite
Now get back to Gitlab and add your Gitlab service account with role=developer onto the repos where the service account should be able to read/post:
* Go to your Gitlab repo(s) > Manage > Members > Invite members > add your Gitlab service account and click on Invite
 ## Step 3 - Configure your VM with local gitlab repo, glab cli and Cosmos Daemon
In this section we’ll configure a AWS EC2 VM with the following:
* cloned local gitlab repo
* `glab` cli so Cosmos local agents can communicate to Gitlab
* Cosmos Daemon (to establish a outbound websocket tunnel from AWS to Cosmos)
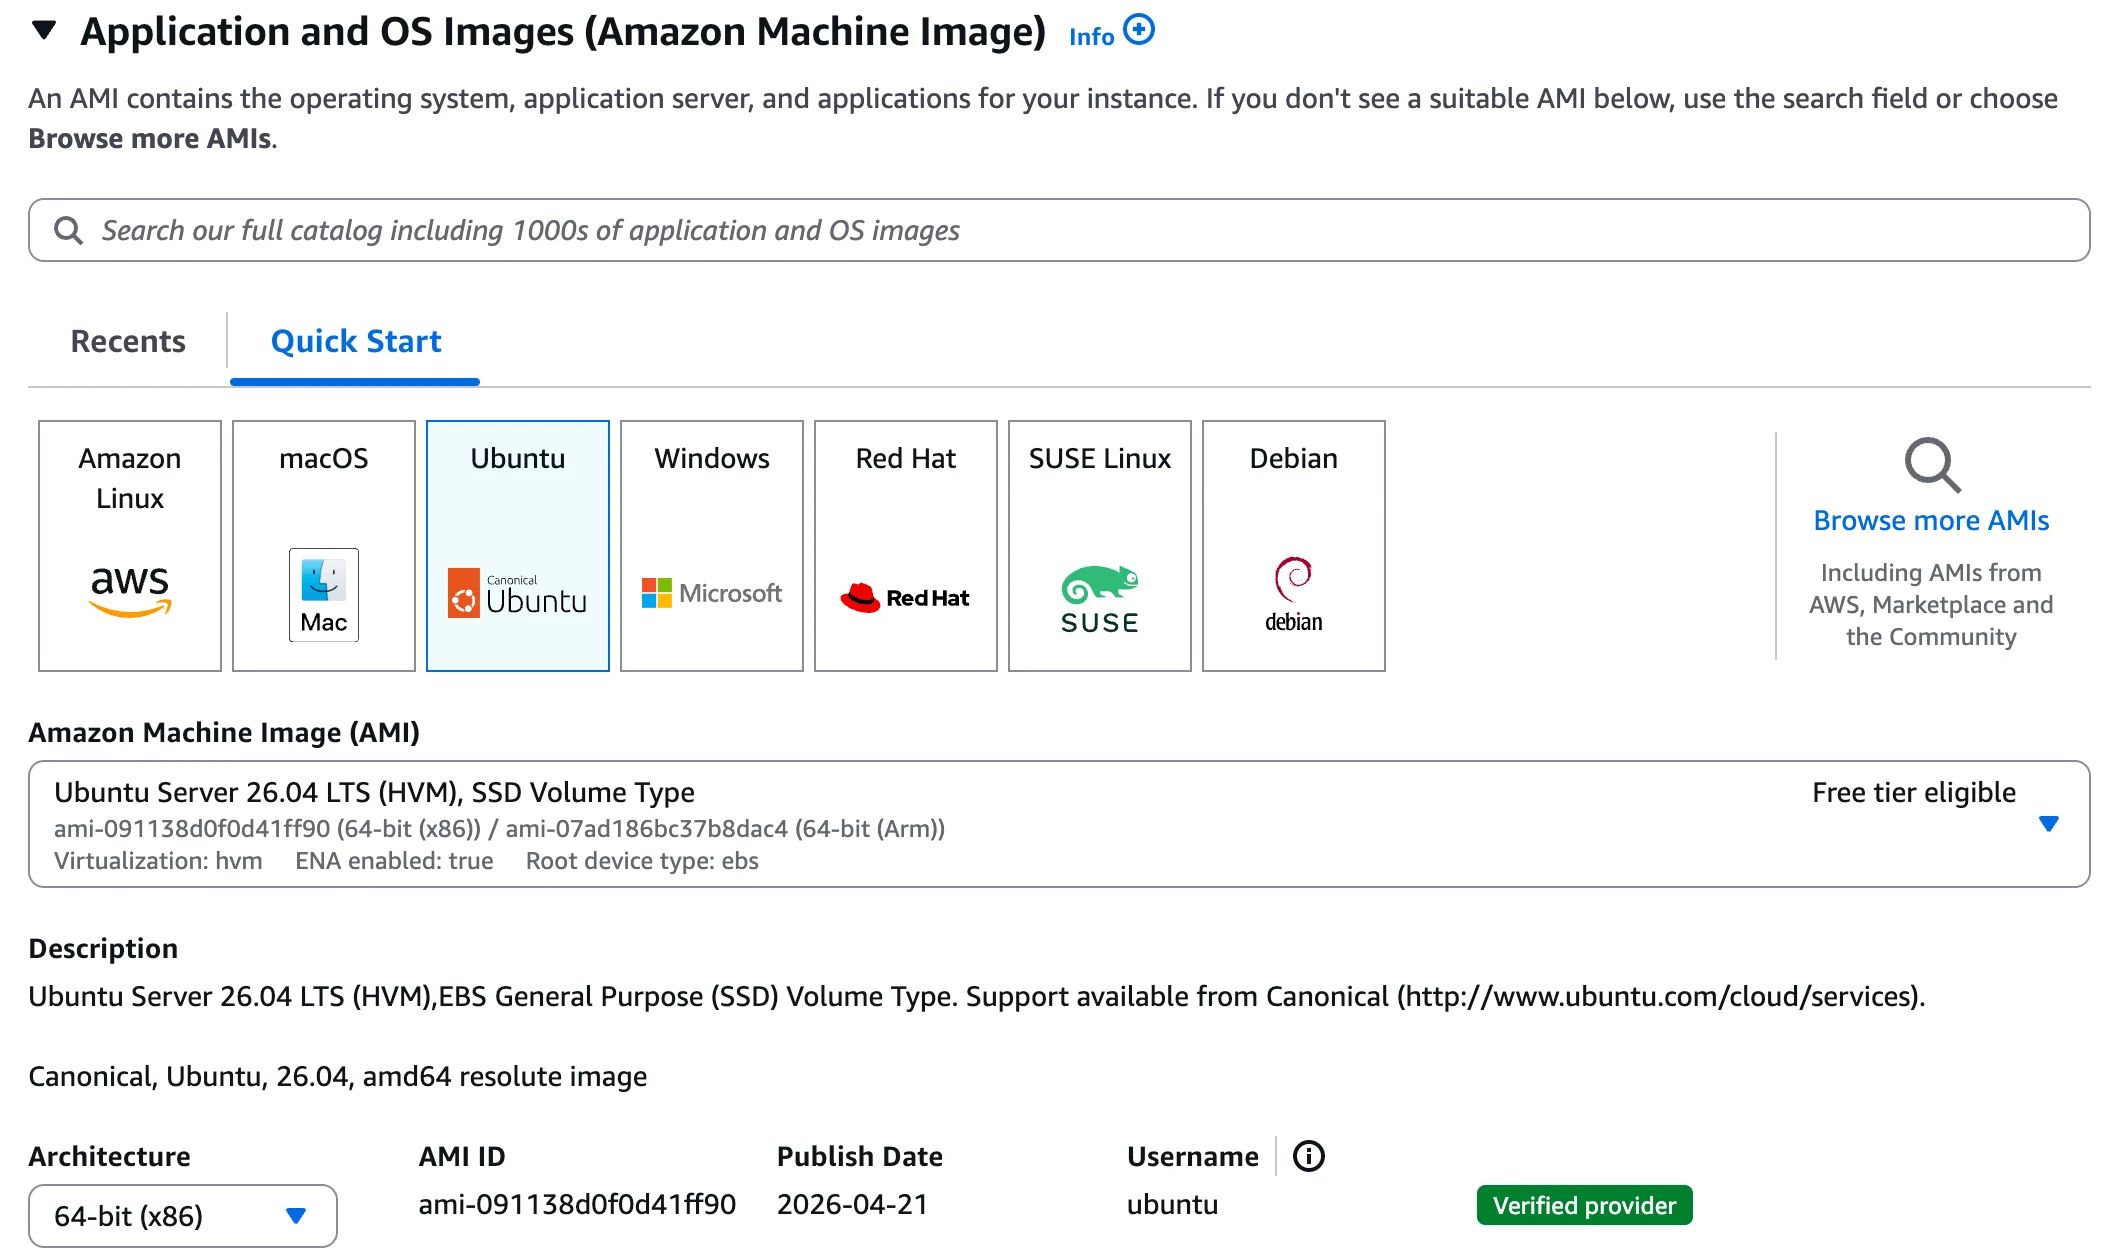
Create a new AWS EC2 Linux instance (ex: Ubuntu x86\_64 - ami-091138d0f0d41ff90) in a AWS VPC that will be able to reach Gitlab Self-Hosted.
## Step 3 - Configure your VM with local gitlab repo, glab cli and Cosmos Daemon
In this section we’ll configure a AWS EC2 VM with the following:
* cloned local gitlab repo
* `glab` cli so Cosmos local agents can communicate to Gitlab
* Cosmos Daemon (to establish a outbound websocket tunnel from AWS to Cosmos)
Create a new AWS EC2 Linux instance (ex: Ubuntu x86\_64 - ami-091138d0f0d41ff90) in a AWS VPC that will be able to reach Gitlab Self-Hosted.
 Then SSH onto the AWS EC2 instance:
1. Install git
```bash theme={null}
sudo apt update && sudo apt install git -y
```
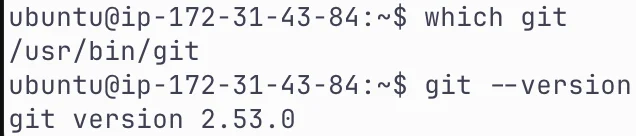
Verify the installation
```bash theme={null}
which git
git --version
```
Then SSH onto the AWS EC2 instance:
1. Install git
```bash theme={null}
sudo apt update && sudo apt install git -y
```
Verify the installation
```bash theme={null}
which git
git --version
```
 1. Install Auggie
* Install NVM
```bash theme={null}
curl -o- https://raw.githubusercontent.com/nvm-sh/nvm/v0.40.1/install.sh | bash
```
* Refresh the terminal profile
```bash theme={null}
source ~/.bashrc
```
* Install the latest Long-Term Support (LTS) version of Node & NPM
```bash theme={null}
nvm install --lts
```
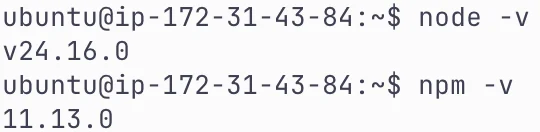
* Verify
```bash theme={null}
node -v
npm -v
```
1. Install Auggie
* Install NVM
```bash theme={null}
curl -o- https://raw.githubusercontent.com/nvm-sh/nvm/v0.40.1/install.sh | bash
```
* Refresh the terminal profile
```bash theme={null}
source ~/.bashrc
```
* Install the latest Long-Term Support (LTS) version of Node & NPM
```bash theme={null}
nvm install --lts
```
* Verify
```bash theme={null}
node -v
npm -v
```
 * Install Auggie
```bash theme={null}
npm install -g @augmentcode/auggie
```
* Create a Augment service account that will be used to authenticate Auggie
```bash theme={null}
auggie login
```
Copy the auth url into your desktop web browser, authenticate, then copy the json with the code back into your terminal where you sshed into your EC2 instance
This will load Auggie in interactive mode. Quit by pressing CTRL-C
At this point your Auggie is authenticated with your human identity
1. Retrieve GITLAB\_TOKEN from the Cosmos secret manager
```bash theme={null}
export GITLAB_TOKEN="$(
auggie cloud secret get GITLAB_TOKEN --reveal 2>/dev/null \
| grep -E -i '^[[:space:]]*value:[[:space:]]*.+$' \
| head -n 1 \
| sed -E 's/^[[:space:]]*[Vv][Aa][Ll][Uu][Ee]:[[:space:]]*//'
)"
```
Verify the token value:
```bash theme={null}
echo $GITLAB_TOKEN
```
1. Clone your gitlab repo locally
git clone the gitlab repo using the “2 layers approach” (ORG\_NAME/REPO\_NAME). Edit and run this command from your root folder:
```bash theme={null}
mkdir -p ~/workspace/augmentcode-sa && git clone https://oauth2:$GITLAB_TOKEN@gitlab.com/augmentcode-sa/ecomm-stack.git ~/workspace/augmentcode-sa/ecomm-stack && ls -d ~/workspace/*/*/.git
```
Your folder structure would look like:
```bash theme={null}
/home/ubuntu/workspace/augmentcode-sa/ecomm-stack/.git
```
Reuse your existing tools/cron jobs to automatically refresh/fetch the repo(s) locally.
1. Install the `glab` cli
Make sure you’re in your root folder, install the `glab` cli using this command:
```bash theme={null}
wget https://gitlab.com/gitlab-org/cli/-/releases/v1.93.0/downloads/glab_1.93.0_linux_amd64.deb && sudo dpkg -i glab_1.93.0_linux_amd64.deb && glab auth status
```
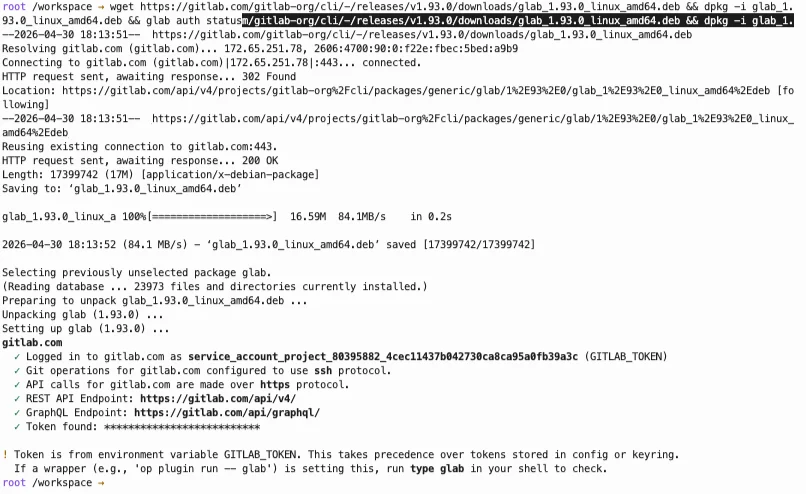
You should that response indicating that glab is properly installed and authenticated:
* Install Auggie
```bash theme={null}
npm install -g @augmentcode/auggie
```
* Create a Augment service account that will be used to authenticate Auggie
```bash theme={null}
auggie login
```
Copy the auth url into your desktop web browser, authenticate, then copy the json with the code back into your terminal where you sshed into your EC2 instance
This will load Auggie in interactive mode. Quit by pressing CTRL-C
At this point your Auggie is authenticated with your human identity
1. Retrieve GITLAB\_TOKEN from the Cosmos secret manager
```bash theme={null}
export GITLAB_TOKEN="$(
auggie cloud secret get GITLAB_TOKEN --reveal 2>/dev/null \
| grep -E -i '^[[:space:]]*value:[[:space:]]*.+$' \
| head -n 1 \
| sed -E 's/^[[:space:]]*[Vv][Aa][Ll][Uu][Ee]:[[:space:]]*//'
)"
```
Verify the token value:
```bash theme={null}
echo $GITLAB_TOKEN
```
1. Clone your gitlab repo locally
git clone the gitlab repo using the “2 layers approach” (ORG\_NAME/REPO\_NAME). Edit and run this command from your root folder:
```bash theme={null}
mkdir -p ~/workspace/augmentcode-sa && git clone https://oauth2:$GITLAB_TOKEN@gitlab.com/augmentcode-sa/ecomm-stack.git ~/workspace/augmentcode-sa/ecomm-stack && ls -d ~/workspace/*/*/.git
```
Your folder structure would look like:
```bash theme={null}
/home/ubuntu/workspace/augmentcode-sa/ecomm-stack/.git
```
Reuse your existing tools/cron jobs to automatically refresh/fetch the repo(s) locally.
1. Install the `glab` cli
Make sure you’re in your root folder, install the `glab` cli using this command:
```bash theme={null}
wget https://gitlab.com/gitlab-org/cli/-/releases/v1.93.0/downloads/glab_1.93.0_linux_amd64.deb && sudo dpkg -i glab_1.93.0_linux_amd64.deb && glab auth status
```
You should that response indicating that glab is properly installed and authenticated:
 1. Install the Cosmos Daemon to connect your local VM to Cosmos
Navigate to your /workspace/ORG\_NAME folder on your VM, and edit and run
```bash theme={null}
auggie daemon \
--workspace ~/workspace/augmentcode-sa/ecomm-stack \
--add-workspace ~/workspace/augmentcode-sa/REPO_B \
--add-workspace ~/workspace/augmentcode-sa/REPO_C \
--allow-indexing
```
(note: Augment is actively working on an auto-discovery mechanism with daemons, stay tuned)
1. Install the Cosmos Daemon to connect your local VM to Cosmos
Navigate to your /workspace/ORG\_NAME folder on your VM, and edit and run
```bash theme={null}
auggie daemon \
--workspace ~/workspace/augmentcode-sa/ecomm-stack \
--add-workspace ~/workspace/augmentcode-sa/REPO_B \
--add-workspace ~/workspace/augmentcode-sa/REPO_C \
--allow-indexing
```
(note: Augment is actively working on an auto-discovery mechanism with daemons, stay tuned)
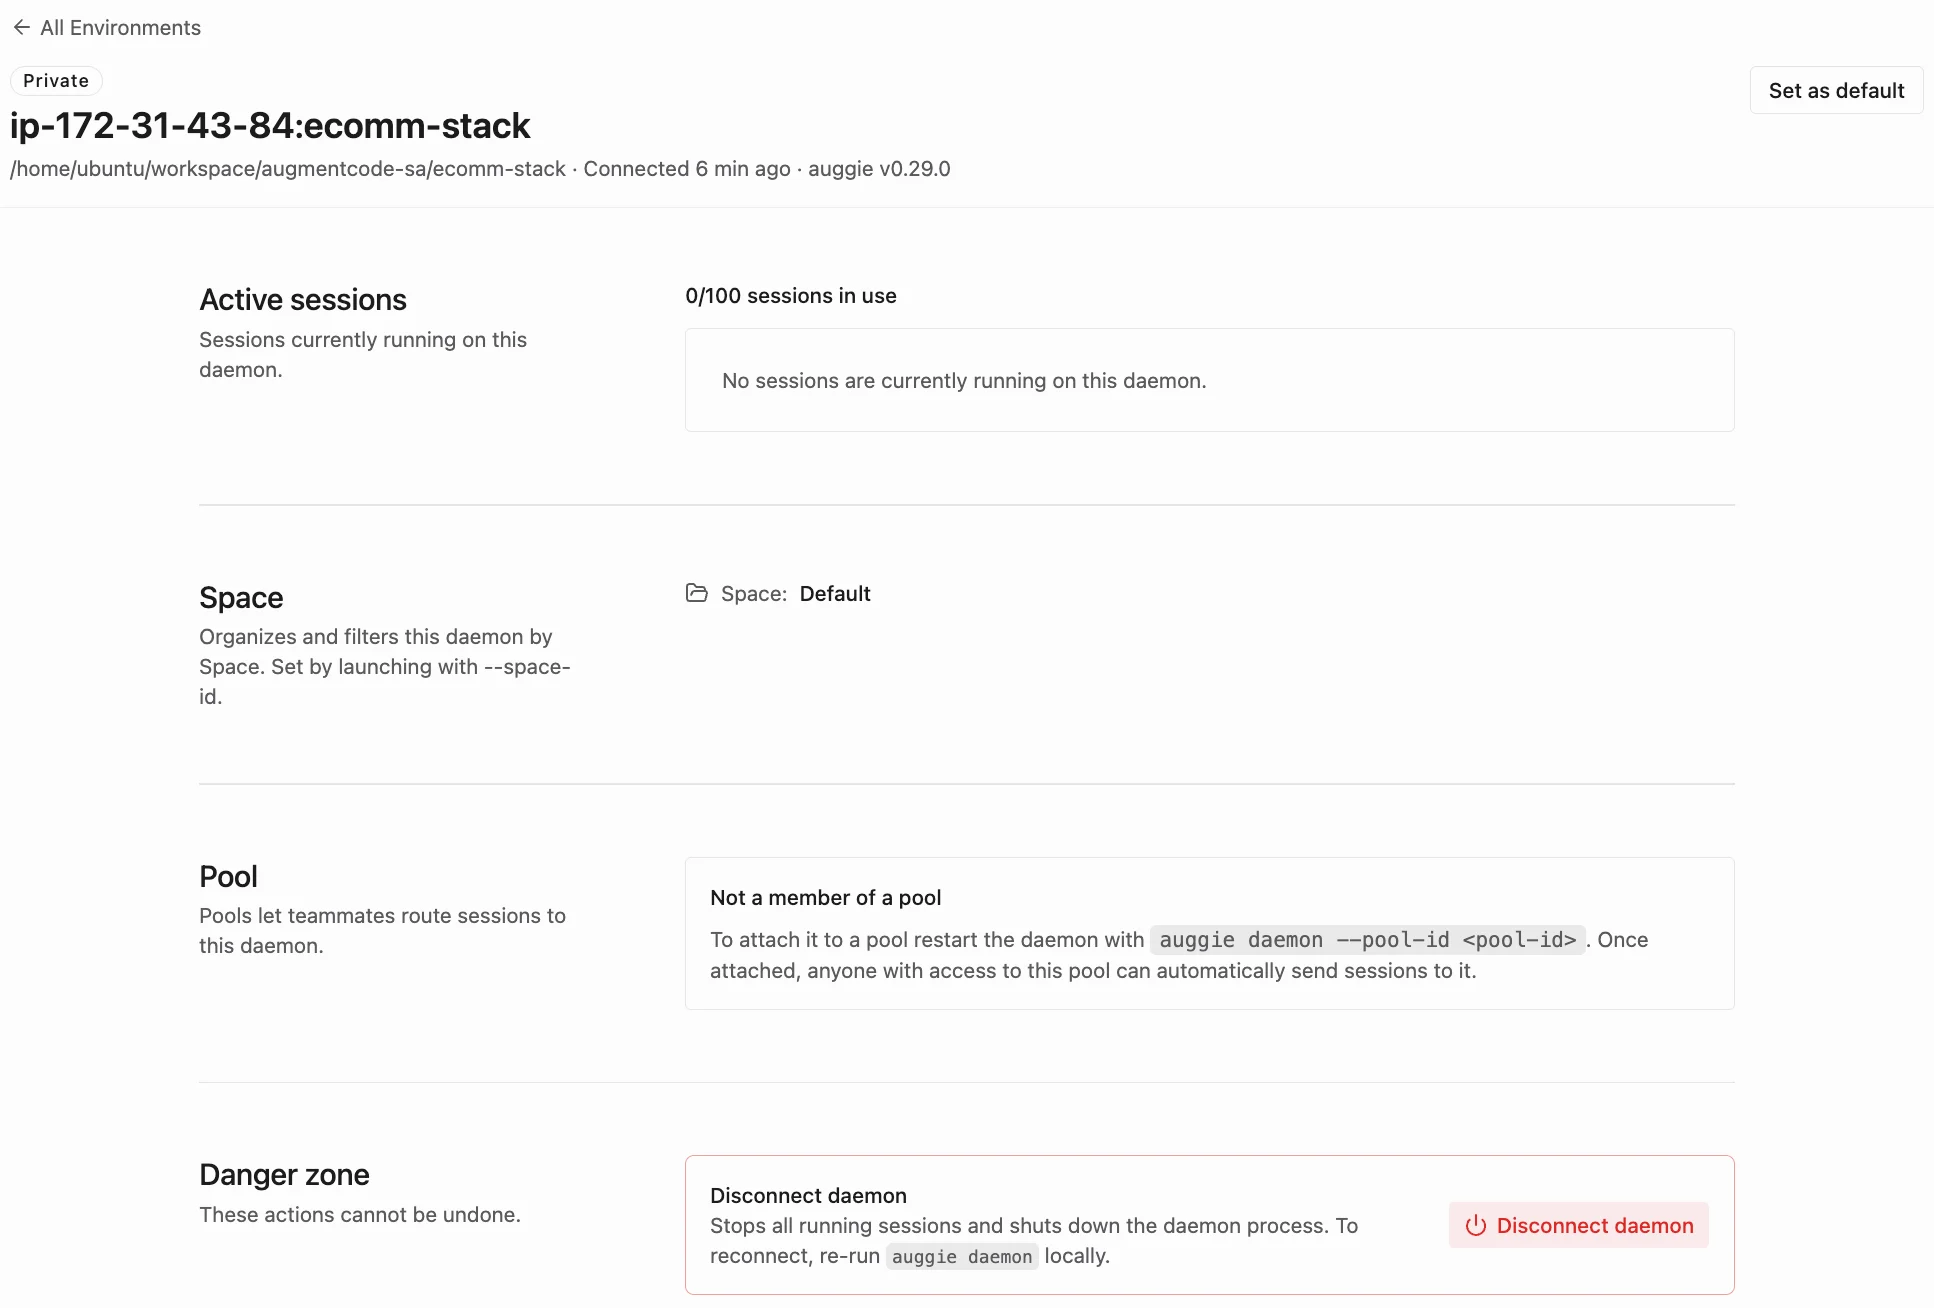
 You can see the daemon running from Cosmos Settings > Foundation > Environments ([https://cosmos.augmentcode.com/environments](https://cosmos.augmentcode.com/environments))
 If you click on it, then top right you can set this daemon as default environment to run your agents
 ## Step 4 - Connectivity Test
Let’s try to create a session in Cosmos (cloud) and verify it can connect to the VM, make sense of the local repo and from that VM reach out to Gitlab.
Go to Cosmos > New Session ([https://cosmos.augmentcode.com/home](https://cosmos.augmentcode.com/home))
Under the prompt, click on the drowdown list with the cloud icon > select daemon > select your daemon
## Step 4 - Connectivity Test
Let’s try to create a session in Cosmos (cloud) and verify it can connect to the VM, make sense of the local repo and from that VM reach out to Gitlab.
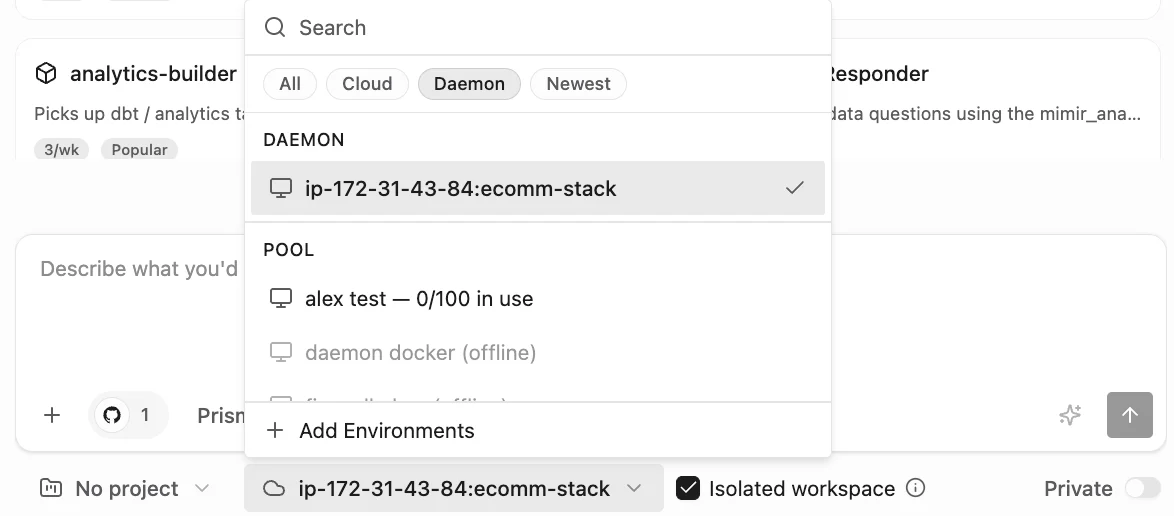
Go to Cosmos > New Session ([https://cosmos.augmentcode.com/home](https://cosmos.augmentcode.com/home))
Under the prompt, click on the drowdown list with the cloud icon > select daemon > select your daemon
 Prompt the session with:
```bash theme={null}
What's this repo about?
```
Prompt the session with:
```bash theme={null}
What's this repo about?
```
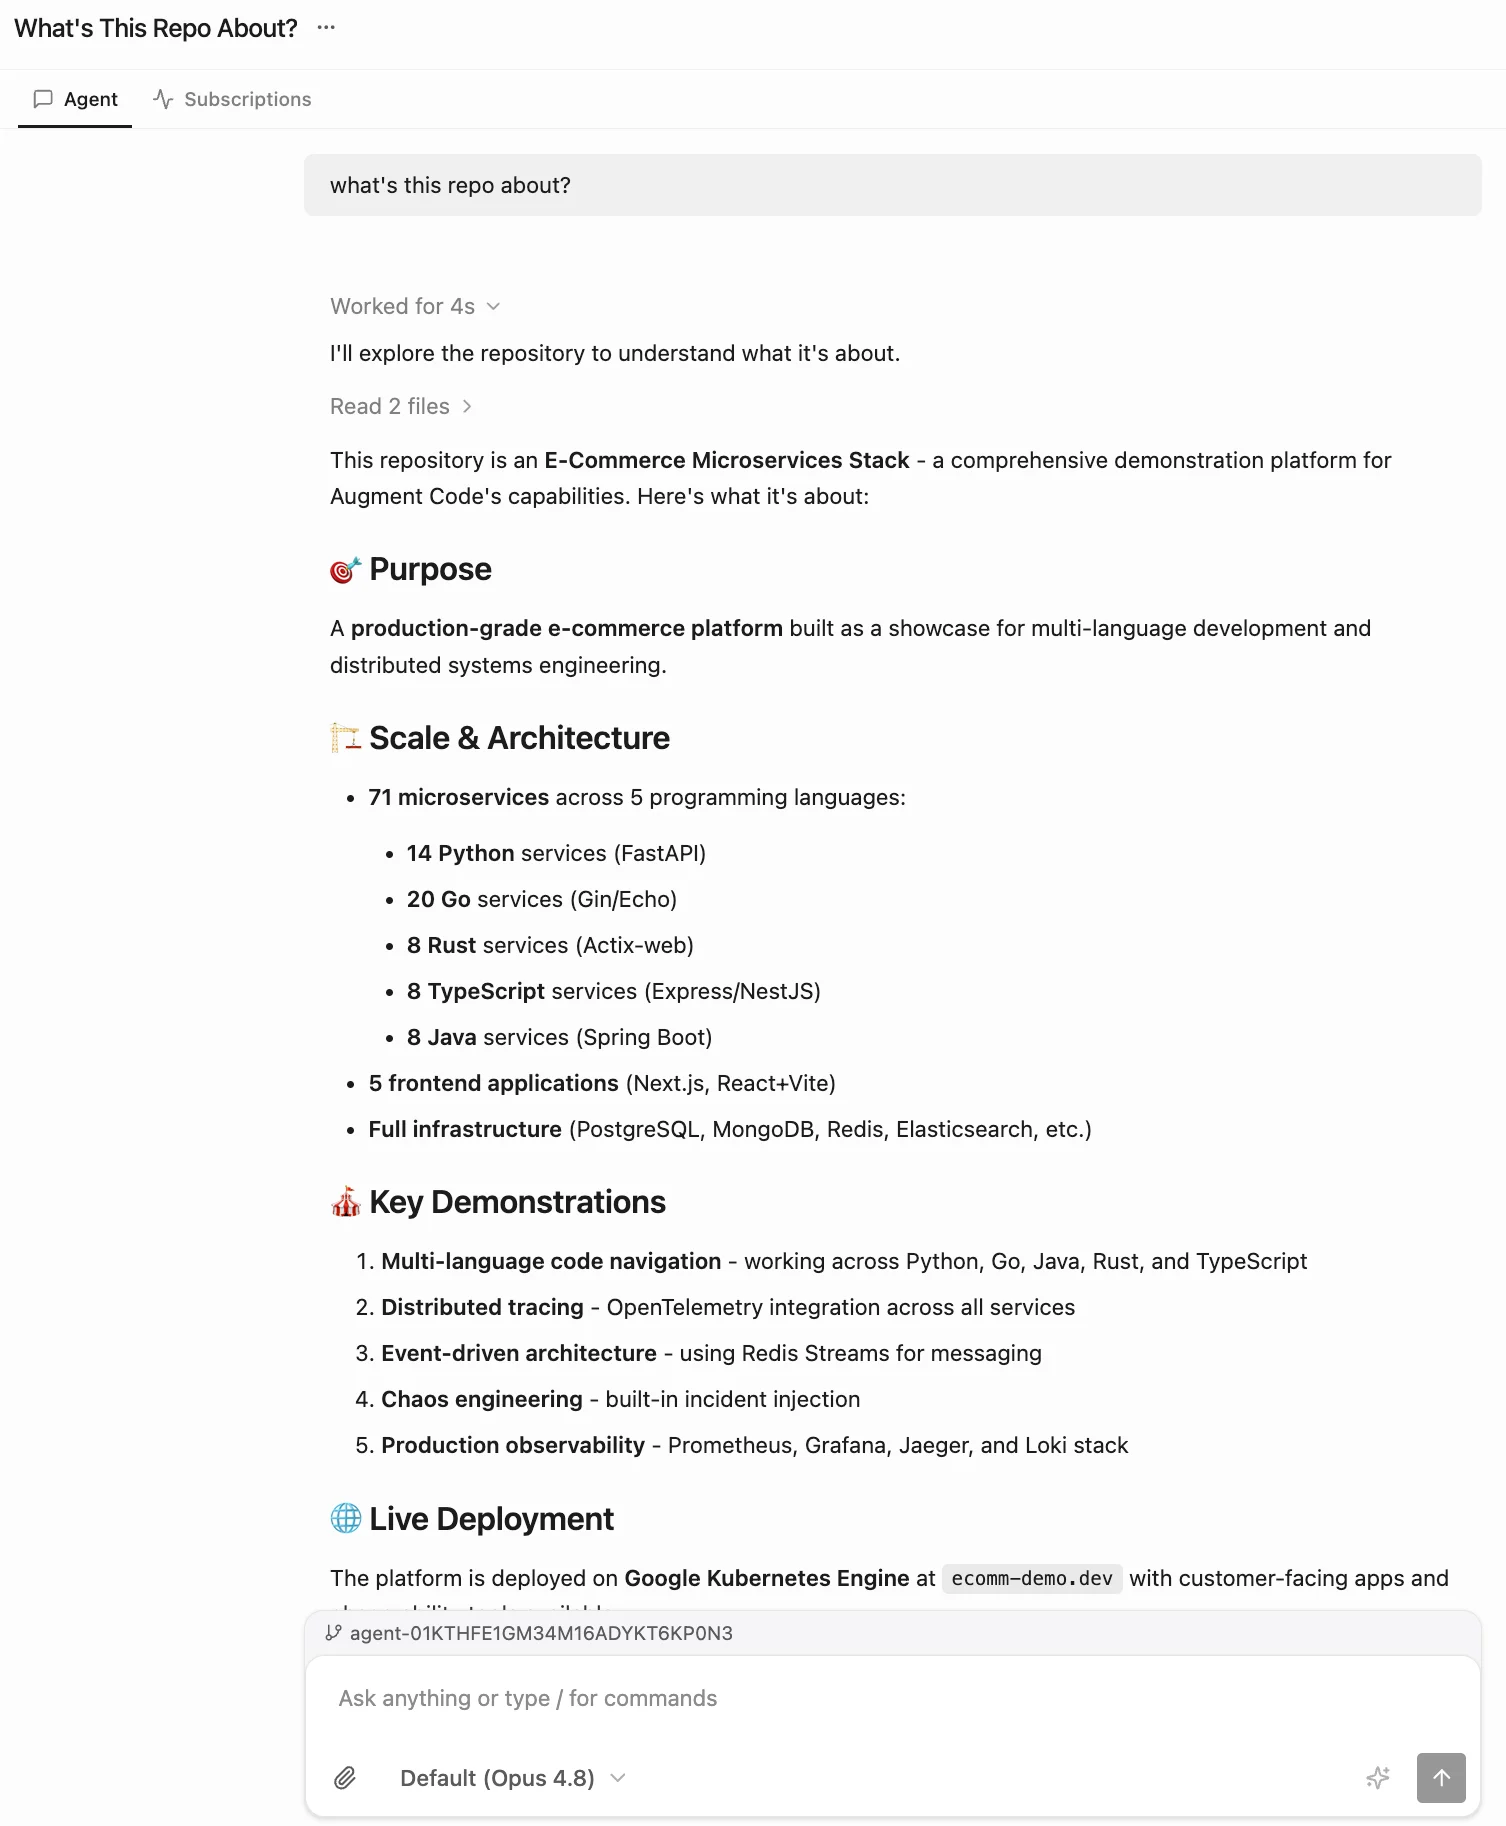 Connectivity between Cosmos (cloud) and your local VM verified ✅
Now prompt the session with something like:
```bash theme={null}
Using the glab cli to look up https://gitlab.com/augmentcode-sa/ecomm-stack/-/merge_requests/174
```
Connectivity between Cosmos (cloud) and your local VM verified ✅
Now prompt the session with something like:
```bash theme={null}
Using the glab cli to look up https://gitlab.com/augmentcode-sa/ecomm-stack/-/merge_requests/174
```
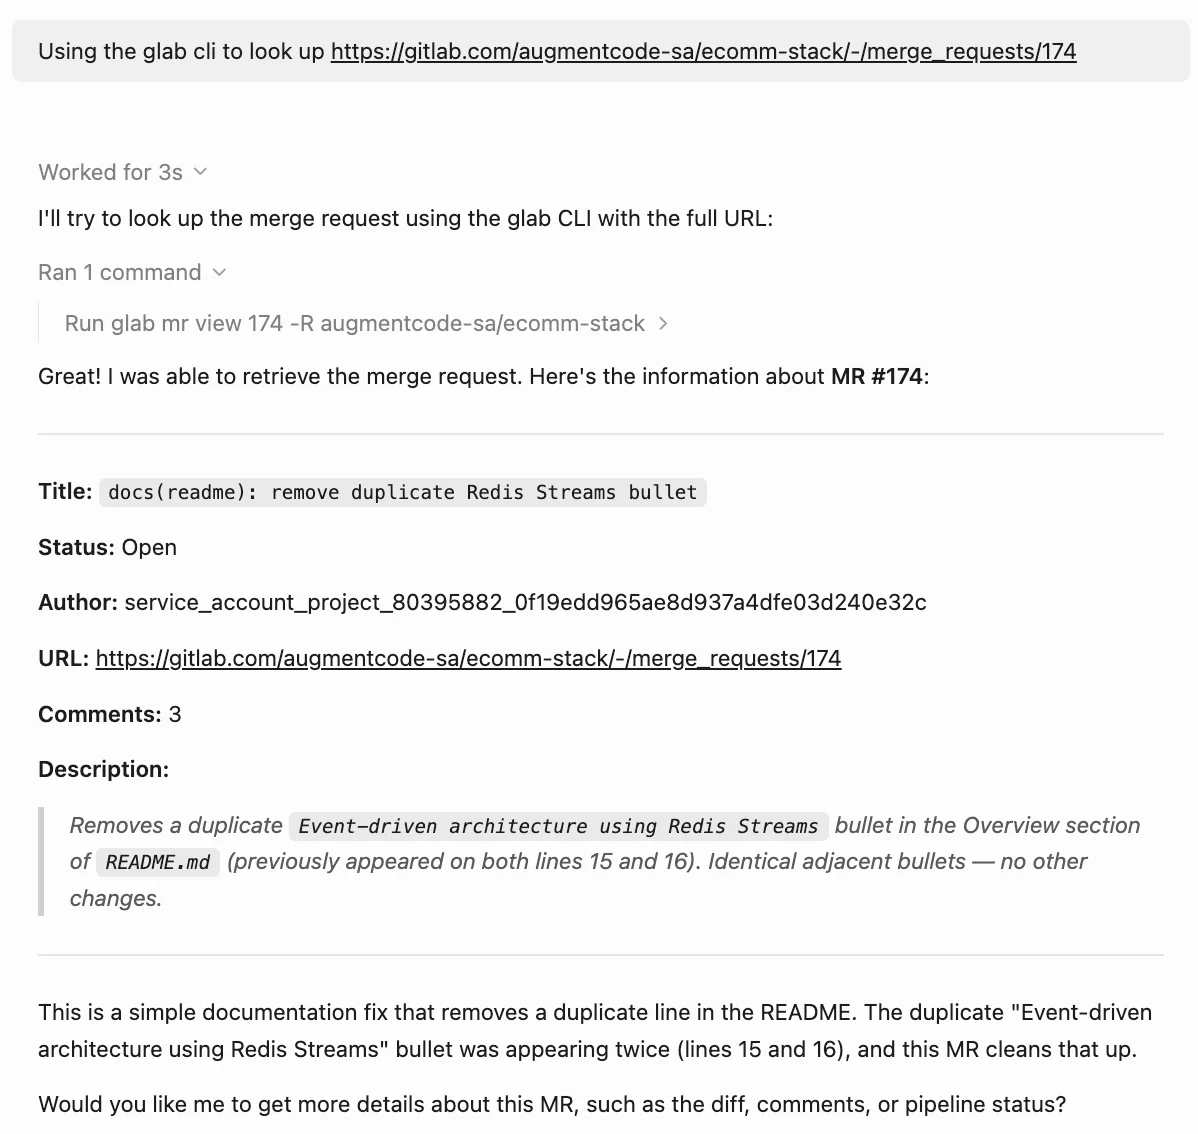 Connectivity between Cosmos (cloud) ↔ your local VM ↔ your Gitlab verified ✅
## Step 5 (optional) - Use a deployment script to automate the steps above
First you’ll need to authenticate into Augment programmatically, 2 options:
1. Authenticate via Personal API Token (available to all Augment users)
Go to [https://app.augmentcode.com/settings/personal-api-tokens](https://app.augmentcode.com/settings/personal-api-tokens) > Add token, Add Description (ex: Cosmos01), no expiration > Next > Download the json: this will download a session.json on your laptop
2. Alternatively (recommended) authenticate via a service account (only for Augment admins)
Go to [https://app.augmentcode.com/settings/service-accounts](https://app.augmentcode.com/settings/service-accounts). > Add Service Account > Add API token > Download json: this will download a session.json on your laptop
Once you get your session.json, you’ll be able to inject its content as env variable into your VM with the name AUGMENT\_SESSION\_AUTH and Auggie will automatically pick up on it.
From your VM, logout from your previous session:
```bash theme={null}
auggie logout
```
Inject the AUGMENT\_SESSION\_AUTH variable with the content of your session.json:
```bash theme={null}
export AUGMENT_SESSION_AUTH='{
"accessToken": "XXX",
"tenantURL": "https://XXX.api.augmentcode.com/",
"scopes": [
"read",
"write"
]
}'
```
You can verify it worked fine by running `auggie` and then `/about` to see your Augment profile
Now edit and run the Terraform script below:
**variables.tf**
This file defines the input variables required for deployment. The execution expects your AWS API credentials and the AUGMENT\_SESSION\_AUTH JSON string.
```bash theme={null}
variable "aws_access_key" {
description = "AWS Access Key ID"
type = string
sensitive = true
}
variable "aws_secret_key" {
description = "AWS Secret Access Key"
type = string
sensitive = true
}
variable "aws_region" {
description = "AWS Region where the AMI is located"
type = string
default = "us-east-1"
}
variable "augment_session_auth" {
description = "The JSON string contents of your downloaded Augment session.json"
type = string
sensitive = true
}
variable "instance_type" {
description = "EC2 Instance Size"
type = string
default = "t3.medium"
}
```
**main.tf**
This script provisions the infrastructure and leverages a custom user\_data execution block to run every automated install script seamlessly from your tutorial.
```bash theme={null}
provider "aws" {
access_key = var.aws_access_key
secret_key = var.aws_secret_key
region = var.aws_region
}
# Security Group setup allowing outbound access for the websocket daemon tunnel
resource "aws_security_group" "cosmos_sg" {
name = "cosmos-daemon-sg"
description = "Allow outbound traffic for Cosmos Daemon websocket connections"
# Outbound rule allowing connection to Augment Cloud & GitLab
egress {
from_port = 0
to_port = 0
protocol = "-1"
cidr_blocks = ["0.0.0.0/0"]
}
# Optional: Uncomment if you want to SSH into the instance for debugging
# ingress {
# from_port = 22
# to_port = 22
# protocol = "tcp"
# cidr_blocks = ["0.0.0.0/0"]
# }
}
resource "aws_instance" "cosmos_vm" {
ami = "ami-091138d0f0d41ff90" # Ubuntu 26.04 LTS from tutorial
instance_type = var.instance_type
vpc_security_group_ids = [aws_security_group.cosmos_sg.id]
tags = {
Name = "Cosmos-GitLab-Daemon-Host"
}
# Automated provisioning script (Step 3 & Step 5 of the tutorial)
user_data = <<-EOF
#!/bin/bash
# 1. Update and install basic dependencies
apt-get update -y
apt-get install -y git wget
# 2. Setup NVM, Node.js (LTS), and Auggie CLI for the ubuntu user context
sudo -u ubuntu -i bash << 'INNER_EOF'
curl -o- https://raw.githubusercontent.com/nvm-sh/nvm/v0.40.1/install.sh | bash
export NVM_DIR="$HOME/.nvm"
[ -s "$NVM_DIR/nvm.sh" ] && \. "$NVM_DIR/nvm.sh"
nvm install --lts
npm install -g @augmentcode/auggie
INNER_EOF
# 4. Install GitLab GLAB CLI globally
wget https://gitlab.com/gitlab-org/cli/-/releases/v1.93.0/downloads/glab_1.93.0_linux_amd64.deb
dpkg -i glab_1.93.0_linux_amd64.deb
rm glab_1.93.0_linux_amd64.deb
# Persist Augment Auth token for the ubuntu profile shell environment
echo "export AUGMENT_SESSION_AUTH='${var.augment_session_auth}'" >> /home/ubuntu/.bashrc
# 3. Automated Repository Cloning Setup Script
cat << 'INNER_EOF' > /home/ubuntu/setup_repo.sh
#!/bin/bash
export NVM_DIR="$HOME/.nvm"
[ -s "$NVM_DIR/nvm.sh" ] && \. "$NVM_DIR/nvm.sh"
export AUGMENT_SESSION_AUTH='${var.augment_session_auth}'
# Fetch GITLAB_TOKEN programmatically from Cosmos Secret Manager
export GITLAB_TOKEN=$(auggie cloud secret get GITLAB_TOKEN --reveal 2>/dev/null | grep -E '^[[:space:]]*value: [[:space:]]*.+$' | head -n 1 | sed -e 's/^[[:space:]]*[Vv][Aa][Ll][Uu][Ee]:[[:space:]]*//')
if [ -n "$GITLAB_TOKEN" ]; then
mkdir -p /home/ubuntu/workspace/augmentcode-sa
git clone https://oauth2:$GITLAB_TOKEN@gitlab.com/augmentcode-sa/ecomm-stack.git /home/ubuntu/workspace/augmentcode-sa/ecomm-stack
else
echo "Error: Failed to safely extract GITLAB_TOKEN from Augment Cloud Secrets" >&2
fi
INNER_EOF
chmod +x /home/ubuntu/setup_repo.sh
sudo -u ubuntu -i /home/ubuntu/setup_repo.sh
# 5. Create a systemd unit service to run the Daemon persistently in the background
cat << 'INNER_EOF' > /etc/systemd/system/auggie-daemon.service
[Unit]
Description=Auggie Cosmos Daemon Background Service
After=network.target
[Service]
Type=simple
User=ubuntu
Environment="HOME=/home/ubuntu"
Environment="AUGMENT_SESSION_AUTH=${var.augment_session_auth}"
ExecStart=/bin/bash -l -c "auggie daemon --workspace /home/ubuntu/workspace/augmentcode-sa/ecomm-stack --allow-indexing"
Restart=always
RestartSec=10
[Install]
WantedBy=multi-user.target
INNER_EOF
# Start and register the service daemon
systemctl daemon-reload
systemctl enable auggie-daemon.service
systemctl start auggie-daemon.service
EOF
}
output "instance_id" {
value = aws_instance.cosmos_vm.id
description = "The ID of the newly deployed EC2 instance."
}
```
**terraform.tfvars**
Create this file locally to supply your required parameters. Do not commit this file to version control systems.
```bash theme={null}
aws_access_key = "XXX"
aws_secret_key = "XXX/XXX/bPxRfiCYEXAMPLEKEY"
aws_region = "us-east-1" # Match the region your AMI is registered in
augment_session_auth = <
Connectivity between Cosmos (cloud) ↔ your local VM ↔ your Gitlab verified ✅
## Step 5 (optional) - Use a deployment script to automate the steps above
First you’ll need to authenticate into Augment programmatically, 2 options:
1. Authenticate via Personal API Token (available to all Augment users)
Go to [https://app.augmentcode.com/settings/personal-api-tokens](https://app.augmentcode.com/settings/personal-api-tokens) > Add token, Add Description (ex: Cosmos01), no expiration > Next > Download the json: this will download a session.json on your laptop
2. Alternatively (recommended) authenticate via a service account (only for Augment admins)
Go to [https://app.augmentcode.com/settings/service-accounts](https://app.augmentcode.com/settings/service-accounts). > Add Service Account > Add API token > Download json: this will download a session.json on your laptop
Once you get your session.json, you’ll be able to inject its content as env variable into your VM with the name AUGMENT\_SESSION\_AUTH and Auggie will automatically pick up on it.
From your VM, logout from your previous session:
```bash theme={null}
auggie logout
```
Inject the AUGMENT\_SESSION\_AUTH variable with the content of your session.json:
```bash theme={null}
export AUGMENT_SESSION_AUTH='{
"accessToken": "XXX",
"tenantURL": "https://XXX.api.augmentcode.com/",
"scopes": [
"read",
"write"
]
}'
```
You can verify it worked fine by running `auggie` and then `/about` to see your Augment profile
Now edit and run the Terraform script below:
**variables.tf**
This file defines the input variables required for deployment. The execution expects your AWS API credentials and the AUGMENT\_SESSION\_AUTH JSON string.
```bash theme={null}
variable "aws_access_key" {
description = "AWS Access Key ID"
type = string
sensitive = true
}
variable "aws_secret_key" {
description = "AWS Secret Access Key"
type = string
sensitive = true
}
variable "aws_region" {
description = "AWS Region where the AMI is located"
type = string
default = "us-east-1"
}
variable "augment_session_auth" {
description = "The JSON string contents of your downloaded Augment session.json"
type = string
sensitive = true
}
variable "instance_type" {
description = "EC2 Instance Size"
type = string
default = "t3.medium"
}
```
**main.tf**
This script provisions the infrastructure and leverages a custom user\_data execution block to run every automated install script seamlessly from your tutorial.
```bash theme={null}
provider "aws" {
access_key = var.aws_access_key
secret_key = var.aws_secret_key
region = var.aws_region
}
# Security Group setup allowing outbound access for the websocket daemon tunnel
resource "aws_security_group" "cosmos_sg" {
name = "cosmos-daemon-sg"
description = "Allow outbound traffic for Cosmos Daemon websocket connections"
# Outbound rule allowing connection to Augment Cloud & GitLab
egress {
from_port = 0
to_port = 0
protocol = "-1"
cidr_blocks = ["0.0.0.0/0"]
}
# Optional: Uncomment if you want to SSH into the instance for debugging
# ingress {
# from_port = 22
# to_port = 22
# protocol = "tcp"
# cidr_blocks = ["0.0.0.0/0"]
# }
}
resource "aws_instance" "cosmos_vm" {
ami = "ami-091138d0f0d41ff90" # Ubuntu 26.04 LTS from tutorial
instance_type = var.instance_type
vpc_security_group_ids = [aws_security_group.cosmos_sg.id]
tags = {
Name = "Cosmos-GitLab-Daemon-Host"
}
# Automated provisioning script (Step 3 & Step 5 of the tutorial)
user_data = <<-EOF
#!/bin/bash
# 1. Update and install basic dependencies
apt-get update -y
apt-get install -y git wget
# 2. Setup NVM, Node.js (LTS), and Auggie CLI for the ubuntu user context
sudo -u ubuntu -i bash << 'INNER_EOF'
curl -o- https://raw.githubusercontent.com/nvm-sh/nvm/v0.40.1/install.sh | bash
export NVM_DIR="$HOME/.nvm"
[ -s "$NVM_DIR/nvm.sh" ] && \. "$NVM_DIR/nvm.sh"
nvm install --lts
npm install -g @augmentcode/auggie
INNER_EOF
# 4. Install GitLab GLAB CLI globally
wget https://gitlab.com/gitlab-org/cli/-/releases/v1.93.0/downloads/glab_1.93.0_linux_amd64.deb
dpkg -i glab_1.93.0_linux_amd64.deb
rm glab_1.93.0_linux_amd64.deb
# Persist Augment Auth token for the ubuntu profile shell environment
echo "export AUGMENT_SESSION_AUTH='${var.augment_session_auth}'" >> /home/ubuntu/.bashrc
# 3. Automated Repository Cloning Setup Script
cat << 'INNER_EOF' > /home/ubuntu/setup_repo.sh
#!/bin/bash
export NVM_DIR="$HOME/.nvm"
[ -s "$NVM_DIR/nvm.sh" ] && \. "$NVM_DIR/nvm.sh"
export AUGMENT_SESSION_AUTH='${var.augment_session_auth}'
# Fetch GITLAB_TOKEN programmatically from Cosmos Secret Manager
export GITLAB_TOKEN=$(auggie cloud secret get GITLAB_TOKEN --reveal 2>/dev/null | grep -E '^[[:space:]]*value: [[:space:]]*.+$' | head -n 1 | sed -e 's/^[[:space:]]*[Vv][Aa][Ll][Uu][Ee]:[[:space:]]*//')
if [ -n "$GITLAB_TOKEN" ]; then
mkdir -p /home/ubuntu/workspace/augmentcode-sa
git clone https://oauth2:$GITLAB_TOKEN@gitlab.com/augmentcode-sa/ecomm-stack.git /home/ubuntu/workspace/augmentcode-sa/ecomm-stack
else
echo "Error: Failed to safely extract GITLAB_TOKEN from Augment Cloud Secrets" >&2
fi
INNER_EOF
chmod +x /home/ubuntu/setup_repo.sh
sudo -u ubuntu -i /home/ubuntu/setup_repo.sh
# 5. Create a systemd unit service to run the Daemon persistently in the background
cat << 'INNER_EOF' > /etc/systemd/system/auggie-daemon.service
[Unit]
Description=Auggie Cosmos Daemon Background Service
After=network.target
[Service]
Type=simple
User=ubuntu
Environment="HOME=/home/ubuntu"
Environment="AUGMENT_SESSION_AUTH=${var.augment_session_auth}"
ExecStart=/bin/bash -l -c "auggie daemon --workspace /home/ubuntu/workspace/augmentcode-sa/ecomm-stack --allow-indexing"
Restart=always
RestartSec=10
[Install]
WantedBy=multi-user.target
INNER_EOF
# Start and register the service daemon
systemctl daemon-reload
systemctl enable auggie-daemon.service
systemctl start auggie-daemon.service
EOF
}
output "instance_id" {
value = aws_instance.cosmos_vm.id
description = "The ID of the newly deployed EC2 instance."
}
```
**terraform.tfvars**
Create this file locally to supply your required parameters. Do not commit this file to version control systems.
```bash theme={null}
aws_access_key = "XXX"
aws_secret_key = "XXX/XXX/bPxRfiCYEXAMPLEKEY"
aws_region = "us-east-1" # Match the region your AMI is registered in
augment_session_auth = <