> ## Documentation Index
> Fetch the complete documentation index at: https://docs.augmentcode.com/llms.txt
> Use this file to discover all available pages before exploring further.
# 101 - Getting Started On Cosmos
> Connect your tech stack & deploy your v1.0 software factory with Cosmos Advisor
## 0. Introduction - why a software factory
With Cosmos, your team can configure, deploy, and run its own **software factory**: a connected set of Experts Agents that move work from ideas & incidents to reviewed, tested pull requests, with humans setting direction and approving changes.
Instead of starting a new agent from scratch for every task, you give specialized Experts repeatable responsibilities, access to the right repositories & your existing tools. Triggers connect those Experts to the events that matter, such as a ticket becoming ready for implementation or a pull request receiving review feedback.
A software factory:
* **Listens 24x7 to what's going on in your tech stack**. Agents can react in real-time to events and take actions.
* **Helps your team collaborate in real time.** Humans work in multiplayer mode on specifications, resolve open questions together, and make decisions faster.
* **Drives a compounding organizational knowledge flywheel**, where agents continuously learn and evolve through Cosmos sessions and human-agent PR feedback.
* **Keeps humans in the loop.** They approve requirements, review important decisions, and decide what merges and deploys.
In this guide you'll learn how to connect Cosmos to your tech stack, deploy the v1.0 version of your software factory using Cosmos Advisor, and explore additional loops to be configured.
Once your software factory is deployed, it can be visually represented like [Software factory core loops](/cosmos/guides/software-factory-core-loops) (if you select top right "v1.0": that's what you'll deploy first in this guide)
Deploying your software factory means using Cosmos Advisor to deploy and stitch together experts, environments, and triggers in Cosmos. You get to decide where the runtime should be for those experts: Cosmos cloud environments or on your own infrastructure with self-hosted k8s.
## 1. One-time connect Cosmos to your tech stack
Before you deploy your software factory you'll first connect 3 types of systems to Cosmos: **your git repos, your ticketing system, and your collaboration tool**. Once your v1.0 software factory is running you can connect additional systems and take on more use cases/loops.
### A. Connect your Git repositories
* GitHub.com ⇒ [GitHub Cloud](/cosmos/connectors/config-github)
* GitLab.com ⇒ [GitLab Cloud](/cosmos/connectors/gitlab-cloud)
* Azure DevOps (ADO Cloud) ⇒ [Azure DevOps Cloud](/cosmos/connectors/azure-devops-cloud)
* GitHub Enterprise Server (GHES) ⇒ [GitHub Enterprise Server](/cosmos/connectors/github-enterprise-server)
* GitLab Self-Hosted (GLSH) ⇒ [GitLab Self-Hosted](/cosmos/connectors/gitlab-self-hosted)
* Azure DevOps Server (ADOS) ⇒ 🚧
If you're using other types of code repositories, contact your Cosmos Solutions Architect for assistance
Once configured, Cosmos can discover repos, makes sense of your sophisticated codebases, detect and react to PR/MR events.
### B. Connect your ticketing system
* Jira / Atlassian Cloud ⇒ [Jira Cloud](/cosmos/connectors/jira-cloud)
* Linear ⇒ [Linear](/cosmos/connectors/config-linear)
* Azure DevOps work items ⇒ [Azure DevOps Cloud](/cosmos/connectors/azure-devops-cloud)
* ClickUp tasks ⇒ [ClickUp](/cosmos/connectors/clickup)
Once configured, Cosmos can detect and react to ticket events.
### C. Connect your collaboration tool
* **Slack ⇒ [Slack](/cosmos/connectors/config-slack)**
* **MSFT Teams ⇒ [Microsoft Teams](/cosmos/connectors/microsoft-teams)**
Once configured, Cosmos can detect and react to messages in given channels and inline reply in-threads.
### D. Create and verify your environment
An **environment** gives an expert the runtime with repositories, tools, dependencies, and network access it needs to work.
In the **Connect your Git repositories** section above, you've already configured one of the 2 types of environment:
* **[Cloud environment](/cosmos/environments/cloud):** experts's runtime is on Cosmos' infrastructure . A cloud env also contains the repos you'd be working against, which the Augment Context Engine will automatically makes sense of. To create a new Cloud env: **Settings** > **Environments** > **Create an environment** > **Augment Cloud** > enter a name, pick an image, select your repos, toggle on Refresh, click on Create Environment
* [Self-hosted Kubernetes](/cosmos/guides/early-access/self-hosted-k8s) (this is the successor of [daemon pools](/cosmos/environments/daemon-pools))**:** experts's runtime is on your infrastructure, collocated with other resources on your VPC that aren't directly exposed to the internet (ex: local mcp servers, on-prem resources etc.)
Your software factory is made up of experts, and each expert will be attached to their own environment. Some experts can share the same environment where it makes sense, some other can use another environment (cloud or self-hosted).
**🏁 Checkpoint: one-time connectivity is completed when:**
* [ ] A session attached to the chosen environment can read the intended repositories.
* [ ] A session can list the last 10 PRs/MRs from your git repos
* [ ] A session can list the last 10 issues from your ticketing system
* [ ] A session can post a hello world to a given Slack/Team channel
* [ ] Cosmos receives events: [https://cosmos.augmentcode.com/automations/events](https://cosmos.augmentcode.com/automations/events) (Event Log tab) surfaces git, ticketing, Slack/Teams events
You now have a working cloud or self-hosted environment.
## 2. Deploy your v1.0 software factory
You'll focus on deploying the code producing loop (yellow) and the spec driven development loop (green) to build your v1.0 software factory. Visually it'll look like:
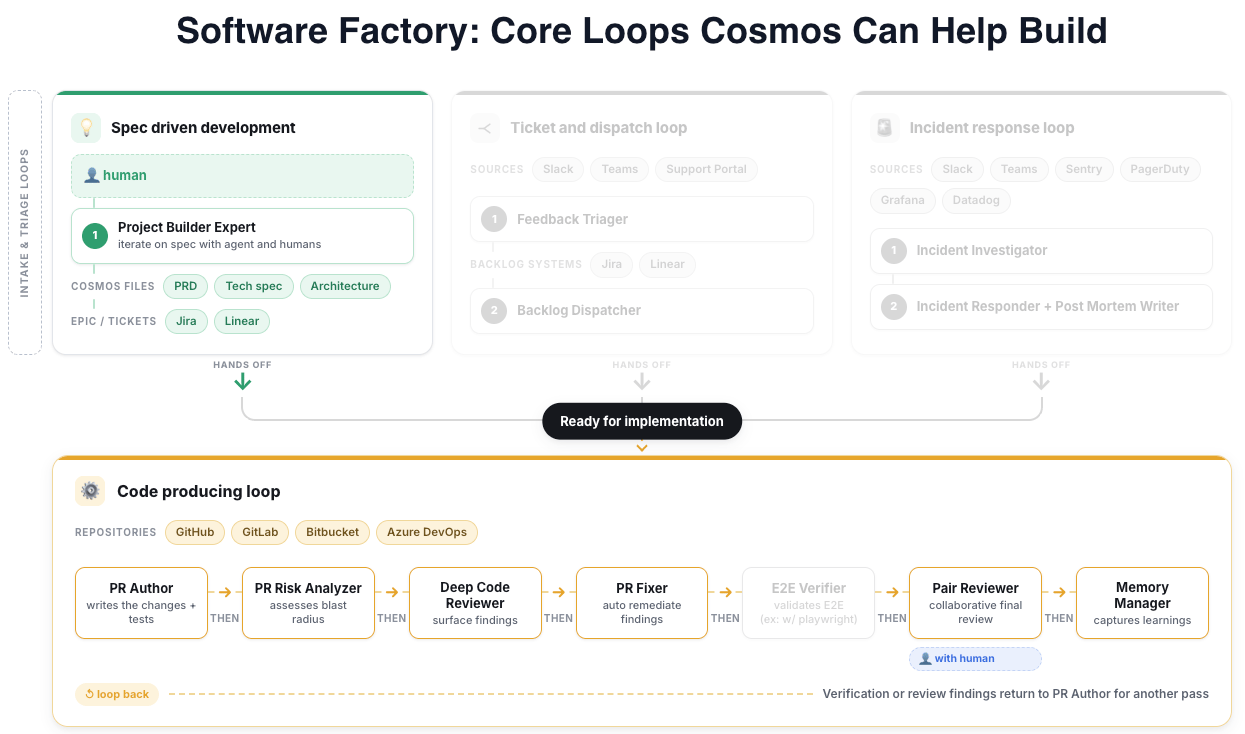 ### A1. Deploy the code producing loop
The code producing loop is made up of experts. To deploy them you'll start a new session with Cosmos Advisor, select your environment, and prompt your session with the experts to deploy and stitch together. For some types of git repos (ex: self-hosted ones) you'll instruct Cosmos Advisor to use specific capabilities. Select the tab corresponding to your tech stack:
For GitHub.com repos, you've previously configured the native GitHub.com integration and a cloud env with those repos.
To deploy your code-producing loop: **New session > Cosmos Advisor** > select your cloud env > submit this prompt:
```text wrap theme={null}
Create a PR Author, PR Risk Analyzer, Deep Code Reviewer, PR Fixer, Pair Reviewer, Memory Manager. Suggest other experts I could deploy. Those experts should be using the attached GitHub.com integration.
```
For GitLab.com repos, you've previously configured the native GitLab.com integration and a cloud env with those repos.
To deploy your code-producing loop: **New session > Cosmos Advisor** > select your cloud env > submit this prompt:
```text wrap theme={null}
Create a MR Author, MR Risk Analyzer, Deep Code Reviewer, MR Fixer, Pair Reviewer, Memory Manager. Suggest other experts I could deploy. Those experts should be using the attached GitLab.com integration.
```
For ADO Cloud repos, you've previously configured the native ADO Cloud integration and a cloud env with those repos.
To deploy your code-producing loop: **New session > Cosmos Advisor** > select your cloud env > submit this prompt:
```text wrap theme={null}
Create a PR Author, PR Risk Analyzer, Deep Code Reviewer, PR Fixer, Pair Reviewer, Memory Manager. Suggest other experts I could deploy. Those experts should be using the attached ADO integration.
```
🚧
For GHES repos, you've previously configured a self-hosted env with those repos and the gh cli.
To deploy your code-producing loop: **New session > Cosmos Advisor** > select your self-hosted env > submit this prompt:
```text wrap theme={null}
Create a PR Author, PR Risk Analyzer, Deep Code Reviewer, PR Fixer, Pair Reviewer, Memory Manager. Suggest other experts I could deploy. Those experts should be using the gh cli (already installed in the attached self-hosted env).
```
🚧
For GLSH repos, you've previously configured a self-hosted env with those repos and the glab cli.
To deploy your code-producing loop: **New session > Cosmos Advisor** > select your self-hosted env > submit this prompt:
```text wrap theme={null}
Create a MR Author, MR Risk Analyzer, Deep Code Reviewer, MR Fixer, Pair Reviewer, Memory Manager. Suggest other experts I could deploy. Those experts should be using the glab cli (already installed in the attached self-hosted env).
```
🚧
For ADO Server repos, you've previously configured a self-hosted env with those repos and the ADO local MCP server.
To deploy your code-producing loop: **New session > Cosmos Advisor** > select your self-hosted env > submit this prompt:
```text wrap theme={null}
Create a PR Author, PR Risk Analyzer, Deep Code Reviewer, PR Fixer, Pair Reviewer, Memory Manager. Suggest other experts I could deploy. Those experts should be using the attached ADO local MCP server.
```
This will start a new session with Cosmos Advisor which may ask you to clarify your intent, and then proceed with deploying experts and their corresponding automations as Cosmos will listen 24x7 to specific events in your tech stack and automatically trigger the corresponding experts. Cosmos Advisor may ask you if you want to first manually invoke those experts or go straight to enabling auto-trigger across all your repos.
You'll find the deployed experts under **Settings** > **Experts**. Each expert will have a job description, a set of capabilities (native integrations, MCP server etc.), a given model (automatically picked by Cosmos Advisor) and may have corresponding workers (a worker is like a sub-expert that the parent expert is aware of and may trigger when needed).
You'll find the corresponding automations under **Settings** > **Automations** > **Automations tab**. An automation is composed of triggers (= the events Cosmos is listening to, ex: a PR got created, a comment was posted onto a PR etc.) and the expert that will be triggered.
### A2. Test the code producing loop
The input of the code producing loop is well fleshed out requirements. The output is PRs/MRs created, reviewed + fixed.
To test your code producing loop: **New session > PR/MR Author**, edit and submit this prompt:
```text wrap theme={null}
Implement this Jira ticket . Create a PR in ready-to-review state.
```
or
```text wrap theme={null}
Implement this change: . Create a PR in ready-to-review state.
```
This will start a new session with PR/MR Author, which will be acting as an orchestrator for: PR/MR Risk Analyzer, Deep Code Reviewer, PR/MR Fixer, Pair Reviewer.
You should observe that:
* the PR/MR is created (click on its link), and the experts are acting on it/replying to it automatically
* in **Settings > Automations > Run History tab** some sessions were started based on the downstream PR/MR events
* in **Settings > Automations > Event Log tab** Cosmos was notified of those specific events
The PR/MR should progress on its own to a ready-for-a-final-review-by-a-human state. The human can open the PR/MR and read & react to the Pair Reviewer verdict onto the PR itself or via the corresponding Pair Reviewer session link.
Congrats you've configured your code producing loop! 🎉
### B1. Deploy the spec driven development loop
The spec driven development loop essentially consists of the Project Builder expert - a human will solo-player invoke Project Builder, which will generate a PRD (Product Requirement Document) and a tech spec as Cosmos files, which humans can multiplayer collaborate on to refine specs. To deploy Project Builder, you'll start a new session with Cosmos Advisor, select your environment, and instruct Cosmos Advisor to use specific capabilities. Edit and submit this prompt:
```text wrap theme={null}
Deploy Project Builder to help my team iterate on PRD + tech specs. I'll provide the link to a JIRA ticket as input. Don't author PRs directly, instead when I'm ready I'll ask you to update a label on the original ticket to "ready-for-cosmos-implementation", and you should trigger the PR Author when this happens. Any questions?
```
For this v1.0 try with a simple ticketing system integration. At a later time you can update Project Builder to integrate with other apps like Figma etc.)
This will start a new session with Cosmos Advisor which may ask you to clarify your intent, and then proceed with deploying the Project Builder expert and the corresponding automations when applicable.
You'll find the Project Builder expert under **Settings** > **Experts**. Project Builder will author files/artifacts (ex: PRD, tech specs) that you'll find under Files > Organization > experts > project-builder.
You'll find the corresponding automations under **Settings** > **Automations** > **Automations tab**. An automation is composed of triggers (= the events Cosmos is listening to, ex: a Jira ticket's label was updated to "ready-for-cosmos-implementation" etc.) and the expert that will be triggered (ex: PR/MR author).
### B2. Test Project Builder
The input of the spec driven development loop/Project Builder is a high level ticket/EPIC that needs to be iterated on. The output is fleshed out requirements: well defined PRD and well defined tech spec.
To test Project Builder: **New session > Project Builder**, edit and submit this prompt:
```text wrap theme={null}
Help me iterate on that Jira EPIC .
```
or
```text wrap theme={null}
I'd like to implement this change: . Create the corresponding Jira ticket and help me spec it.
```
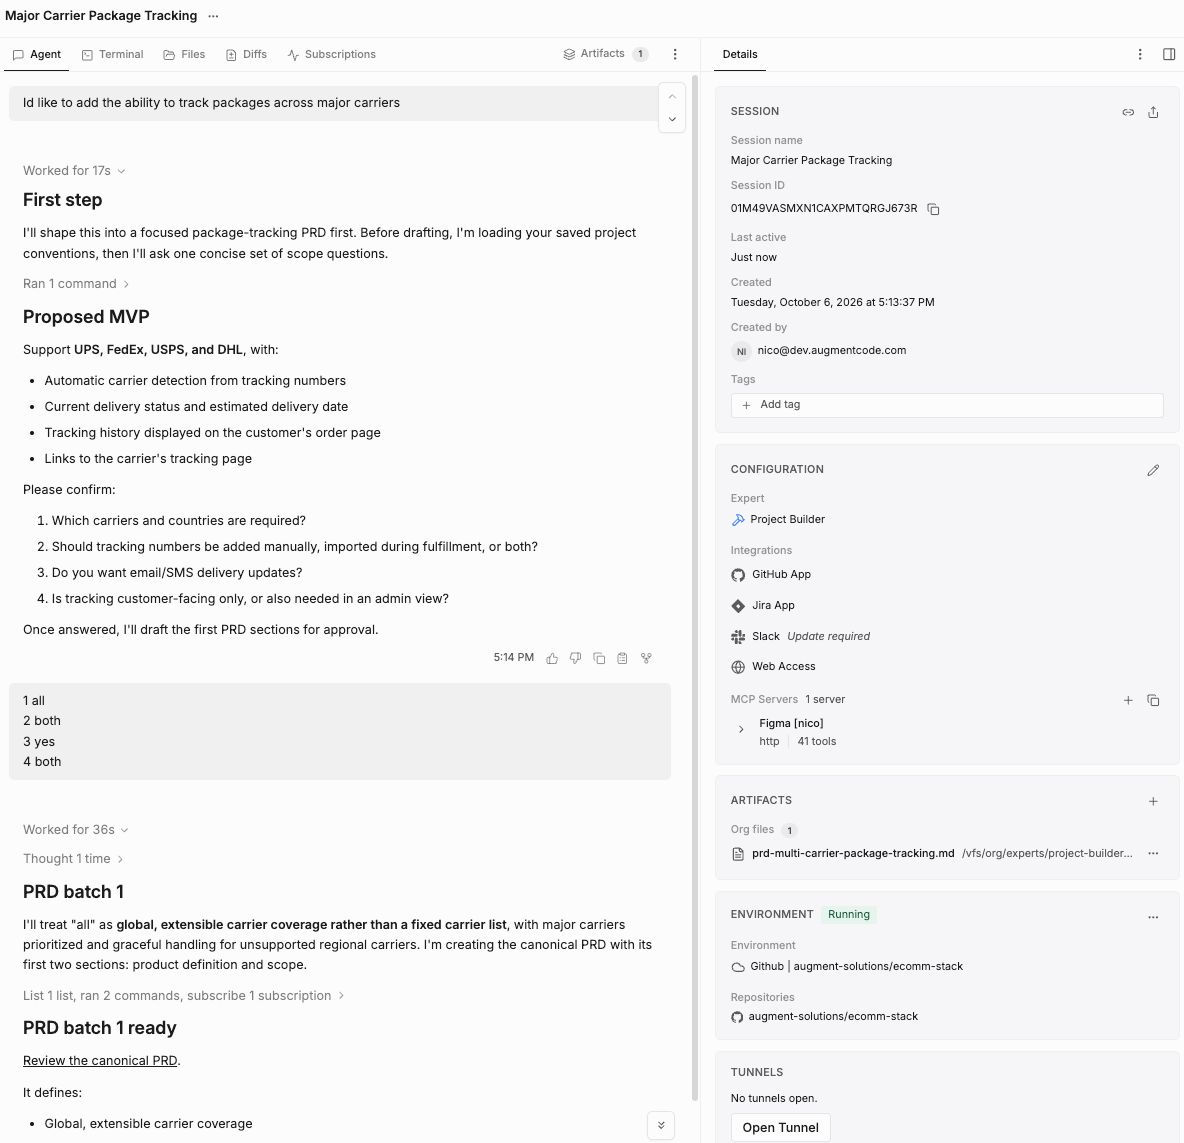
This will start a new session with Project Builder, which may ask you to clarify some aspects that are ambiguous and make decisions regarding the scope, then it'll create a PRD. The session will surface the link to the PRD, and it'll also be listed under "artifacts" in the right-hand drawer ("Details" tab):
### A1. Deploy the code producing loop
The code producing loop is made up of experts. To deploy them you'll start a new session with Cosmos Advisor, select your environment, and prompt your session with the experts to deploy and stitch together. For some types of git repos (ex: self-hosted ones) you'll instruct Cosmos Advisor to use specific capabilities. Select the tab corresponding to your tech stack:
For GitHub.com repos, you've previously configured the native GitHub.com integration and a cloud env with those repos.
To deploy your code-producing loop: **New session > Cosmos Advisor** > select your cloud env > submit this prompt:
```text wrap theme={null}
Create a PR Author, PR Risk Analyzer, Deep Code Reviewer, PR Fixer, Pair Reviewer, Memory Manager. Suggest other experts I could deploy. Those experts should be using the attached GitHub.com integration.
```
For GitLab.com repos, you've previously configured the native GitLab.com integration and a cloud env with those repos.
To deploy your code-producing loop: **New session > Cosmos Advisor** > select your cloud env > submit this prompt:
```text wrap theme={null}
Create a MR Author, MR Risk Analyzer, Deep Code Reviewer, MR Fixer, Pair Reviewer, Memory Manager. Suggest other experts I could deploy. Those experts should be using the attached GitLab.com integration.
```
For ADO Cloud repos, you've previously configured the native ADO Cloud integration and a cloud env with those repos.
To deploy your code-producing loop: **New session > Cosmos Advisor** > select your cloud env > submit this prompt:
```text wrap theme={null}
Create a PR Author, PR Risk Analyzer, Deep Code Reviewer, PR Fixer, Pair Reviewer, Memory Manager. Suggest other experts I could deploy. Those experts should be using the attached ADO integration.
```
🚧
For GHES repos, you've previously configured a self-hosted env with those repos and the gh cli.
To deploy your code-producing loop: **New session > Cosmos Advisor** > select your self-hosted env > submit this prompt:
```text wrap theme={null}
Create a PR Author, PR Risk Analyzer, Deep Code Reviewer, PR Fixer, Pair Reviewer, Memory Manager. Suggest other experts I could deploy. Those experts should be using the gh cli (already installed in the attached self-hosted env).
```
🚧
For GLSH repos, you've previously configured a self-hosted env with those repos and the glab cli.
To deploy your code-producing loop: **New session > Cosmos Advisor** > select your self-hosted env > submit this prompt:
```text wrap theme={null}
Create a MR Author, MR Risk Analyzer, Deep Code Reviewer, MR Fixer, Pair Reviewer, Memory Manager. Suggest other experts I could deploy. Those experts should be using the glab cli (already installed in the attached self-hosted env).
```
🚧
For ADO Server repos, you've previously configured a self-hosted env with those repos and the ADO local MCP server.
To deploy your code-producing loop: **New session > Cosmos Advisor** > select your self-hosted env > submit this prompt:
```text wrap theme={null}
Create a PR Author, PR Risk Analyzer, Deep Code Reviewer, PR Fixer, Pair Reviewer, Memory Manager. Suggest other experts I could deploy. Those experts should be using the attached ADO local MCP server.
```
This will start a new session with Cosmos Advisor which may ask you to clarify your intent, and then proceed with deploying experts and their corresponding automations as Cosmos will listen 24x7 to specific events in your tech stack and automatically trigger the corresponding experts. Cosmos Advisor may ask you if you want to first manually invoke those experts or go straight to enabling auto-trigger across all your repos.
You'll find the deployed experts under **Settings** > **Experts**. Each expert will have a job description, a set of capabilities (native integrations, MCP server etc.), a given model (automatically picked by Cosmos Advisor) and may have corresponding workers (a worker is like a sub-expert that the parent expert is aware of and may trigger when needed).
You'll find the corresponding automations under **Settings** > **Automations** > **Automations tab**. An automation is composed of triggers (= the events Cosmos is listening to, ex: a PR got created, a comment was posted onto a PR etc.) and the expert that will be triggered.
### A2. Test the code producing loop
The input of the code producing loop is well fleshed out requirements. The output is PRs/MRs created, reviewed + fixed.
To test your code producing loop: **New session > PR/MR Author**, edit and submit this prompt:
```text wrap theme={null}
Implement this Jira ticket . Create a PR in ready-to-review state.
```
or
```text wrap theme={null}
Implement this change: . Create a PR in ready-to-review state.
```
This will start a new session with PR/MR Author, which will be acting as an orchestrator for: PR/MR Risk Analyzer, Deep Code Reviewer, PR/MR Fixer, Pair Reviewer.
You should observe that:
* the PR/MR is created (click on its link), and the experts are acting on it/replying to it automatically
* in **Settings > Automations > Run History tab** some sessions were started based on the downstream PR/MR events
* in **Settings > Automations > Event Log tab** Cosmos was notified of those specific events
The PR/MR should progress on its own to a ready-for-a-final-review-by-a-human state. The human can open the PR/MR and read & react to the Pair Reviewer verdict onto the PR itself or via the corresponding Pair Reviewer session link.
Congrats you've configured your code producing loop! 🎉
### B1. Deploy the spec driven development loop
The spec driven development loop essentially consists of the Project Builder expert - a human will solo-player invoke Project Builder, which will generate a PRD (Product Requirement Document) and a tech spec as Cosmos files, which humans can multiplayer collaborate on to refine specs. To deploy Project Builder, you'll start a new session with Cosmos Advisor, select your environment, and instruct Cosmos Advisor to use specific capabilities. Edit and submit this prompt:
```text wrap theme={null}
Deploy Project Builder to help my team iterate on PRD + tech specs. I'll provide the link to a JIRA ticket as input. Don't author PRs directly, instead when I'm ready I'll ask you to update a label on the original ticket to "ready-for-cosmos-implementation", and you should trigger the PR Author when this happens. Any questions?
```
For this v1.0 try with a simple ticketing system integration. At a later time you can update Project Builder to integrate with other apps like Figma etc.)
This will start a new session with Cosmos Advisor which may ask you to clarify your intent, and then proceed with deploying the Project Builder expert and the corresponding automations when applicable.
You'll find the Project Builder expert under **Settings** > **Experts**. Project Builder will author files/artifacts (ex: PRD, tech specs) that you'll find under Files > Organization > experts > project-builder.
You'll find the corresponding automations under **Settings** > **Automations** > **Automations tab**. An automation is composed of triggers (= the events Cosmos is listening to, ex: a Jira ticket's label was updated to "ready-for-cosmos-implementation" etc.) and the expert that will be triggered (ex: PR/MR author).
### B2. Test Project Builder
The input of the spec driven development loop/Project Builder is a high level ticket/EPIC that needs to be iterated on. The output is fleshed out requirements: well defined PRD and well defined tech spec.
To test Project Builder: **New session > Project Builder**, edit and submit this prompt:
```text wrap theme={null}
Help me iterate on that Jira EPIC .
```
or
```text wrap theme={null}
I'd like to implement this change: . Create the corresponding Jira ticket and help me spec it.
```
This will start a new session with Project Builder, which may ask you to clarify some aspects that are ambiguous and make decisions regarding the scope, then it'll create a PRD. The session will surface the link to the PRD, and it'll also be listed under "artifacts" in the right-hand drawer ("Details" tab):
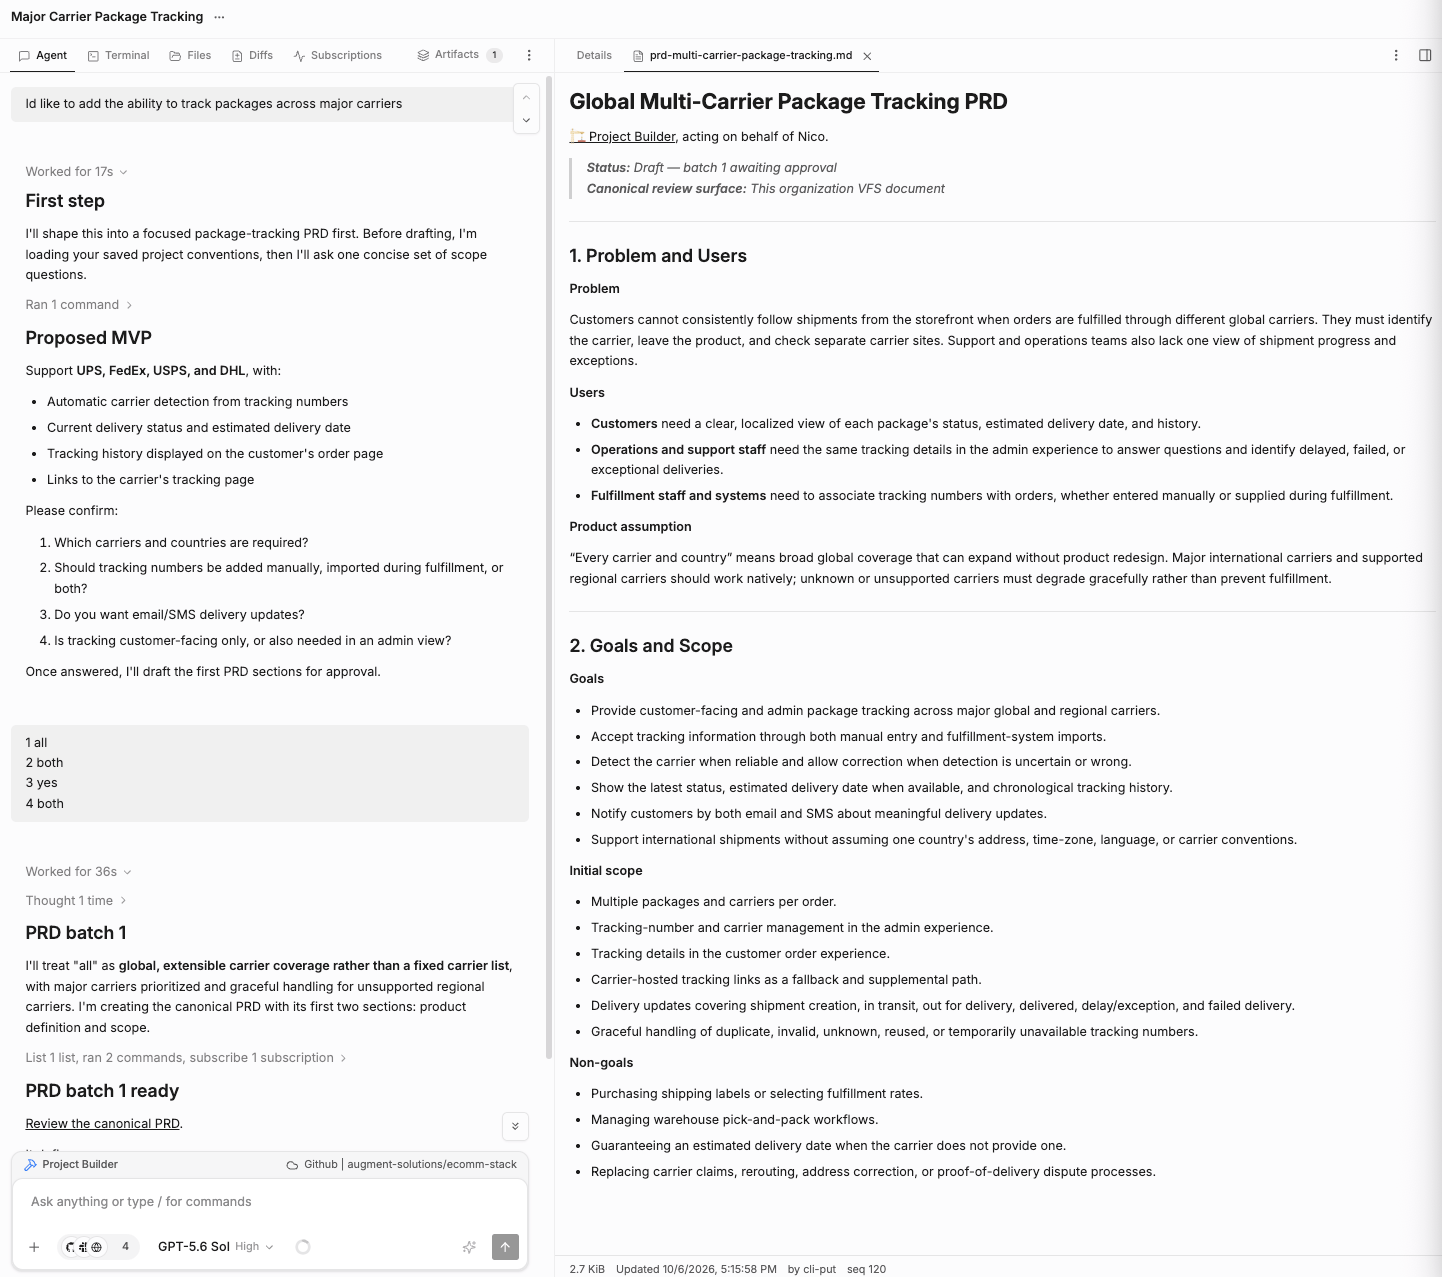
 When you click on the PRD, that'll open the file in a new tab in the right-hand drawer:
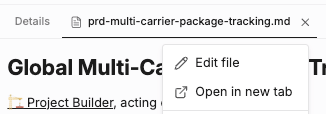
 You can also right-click on the file tab > Open in a new tab to see the file in full screen:
 You can edit the PRD, share it with other folks on your team, select a portion of text to comment and tag your teammates on it:
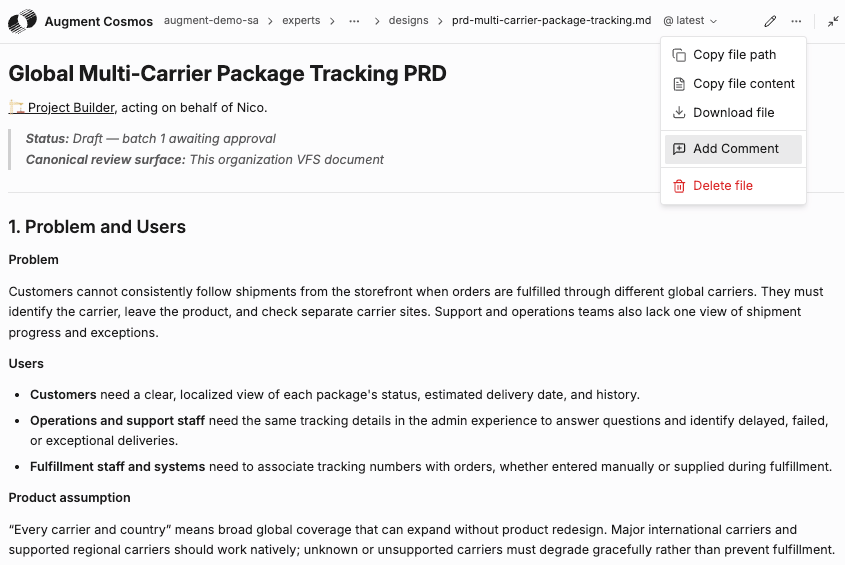
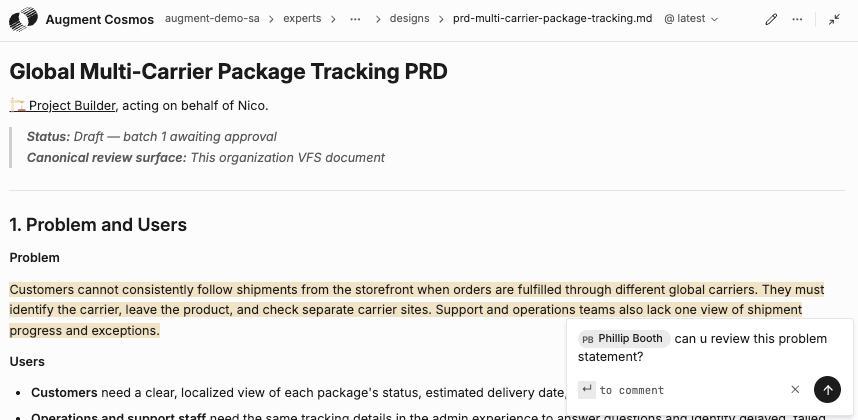 By default Project Builder will create PRDs in your Organization files, which means that anyone can collaborate on them. If you create experts in spaces, by default the files will live in the Space files. You can also instruct your experts to create personal files, which you'll have to explicitly share with teammates.
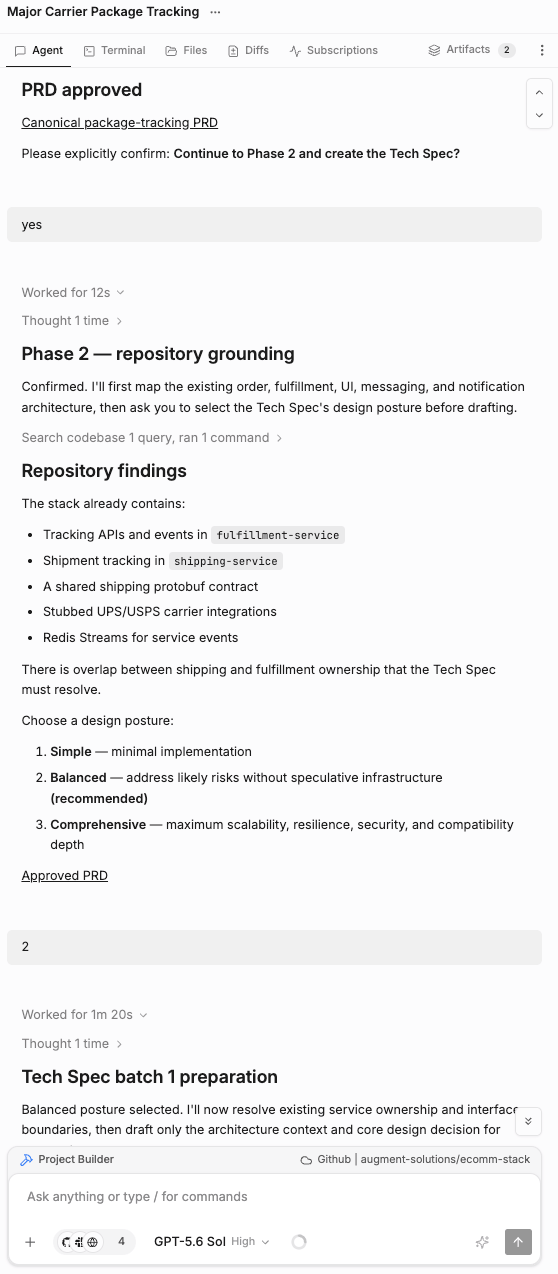
Iterate on your PRD, validate the scope and assumptions Project Builder brought to your attention. Then Project Builder will offer to create a tech spec and ask to choose a design posture based on the nature of the change (you can later in-session ask Project Builder to remember decisions for you/your team):
By default Project Builder will create PRDs in your Organization files, which means that anyone can collaborate on them. If you create experts in spaces, by default the files will live in the Space files. You can also instruct your experts to create personal files, which you'll have to explicitly share with teammates.
Iterate on your PRD, validate the scope and assumptions Project Builder brought to your attention. Then Project Builder will offer to create a tech spec and ask to choose a design posture based on the nature of the change (you can later in-session ask Project Builder to remember decisions for you/your team):
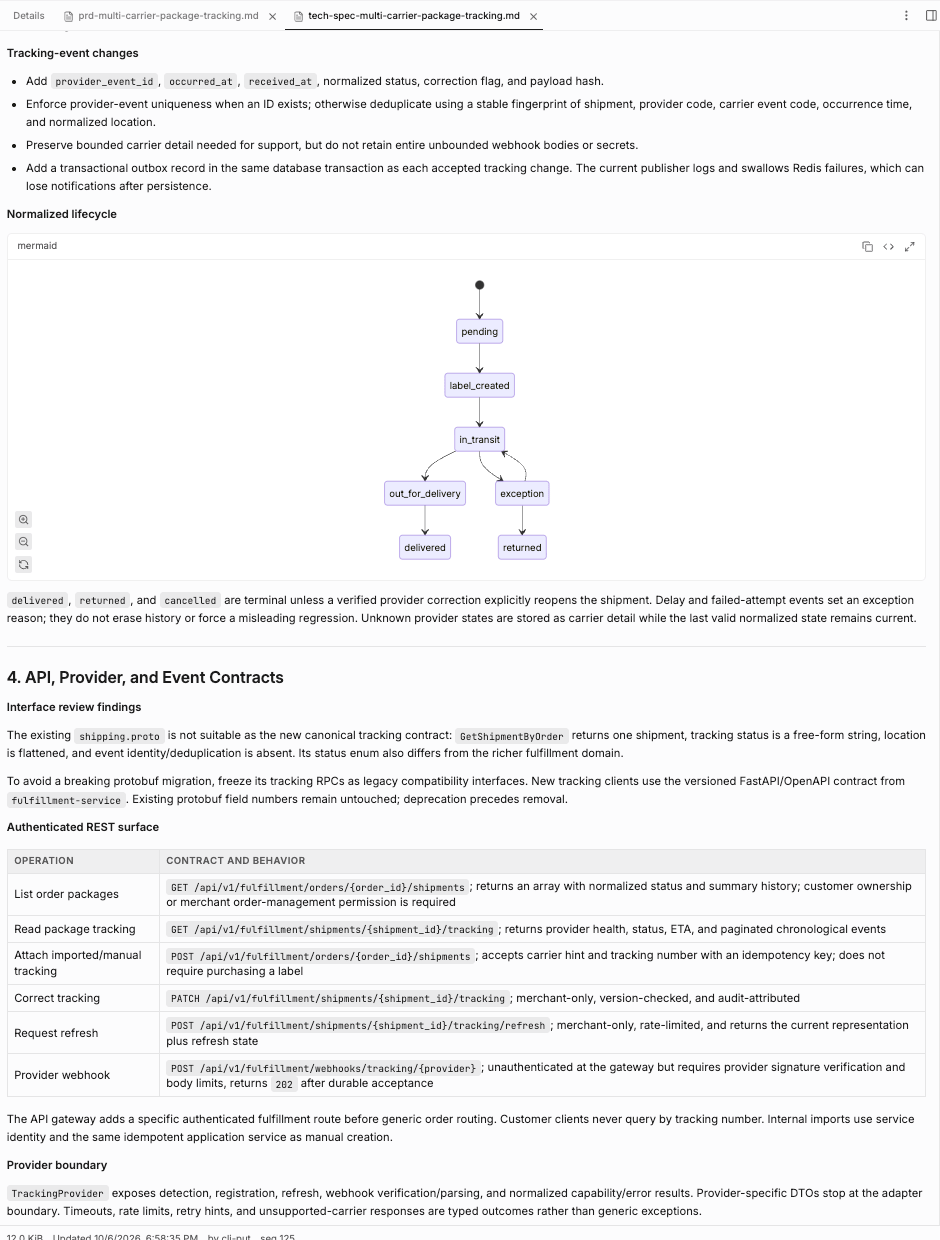
 You can open and review the tech spec in a new tab. Cosmos continuously makes sense of your codebase (thanks to the Augment Context Engine) and surfaces the very modules and components in your architecture that will be impacted by your decisions.
 Once you approve the tech spec, Project Builder will suggest the next steps.
You can later instruct Project Builder to remember to update the original Jira ticket with the PRD + Tech Spec and flip a label to "ready-for-cosmos-implementation" for an automated ticket-to-PR flow. At any time you can also ask Cosmos Advisor to perform those changes.
You can choose to handoff to PR author for this first test. Project Builder will update the tech spec with a new section that breaks down the tasks and PRs to be created and in which sequence:
Once you approve the tech spec, Project Builder will suggest the next steps.
You can later instruct Project Builder to remember to update the original Jira ticket with the PRD + Tech Spec and flip a label to "ready-for-cosmos-implementation" for an automated ticket-to-PR flow. At any time you can also ask Cosmos Advisor to perform those changes.
You can choose to handoff to PR author for this first test. Project Builder will update the tech spec with a new section that breaks down the tasks and PRs to be created and in which sequence:
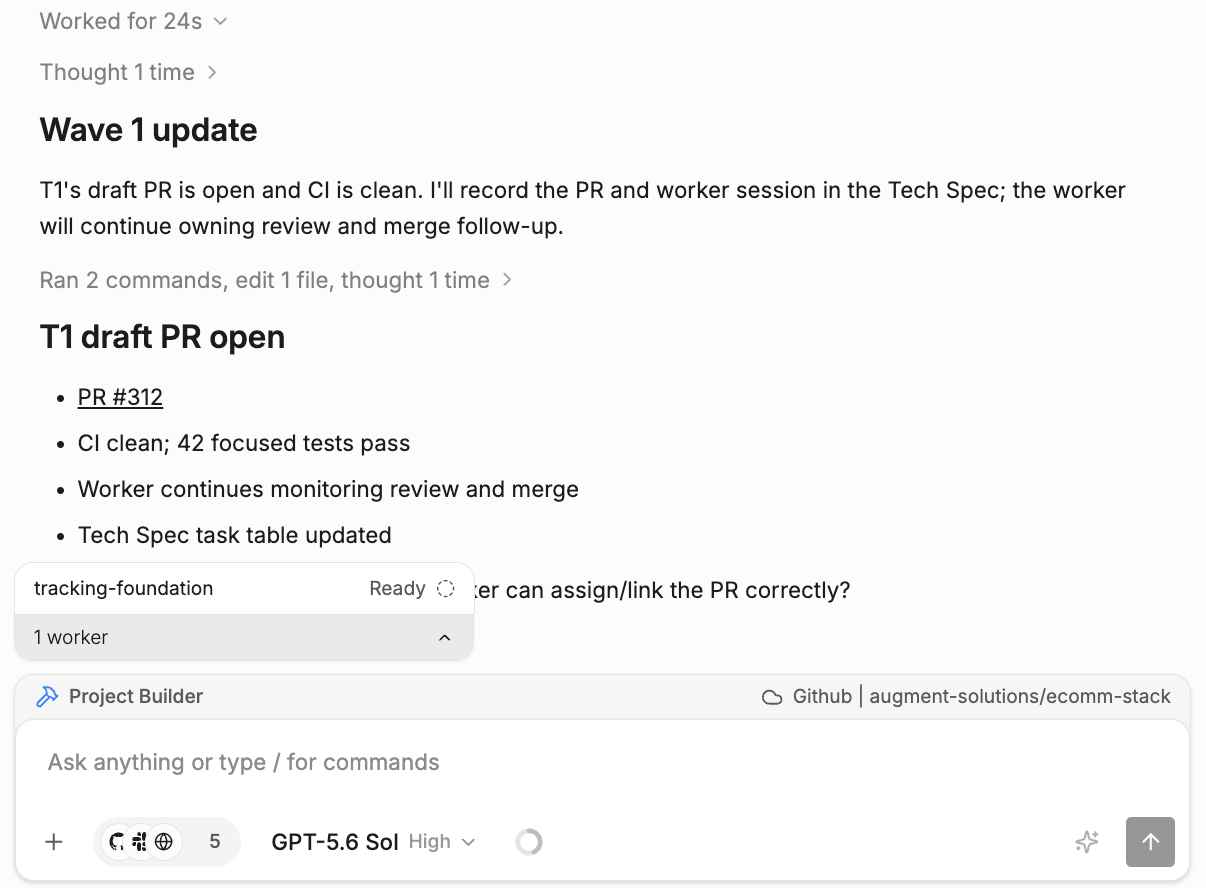
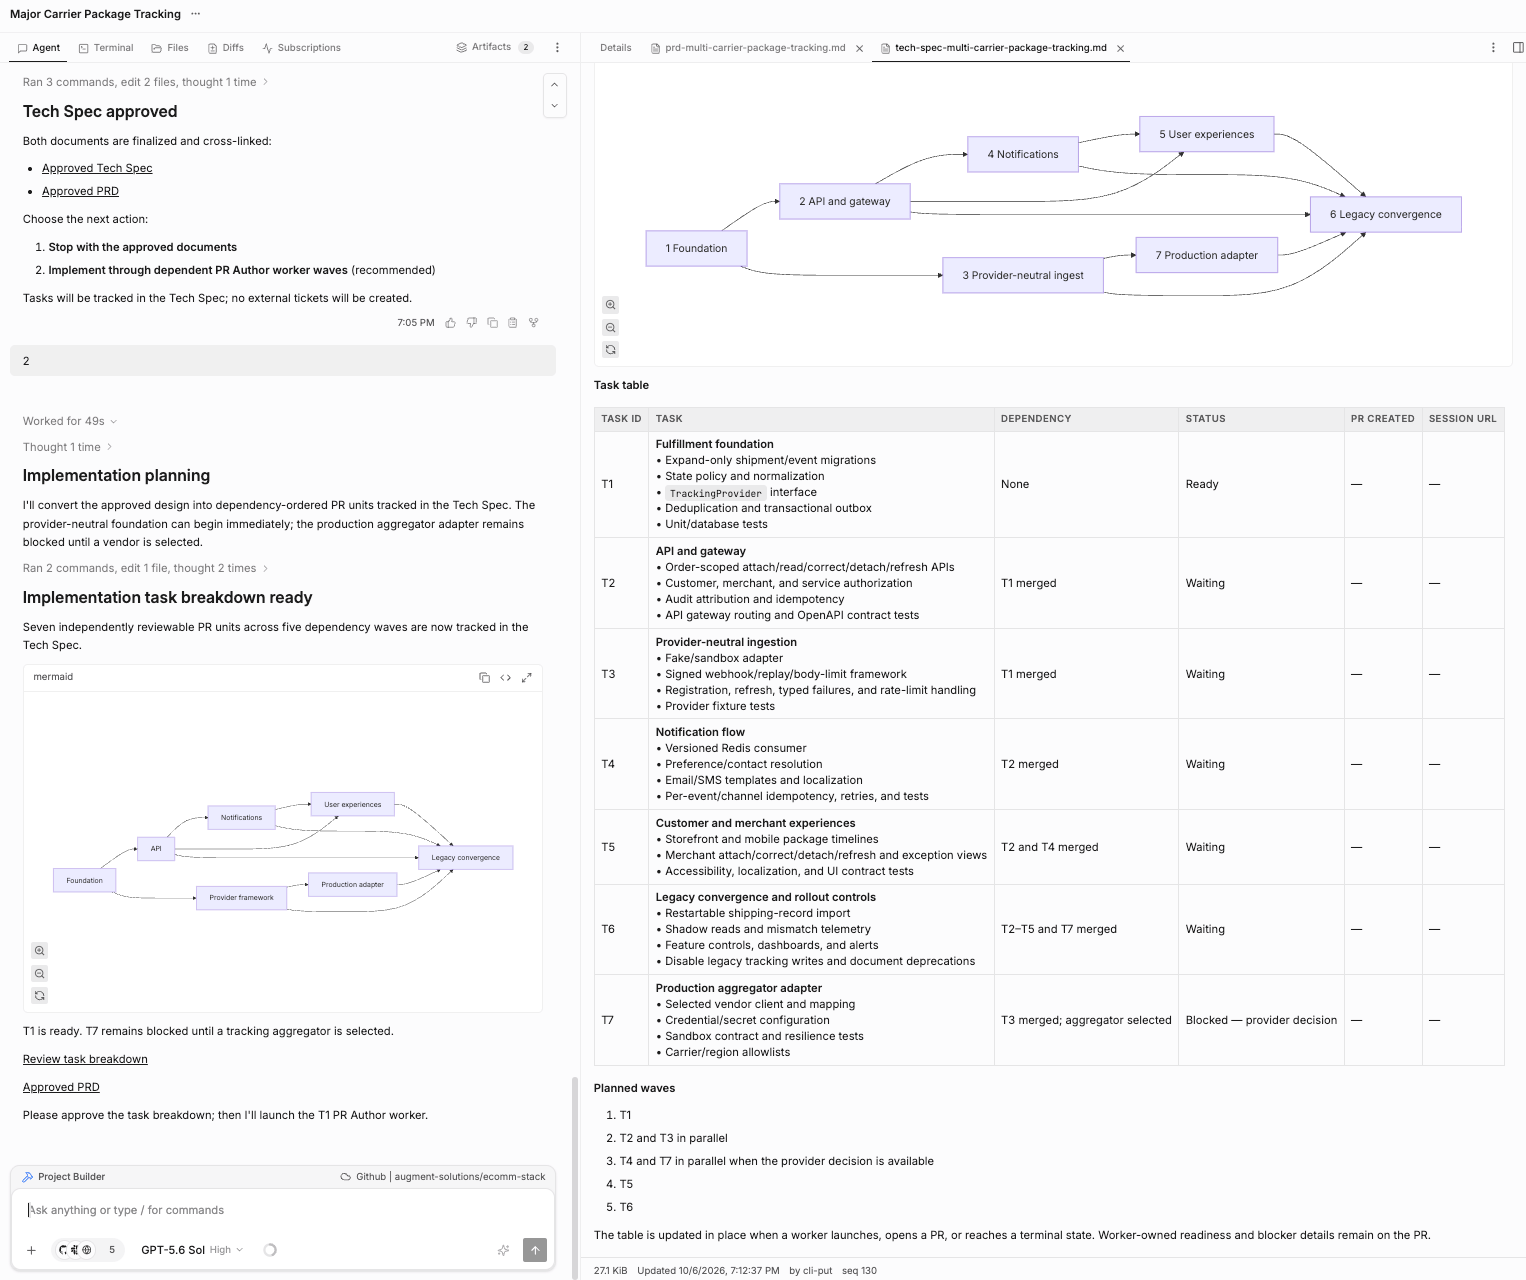 At the bottom of the Project Builder session, you'll see the worker session related to the PR Author, you can click on it from there:
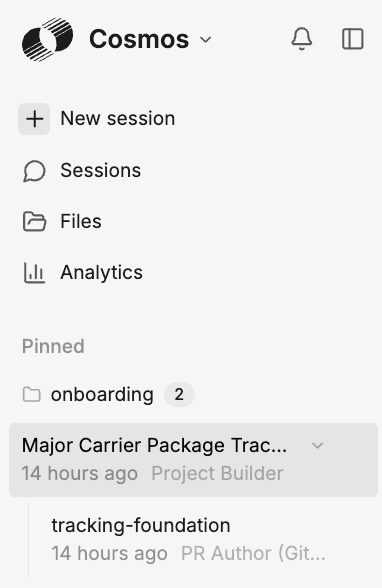
 You can also access the PR Author session in the left nav bar by expanding the Project Builder session:
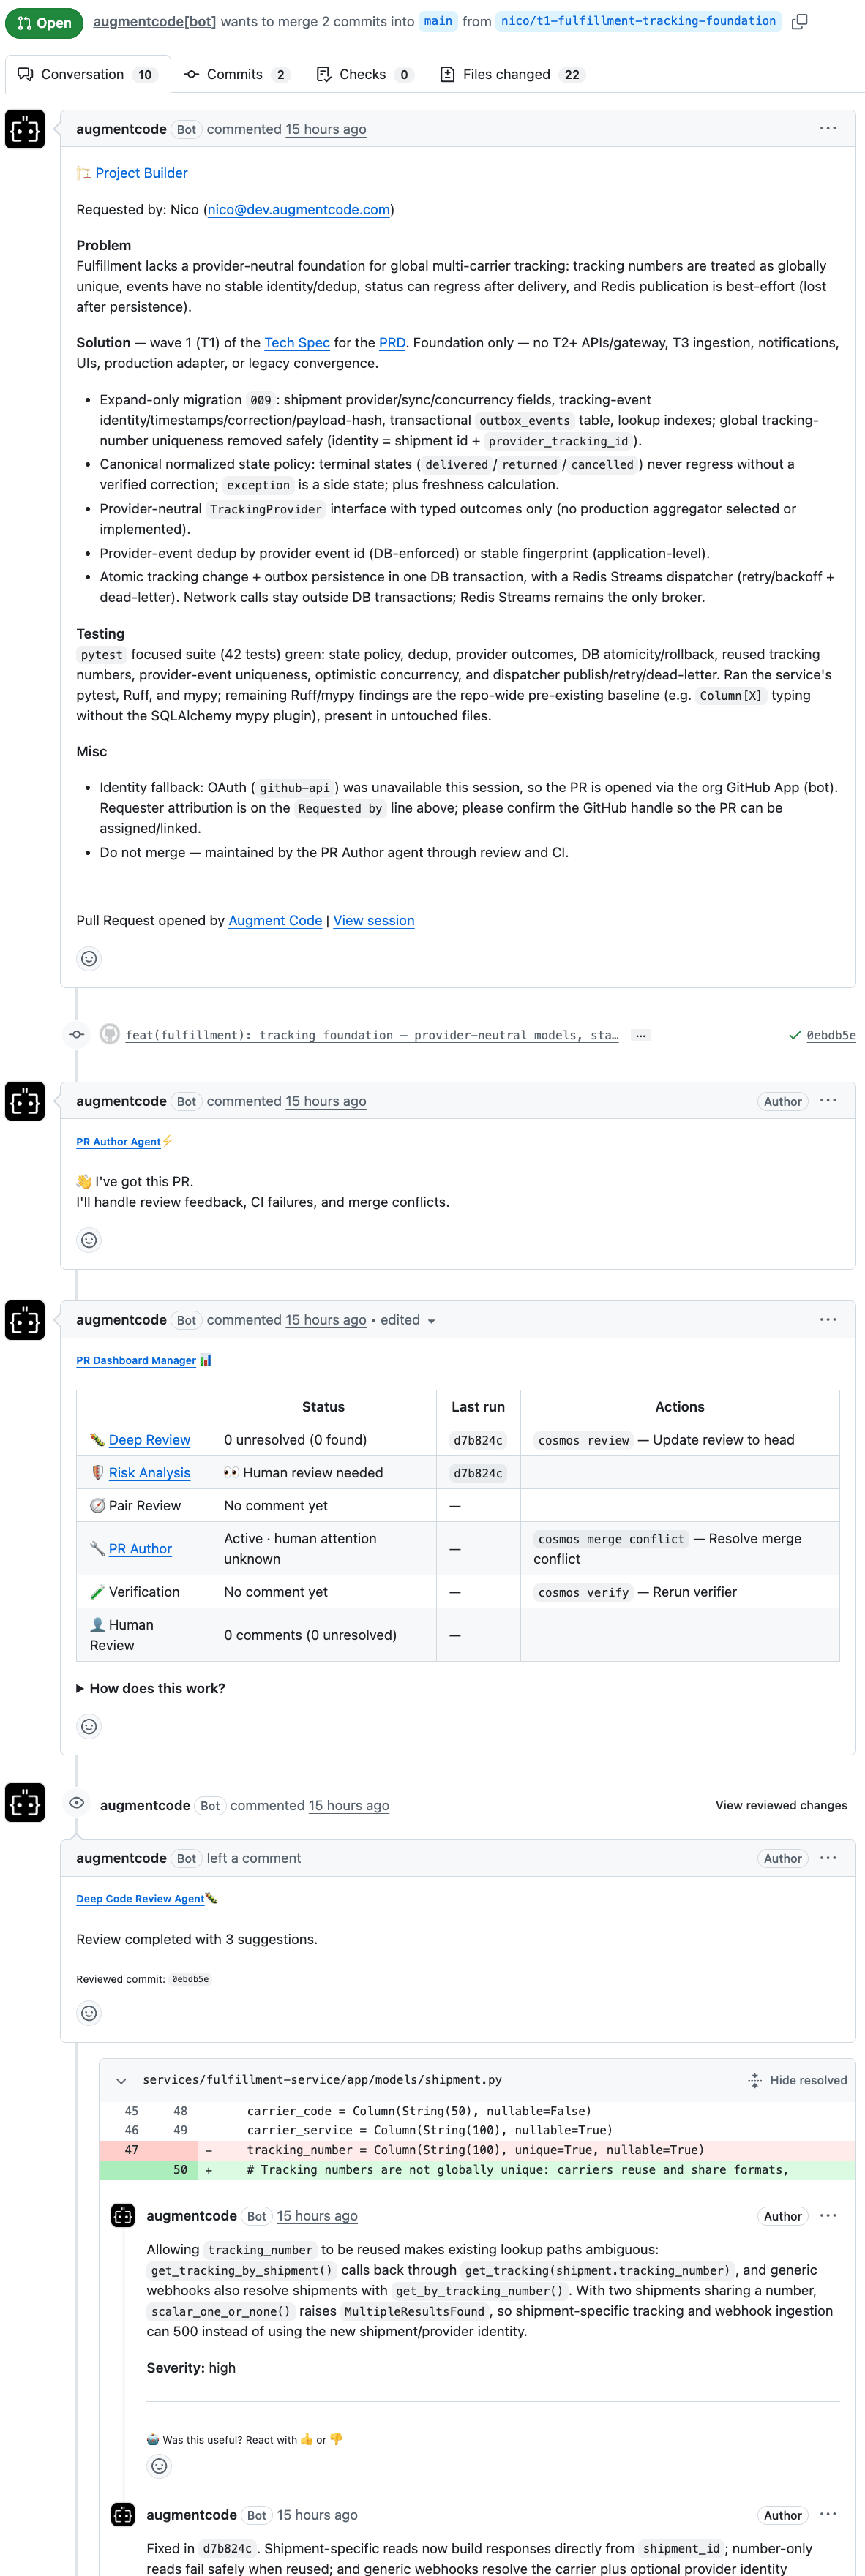
 In the PR Author session, you'll see the PR link under Artifacts. On the PR you'll see the code producing loop experts interacting with it:
 Congrats you've successfully configured your code producing & spec driven development loops! 🎉
Coming soon: 102 - Advanced loops (in construction 🚧)
This documentation is built and hosted on [Mintlify](https://mintlify.com), a developer documentation platform.
Congrats you've successfully configured your code producing & spec driven development loops! 🎉
Coming soon: 102 - Advanced loops (in construction 🚧)
This documentation is built and hosted on [Mintlify](https://mintlify.com), a developer documentation platform.